Table of Contents

calibrate angles – base () link1 () link 2 () rotational () gripper ()

calibrate angles block

Description

Calibrate angles – base () link 1 () link 2 () rotational () gripper () is a stack block available in Robotic Arm extension for evive and other Arduino boards. This block should be included every time you work with the robotic arm as this block calibrates the angles of the servo motors and saves it in the memory of evive.

Input Parameters

  1. Enter the error angle of base servo.
  2. Enter the error angle of link 1 servo.
  3. Enter the error angle of link 2 servo.
  4. Enter the error angle of the rotational servo.
  5. Enter the error angle of the gripper servo.
evive Notes Icon
Note: This block is available in both Stage and Upload mode.

Example

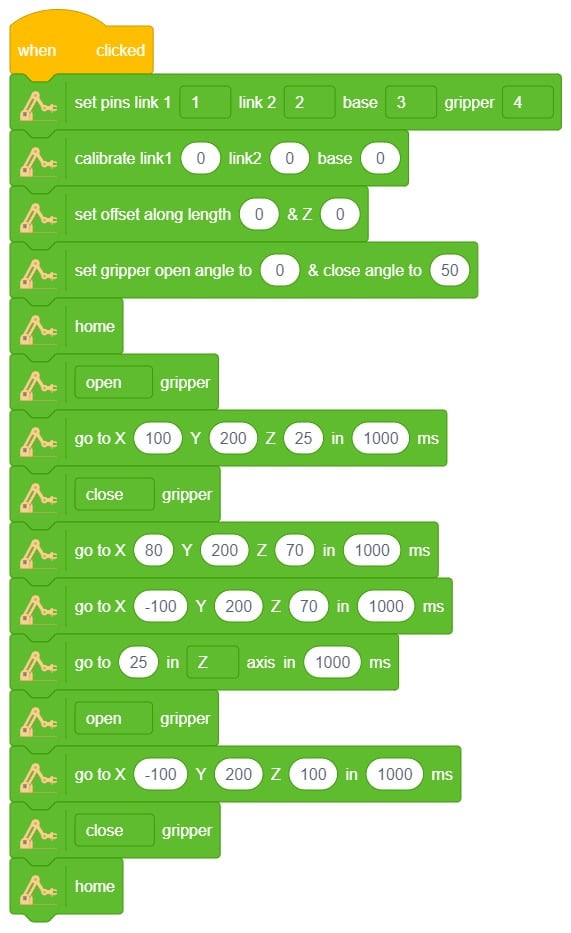
Here, in the given script, we’ll be calibrating the entire robotic arm i.e. all the six servos before working it. Write the script given below to calibrate all the servo angles.calibration script

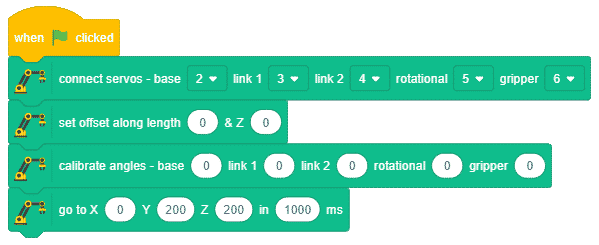
  • Run the script by clicking on the green flag.
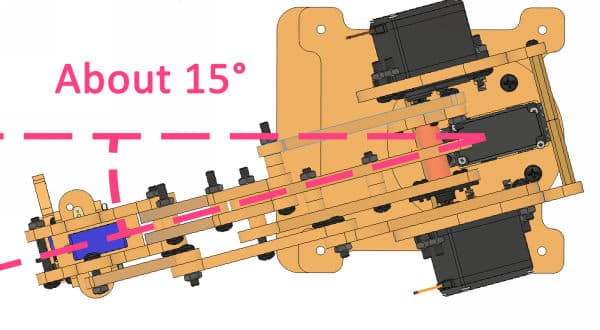
  • If the robotic arm is straight, keep the base angle as 0° in the calibrate angles blocks. If it is not straight, then change the base offset angle and run the script. Use the trial and error method to calibrate the servos.on block. For example, if the base angle is about 15° towards the left, then set the base angle as -15° in the calibrate angles block.Calibarting Base ServoCalibarting Base Servo
  • Similarly, calibrate the rotational servos. If it is straight, keep the rotational angle as 0°. If not, then change the rotational servo offset block.
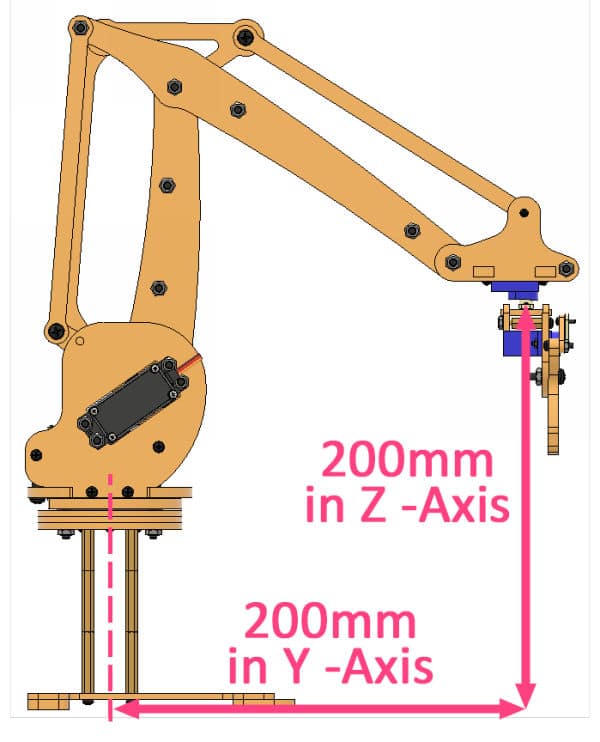
  • Now, it’s time to calibrate the link servos. Using a scale, measure the distance of the end effector from the head of Rotational Servo to the base center in the Y and Z directions. If it is 200mm in both directions, then it’s ok; otherwise, change the link 1 and link 2 angles in the calibrate angles block, so that the distance is 200mm along both the axes.

Calibrating the Link 1 and 2Servo:

evive Alert
If you need to change any angle by more than 25 degrees, then disassemble the Robotic Arm and carefully reassemble it.

Run the script every time you calibrate a part.

Example

Discover the capabilities of pick-and-place robotic arms, mechanical systems designed to efficiently pick up objects from one location and precisely place them in another.

Introduction

A pick-and-place robotic arm is a mechanical system designed to perform the task of picking up objects from one location and placing them in another. It consists of multiple segments connected, similar to a human arm, and is equipped with motors, sensors, and grippers.

The robotic arm is programmed to move in a precise and controlled manner. It can be guided by various input methods, such as a computer interface or remote control. The arm uses its grippers to grasp objects securely, and then it can move them to a different location.

Pick-and-place robotic arms are commonly used in industries such as manufacturing, logistics, and assembly lines. They automate repetitive tasks that involve moving objects, saving time and reducing the risk of human error. These robotic arms can handle a wide range of objects, from small components to larger items, with accuracy and efficiency.

Code

Logic

  1. Open the Pictoblox application.
  2. Select the block-based environment.
  3. Click on the robotic arm extension available in the left corner.
  4. Drag and drop the Set Pins Link1(), Link2(), Base(), and Gripper() block to define the robotic arm for each servo connection.
  5. Use the Calibrate Link1(), Link2(), and Base() block to set the angle.
  6. Drag and drop the Set Offset Along Length() and Set Offset along Z() blocks to adjust the position of the end effector in the z-direction.
  7. Select the home() block to set the home position for the robotic arm.
  8. Open the gripper to pick up a specific object.
  9. Close the gripper to grab the object securely.
  10. Move to the desired location, then open the gripper to release the object.
  11. Close the gripper afterward.
  12. Then The arm will move to its default or home position using home() block.
  13. Press Run to run the code.

Output

Read More
All articles loaded
No more articles to load