Camera Module
The Camera module allows you to use your mobile camera for different activities like recording videos, capturing images, color detection, and face detection. Depending on the type of activities you want to do with your mobile camera the module is further divided into four modules each capable of executing a specific activity.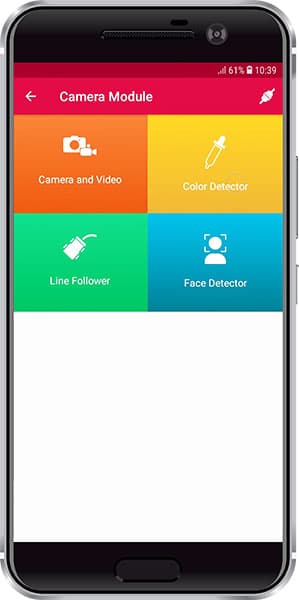
These modules are:
- Camera and Videos
- Color Detector
Camera and Video Module
Like any general camera application present in mobile this module also allows you to take pictures and videos but it also allows you to handle these activities by sending the command from your hardware.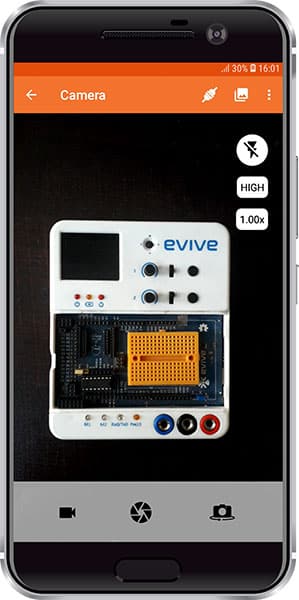
You can send the command from your board to:
- Record videos
- Capture images
- Flip camera to front or rear
- Change the flash mode to ON, OFF, or Auto
- Change zoom scaling
- Set camera quality to High or Low.
Control of the same things is also possible from icons present in the module. You can view the images or videos captured through this module by clicking on the gallery icon present in middle at the top right corner of your screen beside the connect icon.
Arduino IDE Functions
Header
To include the Camera and Video module in the Arduino program, you have to include the following header:
#define CUSTOM_SETTINGS
#define INCLUDE_CAMERA_MODULE
After defining the above mention headers, you have to include the dabble library:
<code>#include <Dabble.h>
You can download the zip of Arduino Library for
- evive, Uno, Mega, and Nano – Dabble-Arduino
- ESP32 – Dabble-ESP32
depending on the board you are using.
Enabling Bluetooth Communication
To enable Bluetooth communication, you have to initialize serial communication using the following code:
- For evive and Arduino Mega, Uno, and Nano
Dabble.begin(Baud_Rate);Here Baud_Rate is the baud rate set for the Bluetooth module. With evive, you normally get 115200 baud rate modules. - For ESP32
Dabble.begin("Bluetooth_Name");In place of Bluetooth_Name enter the name that you want to keep for Bluetooth of ESP32. The default name given in the library is “MyEsp32”.
Refreshing the data
To refresh the data that the device has got from the mobile app, you have to use the following line of code:
<code>Dabble.processInput();
This function also changes the state and the brightness of the LED automatically and you don’t have to do anything.
Functions
Following are the function available for the Camera and Video module:
- captureImage() – Sends command to click images.
- startRecording() – Sends command to start video.
- stopRecording() – Sends command to stop video.
- flipTo(direction) – This function sends the command to rotate the camera to the front or rear. There are two constants namely FRONT and REAR defined in the library to change camera direction. Pass either of constant as an argument in place of “direction” in the function.
- setQuality(quality) – This function sends the command to set the quality of the camera. Using this function the quality of the camera can be set to high or low. There are two constants namely HIGH_QUALITY and LOW_QUALITY. Pass either of constant as an argument in place of “quality” in the function.
- flashMode(modeName) – This function sends the command to set flash mode. Using this command flash can be set to On, Off, or Auto mode. There are three constants namely ON, OFF and AUTO. Pass either of the constants as an argument in place of “modeName” in the function.
- zoom(value) – Enter a value between 0 – 100 for setting that much percentage zoom on your mobile camera.
- setParameters(Direction, flash, quality, zoom) – This function allows you to set all basic camera settings before taking an image or video. The direction of the camera, the flash status, quality, and zoom value are passed as arguments to this function in sequential order as written. All these parameters are constants mentioned in the above functions.
PictoBlox (Scratch) Blocks
There are three blocks in this module. All three blocks are explained below:
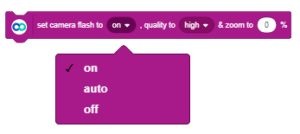
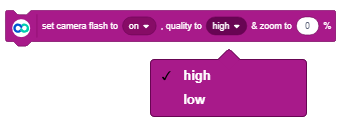
- “set camera flash to” is a stacked block used for changing flash settings, camera quality, and zoom settings of the camera. The block consists of two drop-downs and a numeric entry section each helping in setting a unique parameter of the Camera.
- The first drop-down is for flash setting, it allows you to set the flash mode to On, Off, or Auto.
- The second drop-down is for setting quality, it allows you to set camera quality to high or low. Enter zoom percent between 0 to 100 in the text field of zoom for getting that much % of zoom for the camera.
- The first drop-down is for flash setting, it allows you to set the flash mode to On, Off, or Auto.
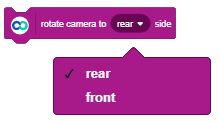
- “rotate camera to” is a stacked block used to rotate the camera in the module. Its drop-down contains two options namely “rear” and “front” for rotating the camera to the front or rear side.
- “capture image on camera” is a stacked block used to send commands for clicking an image, starting the video, and stopping the video in the camera module. Its drop-down consists of three options namely “Capture Image”, “Start Video” and “Stop Video”.


Examples
Arduino IDE
In this example, you will capture images and record video with different camera settings.
Follow these steps:
- Copy code as per your board in Arduino IDE
- Upload code
- Connect with Dabble and open the Camera and Video module
evive
   /*Camera Module allows you to click images and videos from smartphone by sending commands from your evive.
   This function demonstrates the functions available in library for camera module.

   You can reduce the size of library compiled by enabling only those modules that you want to
   use. For this first define CUSTOM_SETTINGS followed by defining INCLUDE_modulename.

   Explore more on: https://thestempedia.com/docs/dabble/camera-module-photos-videos/ */

#define CUSTOM_SETTINGS
#define INCLUDE_CAMERA_MODULE
#include <Dabble.h>

bool isVideoRecordingOn = false;

void setup() {
  Dabble.begin(115200);     //Enter baudrate of your bluetooth.Connect bluetooth on Bluetooth port present on evive.
  pinMode(TACTILESW1, INPUT);
  pinMode(TACTILESW1, INPUT);
  pinMode(SLIDESW1_D1, INPUT);
  pinMode(SLIDESW1_D1, INPUT);
  pinMode(SLIDESW1_D2, INPUT);
  pinMode(SLIDESW1_D2, INPUT);
}

void loop() {
  Dabble.processInput();   //this function is used to refresh data obtained from smartphone.Hence calling this function is mandatory in order to get data properly from your mobile.
  if (digitalRead(TACTILESW1) == HIGH)    //capture picture from front camera
  {
    Camera.flipTo(FRONT);
    Camera.captureImage();
    delay(1000);
  }
  if (digitalRead(TACTILESW2) == HIGH)   //capture a low quality picture from rear camera
  {
    Camera.flipTo(REAR);
    Camera.flashMode(AUTO);
    Camera.setQuality(LOW_QUALITY);
    Camera.captureImage();
     delay(1000);
  }
  if (digitalRead(SLIDESW1_D1) == HIGH)                    //start video recording
  {
    if (isVideoRecordingOn == false)
    {
      Camera.setParameters(REAR, OFF, HIGH_QUALITY, 50);      //rotate to rear camera, Turn flash light on,set high camera quality, set zoom to 50%
      Camera.startRecording();
      isVideoRecordingOn = true;
    }
  }
  if (digitalRead(SLIDESW1_D1) == LOW)                    //stop video recording
  {
   if (isVideoRecordingOn == true)
    {
      Camera.stopRecording();
      isVideoRecordingOn = false;
    }
  }
}
Following activities occur while pressing the slide switch and tactile switches on evive:
- On pressing Tactile Switch 1 – a High-quality image is captured from the front camera.
- On pressing Tactile Switch 2 – a Low-quality image is captured in auto flash mode from the rear camera.
- On sliding up Slide Switch 1 – a High-quality video recording starts from the rear camera with 50% zoom.
Mega, Uno, and Nano
After uploading the code open the serial monitor. you will be able to see instructions printed on Serial Monitor asking you to enter any number between 1 to 4. For each number, there is a task mentioned that will be executed.
/*
  Camera Module allows you to click images and videos from smartphone by sending commands from your evive.
  This function demonstrates functions available in library for camera module.

  Open Serial monitor and follow the instructions printed there to take images and videos in different cases.

  NOTE:
   1)For Arduino Mega Connect Bluetooth on Serial3 pins.
   2)For Arduino Uno/Nano library uses SoftwareSerial,hence pin 2 and pin 3 are used
   as RX and TX pins respectively on SoftwareSerial.Hence with arduino Uno
   follow below connections for bluetooth.
   UNO  - BLUETOOTH
   2    - TX
   3    - RX
   3)For Uno/Nano keep bluetooth Baudrate below 38400.

   You can reduce the size of library compiled by enabling only those modules that you want
   to use. For this first define CUSTOM_SETTINGS followed by defining INCLUDE_modulename.

   Explore more on: https://thestempedia.com/docs/dabble/
*/

#define CUSTOM_SETTINGS
#define INCLUDE_CAMERA_MODULE
#include <Dabble.h>

bool isVideoRecordingOn = false;

void setup() {
  Serial.begin(9600);       // make sure your Serial Monitor is also set at this baud rate.
  Dabble.begin(9600);       //Change this baudrate as per your bluetooth baudrate. Connect bluetooth on digital pin 2(RX) and 3(TX) for Uno/Nano and on Serial3 pins for Mega.
  printMessage();
}

void loop() {
  Dabble.processInput();  //this function is used to refresh data obtained from smartphone.Hence calling this function is mandatory in order to get data properly from your mobile.
  char a = processSerialdata();

  if (a == '1')    //capture picture from front camera
  {
    Camera.flipTo(FRONT);
    Camera.captureImage();
    delay(1000);
  }
  if (a == '2')   //capture a low quality picture from rear camera
  {
    Camera.flipTo(REAR);
    Camera.flashMode(AUTO);
    Camera.setQuality(LOW_QUALITY);
    Camera.captureImage();
    delay(1000);
  }
  if (a == '3')                    //start video recording
  {
    if (isVideoRecordingOn == false)
    {
      Serial.println("3");
      Camera.setParameters(REAR, OFF, HIGH_QUALITY, 50);      //rotate to rear camera, Turn flash light on,set high camera quality, set zoom to 50%
      Camera.startRecording();
      isVideoRecordingOn = true;
    }
  }
  if (a == '4')                    //stop video recording
  {
    if (isVideoRecordingOn == true)
    {
      Camera.stopRecording();
      isVideoRecordingOn = false;
    }
  }
}

void printMessage()
{
  Serial.println("Enter any number between 1 to 3 for executing task corresponding to that number: ");
  Serial.println("Tasks executed on sending different numbers are as followed: ");
  Serial.println("1 - Take a high quality image from front camera with no flash and no zoom.");
  Serial.println("2 - Take a low quality image from rear camera with Auto flash and no zoom");
  Serial.println("3 - Start a 50% zoomed video from Rear camera in high quality and auto  flash");
  Serial.println("4 - Stop a video");
}

char processSerialdata()
{
  if (Serial.available() != 0)
  {
    return Serial.read();
  }
  else
  {
    return '0';
  }
}
ESP32
After uploading the code open the serial monitor and reset your board once. You will be able to see instructions on the serial monitor and follow them to capture images and videos from Camera Module.
/*
  Camera Module allows you to click images and videos from smartphone by sending commands from your evive.
  This function demonstrates functions available in library for camera module.

  Open Serial monitor and follow the instructions printed there to take images and videos in different cases.

  NOTE:
   1)For Arduino Mega Connect Bluetooth on Serial3 pins.
   2)For Arduino Uno/Nano library uses SoftwareSerial,hence pin 2 and pin 3 are used
   as RX and TX pins respectively on SoftwareSerial.Hence with arduino Uno
   follow below connections for bluetooth.
   UNO  - BLUETOOTH
   2    - TX
   3    - RX
   3)For Uno/Nano keep bluetooth Baudrate below 38400.

   You can reduce the size of library compiled by enabling only those modules that you want
   to use. For this first define CUSTOM_SETTINGS followed by defining INCLUDE_modulename.

   Explore more on: https://thestempedia.com/docs/dabble/
*/

#define CUSTOM_SETTINGS
#define INCLUDE_CAMERA_MODULE
#include <DabbleESP32.h>

bool isVideoRecordingOn = false;

void setup() {
  Serial.begin(115200);       // make sure your Serial Monitor is also set at this baud rate.
  Dabble.begin("MyEsp32");       //Change this baudrate as per your bluetooth baudrate. Connect bluetooth on digital pin 2(RX) and 3(TX) for Uno/Nano and on Serial3 pins for Mega.
  printMessage();
}

void loop() {
  Dabble.processInput();  //this function is used to refresh data obtained from smartphone.Hence calling this function is mandatory in order to get data properly from your mobile.
  char a = processSerialdata();

  if (a == '1')    //capture picture from front camera
  {
    Camera.flipTo(FRONT);
    Camera.captureImage();
    delay(1000);
  }
  if (a == '2')   //capture a low quality picture from rear camera
  {
    Camera.flipTo(REAR);
    Camera.flashMode(AUTO);
    Camera.setQuality(LOW_QUALITY);
    Camera.captureImage();
    delay(1000);
  }
  if (a == '3')                    //start video recording
  {
    if (isVideoRecordingOn == false)
    {
      Serial.println("3");
      Camera.setParameters(REAR, OFF, HIGH_QUALITY, 50);      //rotate to rear camera, Turn flash light on,set high camera quality, set zoom to 50%
      Camera.startRecording();
      isVideoRecordingOn = true;
    }
  }
  if (a == '4')                    //stop video recording
  {
    if (isVideoRecordingOn == true)
    {
      Camera.stopRecording();
      isVideoRecordingOn = false;
    }
  }
}

void printMessage()
{
  Serial.println("Enter any number between 1 to 3 for executing task corresponding to that number: ");
  Serial.println("Tasks executed on sending different numbers are as followed: ");
  Serial.println("1 - Take a high quality image from front camera with no flash and no zoom.");
  Serial.println("2 - Take a low quality image from rear camera with Auto flash and no zoom");
  Serial.println("3 - Start a 50% zoomed video from Rear camera in high quality and auto  flash");
  Serial.println("4 - Stop a video");
}

char processSerialdata()
{
  if (Serial.available() != 0)
  {
    return Serial.read();
  }
  else
  {
    return '0';
  }
}
PictoBlox
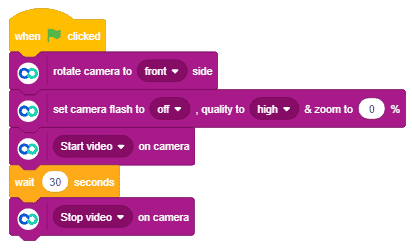
There are two scripts given below, of which one is for capturing the image and one is for recording a 30-second video. Both the scripts are made for Stage Mode in PictoBlox. Both the scripts will work for evive and Arduino Uno, Nano, and Mega. Currently, PictoBlox does not support ESP32; however, its support will be added soon.
Capture Images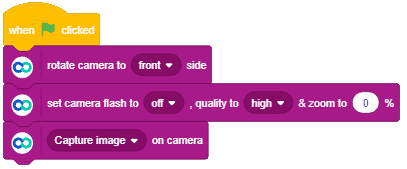
Record Videos