Introduction
The Notification module in the IoT module can be used to trigger a notification in your Smartphone based on events occurring on your hardware.
All the commands related to triggering a notification are transferred from hardware only. This means that the title name of the notification and the text content of the notification will be sent from your hardware board only. The module in the Smartphone shows you the history of the last notification created on the phone.
The image below shows that a notification is created in smartphones for monitoring the moisture content of plants.
You can see the title of the notification is “Plant Monitoring Status” and the content states that “The moisture level has gone down. Water your plant and quench its thirst ”.

Arduino IDE Functions
Header
To send a Notification, you have to include the following header:
#define CUSTOM_SETTINGS
#define INCLUDE_MUSIC_MODULEAfter defining the above mention headers, you have to include the dabble library:
#include <Dabble.h>You can download the zip of the Arduino Library for
- evive, Uno, Mega, and Nano – Dabble-Arduino
- ESP32 – Dabble-ESP32
depending on the board you are using.
Enabling Bluetooth Communication
To enable Bluetooth communication, you have to initialize serial communication using the following code:
- For evive and Arduino Mega, Uno, and Nano
Dabble.begin(Baud_Rate);Here Baud_Rate is the baud rate set for the Bluetooth module. With evive, you normally get 115200 baud rate modules.
- For ESP32
Dabble.begin("Bluetooth_Name");In place of Bluetooth_Name enter the name that you want to keep for Bluetooth of ESP32. The default name given in the library is “MyEsp32”.
Refreshing the data
To refresh the data that the device has got from the mobile app, you have to use the following line of code:
Dabble.processInput();Functions
The following are the function available for this module:
- Notification.clear() – To clear all the previous notifications.
- Notification.setTitle(titleName) – Enter the title name you want to give to your notification. Remember that at a time you can generate only one topic for notification on the phone. Hence make sure you don’t create multiple titles.
- Notification.notifyPhone(content) – Write the content of the notification.
PictoBlox Blocks
For handling notifications, there are two stacked blocks namely “send notification titled () & message ()” and “clear notification“. The “clear notification” block is used for clearing the previous notification from the phone.![]()
The “send notification titled () & message ()” is used to create the title of the notification and also it’s content. As stated earlier that you can create only one notification topic and updating it again and again is possible, hence make sure that the notification title is the same for all messages related to that topic.

Examples
Arduino IDE Example for IoT Module – Notification
evive
In this example, a notification for monitoring the status of touch pins of evive and sending SMS on pressing the tactile switch is shown.
Either copy code from below or navigate to “Files>>Dabble>>01.evive>>10.IOT>> Notification in Arduino IDE.
/*
   This example demonstrates how to use Notification module of Dabble app. Here status of touch sensors of evive is notified to mobile.

   You can reduce the size of library compiled by enabling only those modules that you
   want to use. For this first define CUSTOM_SETTINGS followed by defining
   INCLUDE_modulename.

   Explore more on: https://thestempedia.com/docs/dabble/
*/
#define CUSTOM_SETTINGS
#define INCLUDE_NOTIFICATION_MODULE
#include <evive.h>
#include <Dabble.h>
bool isTouchSensed = false;
void setup() {
  Serial.begin(250000);             // make sure your Serial Monitor is also set at this baud rate.
  Dabble.begin(115200);             //Enter baudrate of your bluetooth.Connect bluetooth on Bluetooth port present on evive.
  Dabble.waitForAppConnection();    //waiting for App to connect
  Notification.clear();             //clear previous notifictions
  Notification.setTitle("Touch sensor Status");      //Enter title of your notification
  touchPins.begin(0x5A);
}

void loop()
{
  Dabble.processInput();        //this function is used to refresh data obtained from smartphone.Hence calling this function is mandatory in order to get data properly from your mobile.
  for (int i = 1; i <= 12; i++)
  {
    if (touchPins.isTouched(i))
    {
      isTouchSensed = true;
      Notification.notifyPhone(String("Touch is sensed on pin ") + i);              //Content of notification
    }
  }
  if(isTouchSensed == false)
  {
    Notification.notifyPhone("No touch was sensed by any touch pin");     //Content of notification
  }
  isTouchSensed = false;
}
Mega, Uno, and Nano
You can also find the below code in Arduino IDE for this navigate to “Files>>Dabble>>01.Uno Nano Mega>>10.IOT>> Notification
In the below example, status of the push button is notified in the Smartphone.
/*
  Notification module can be used for notifying your mobile about status of various activities happening on your hardware.
  In this example a push button is connected to a digital pin. And mobile is notified about how many times that push button
  is pressed.
  NOTE:
    1)For Arduino Mega Connect Bluetooth on Serial3 pins.
    2)For Arduino Uno/Nano library uses SoftwareSerial,hence pin 2 and pin 3 are used
    as RX and TX pins respectively on SoftwareSerial.Hence with arduino Uno
    follow below connections for bluetooth.
    UNO  - BLUETOOTH
    2    - TX
    3    - RX
    3)For Uno/Nano keep bluetooth Baudrate below 38400.

    You can reduce the size of library compiled by enabling only those modules that you want to
    use. For this first define CUSTOM_SETTINGS followed by defining INCLUDE_modulename.

    Explore more on: https://thestempedia.com/docs/dabble/
*/

#define CUSTOM_SETTINGS
#define INCLUDE_NOTIFICATION_MODULE
#include <Dabble.h>
uint8_t pushButtonPin = 5;
int counts = 0;

void setup() {
  Serial.begin(9600);                          // make sure your Serial Monitor is also set at this baud rate.
  Dabble.begin(9600);                          //Change this baudrate as per your bluetooth baudrate. Connect bluetooth on digital pin 2(RX) and 3(TX) for Uno/Nano and on Serial3 pins for Mega.
  pinMode(pushButtonPin, INPUT_PULLUP);        //Since pin is internally pulled up hence connect one side of push button to ground so whenever button is pushed pin reads LOW logic.
  Dabble.waitForAppConnection();               //waiting for App to connect
  Notification.clear();                        //clear previous notifictions
  Notification.setTitle("Button Counts");      //Enter title of your notification
}

void loop() {
  Dabble.processInput();    //this function is used to refresh data obtained from smartphone.Hence calling this function is mandatory in order to get data properly from your mobile.
  if (digitalRead(pushButtonPin) == LOW)
  {
    counts++;
    delay(1000);   //debounce delay
  }
  Notification.notifyPhone(String("Button has been pressed ") + counts + String (" time"));
}
ESP32
You can also find the below code in Arduino IDE for this navigate to “Files>>DabbleESP32>>10.IOT>> Notification.
In the below example, the status of the push button is notified in the Smartphone.
/*
  Notification module can be used for notifying your mobile about status of various activities happening on your hardware.
  In this example a push button is connected to a digital pin. And mobile is notified about how many times that push button
  is pressed.

  You can reduce the size of library compiled by enabling only those modules that you want to
  use. For this first define CUSTOM_SETTINGS followed by defining INCLUDE_modulename.

  Explore more on: https://thestempedia.com/docs/dabble/
*/

#define CUSTOM_SETTINGS
#define INCLUDE_NOTIFICATION_MODULE
#include <DabbleESP32.h>
uint8_t pushButtonPin = 2;
int counts = 0;

void setup() {
  Serial.begin(115200);
  Dabble.begin("MyEsp32");                     //set bluetooth name of your device
  pinMode(pushButtonPin, INPUT_PULLUP);        //Since pin is internally pulled up hence connect one side of push button to ground so whenever button is pushed pin reads LOW logic.
  Dabble.waitForAppConnection();               //waiting for App to connect
  Notification.clear();                        //clear previous notifictions
  Notification.setTitle("Button Counts");      //Enter title of your notification
}

void loop() {
  Dabble.processInput();    //this function is used to refresh data obtained from smartphone.Hence calling this function is mandatory in order to get data properly from your mobile.
  if (digitalRead(pushButtonPin) == LOW)
  {
    counts++;
    delay(1000);   //debounce delay
  }
  Notification.notifyPhone(String("Button has been pressed ") + counts + String (" time"));
}
PictoBlox Example for IoT Module – Notification
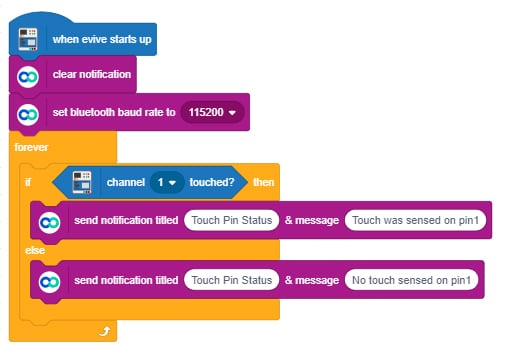
evive
In the example below notification for monitoring the status of the touch pins of evive is shown.
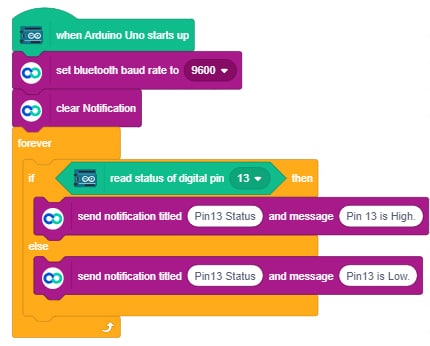
Uno, Mega Nano
For Mega and Nano just changes the head block of the below script.
The script below creates a notification that shows the status of digital pin 13 on the phone. Note that here at first all the notifications are cleared using the “clear notification” block and then a new notification is created. The title of the notification in each block is the same and only the content is different.