Introduction
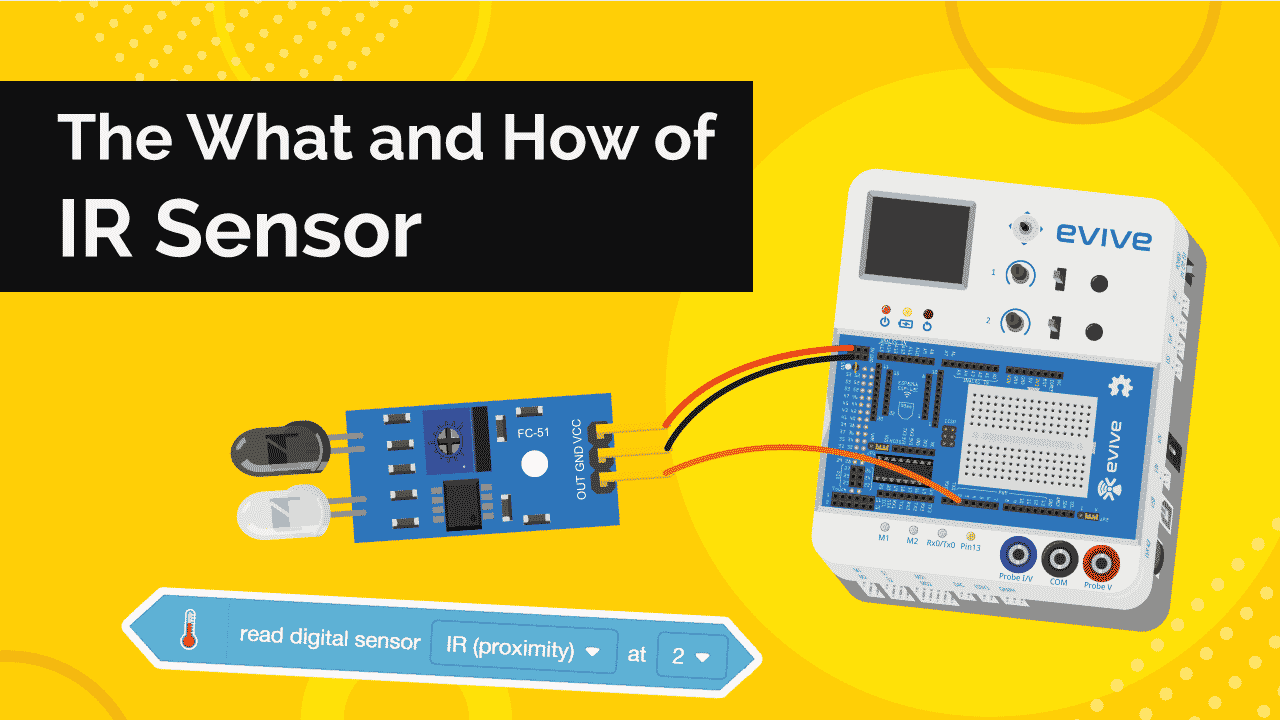
Learn all about the IR sensor with us in this tutorial on electronics for beginners: what is an IR sensor (short for Infrared sensor), how it works, how to interface it with evive and program it with ease in PictoBlox – our Scratch blocks-based graphical programming platform with advanced hardware interaction abilities. Once you’re equipped with the basic knowledge about the IR sensor, we’ll show some DIY projects that you can make using the IR sensor.
To work in PictoBlox, you’ll first need to download it from HERE.
Ready? Set. Go!
What is an IR Sensor and how does it work?
An infrared (IR) sensor a proximity sensor, or a ‘nearness’ sensor senses whether there is an object near it or not. The IR stands for Infrared sensor. Infrared is the light out of our visible spectrum.
Working of an IR Sensor
The white LED here is an IR LED which works as the transmitter and the component next to the IR LED is a photodiode that works as the receiver in the IR sensor.
The IR transmitter continuously emits the IR light and the IR receiver keeps on checking for the reflected light. If the light gets reflected back by hitting any object in front it, the IR receiver receives this light. This way the object is detected in the case of the IR sensor.
The blue knob here is a potentiometer. You can control the range i.e. from how far you want to detect the object by changing the value of the potentiometer.
An IR sensor has two small LED indicators – one for power, which is ON the entire time the sensor is ON; the other is the Signal LED which detects the object. The signal LED has two states or situations:
- ON (Active) when it detects an object
- OFF (Inactive) when it doesn’t detect any object
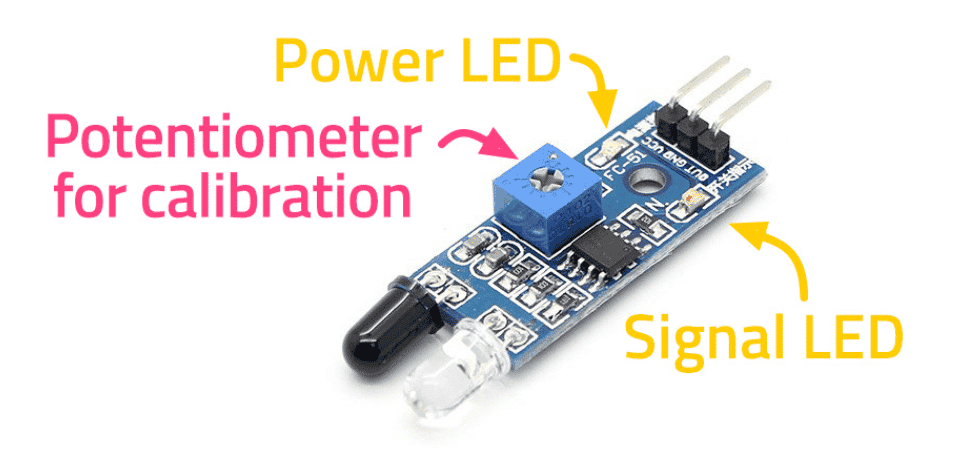
The IR sensor is a digital sensor, thus, the output received from it will either be 1 or 0.
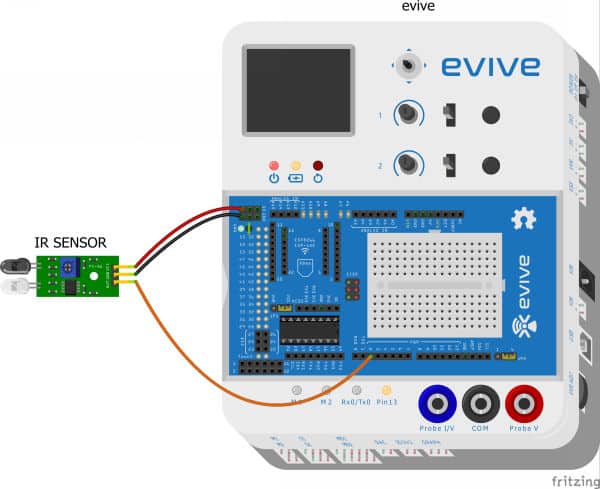
How to interface an IR sensor with evive
Now that we have a little idea about its works, let’s take a look at how to interface it with evive and see it in action.
- Connect VCC pin to the +5V pin on evive.
- Connect GND pin to evive’s GND pin.
- Connect OUT to evive’s digital pin 2.
Testing the working of the IR sensor and calibrating it
Now that we have made the connections, let’s test whether the IR sensor is working or not.
Bring your hand or any object in front of the sensor. In doing so, the signal LED should turn ON. If not, then you need to calibrate the IR sensor.
How to Calibrate an IR Sensor
Calibrating the sensor is essentially is making sure that the LED turns ON when it detects the object and turns OFF when it doesn’t. That’s it.
Follow the steps below to calibrate the sensor:
- Place an object at least 15cm away from the robot. If the signal LED is OFF, the sensor is working properly. Otherwise, gently turn the potentiometer (that tiny blue cube with a screw in it) with a screwdriver in the anti-clockwise direction such that the LED turns OFF.
- Similarly, place an object about 5cm from the sensor. If the signal LED is ON, then it is working properly. Otherwise, turn the potentiometer in the clockwise direction such that the LED turns ON.
- Repeat the above two steps till the signal LED works as is should in both cases.
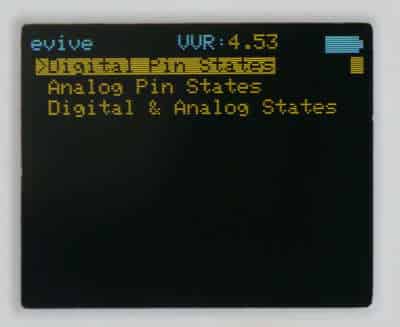
Now let’s see how to display and read the sensor data on the evive screen.
- Switch ON evive.
- Open evive’s menu.
- Using the NAV key, navigate to pin state monitor.
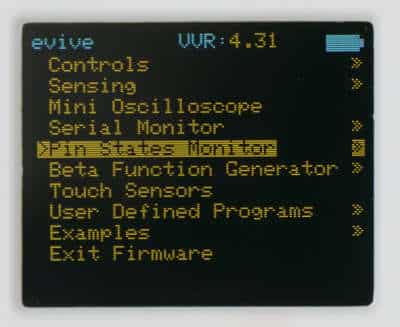
- Then select Digital Pins State.
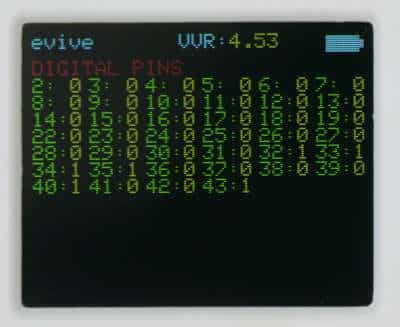
- Now, take your hand close to the IR sensor; in doing so, you’ll see that the Signal LED lights up, and ‘0’ is displayed next to Pin 2 on evive’s screen.
- As soon as you take your hand sufficiently far away from the sensor, the LED will turn OFF, and the state goes back to being ‘1’.
Working with IR sensors in real-time
Follow the steps below to write the script:
- Connect evive to your computer and open PictoBlox.
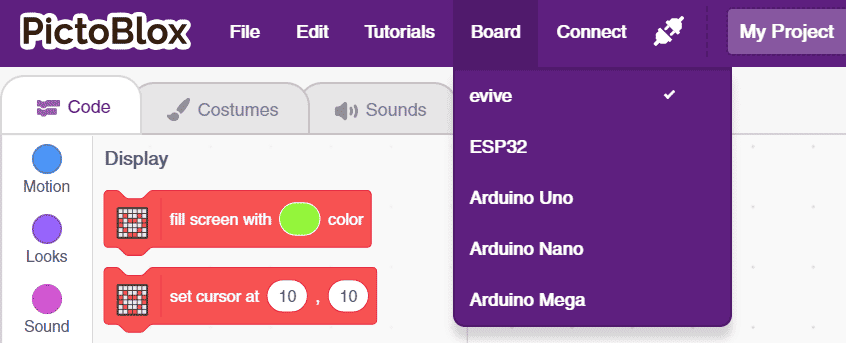
- Go to the toolbar and click on the Board menu. Then select evive as your board.
- Next, select the Port to which evive is connected e.g. COMXX or ttyXX from the dialogue box that appears. Once you select the port, the icon beside the Connect tab will become connected.

 Before writing the script, make sure that the firmware is uploaded. If not, upload it using the Upload firmware button.
 - Now, let’s make a small script to make Tobi let know whether an object has been detected or not. The IR sensor gives ‘0’ as output if it detects an object and ‘1’ otherwise.
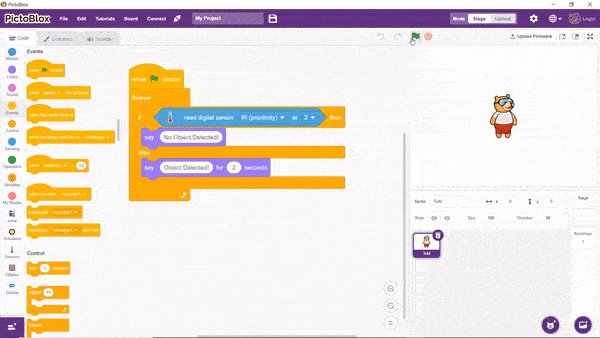
- We’ll monitor the output of the IR sensor using an if-else block.
- In the hexagonal box of the if arm, place the read digital sensor block from the sensors palette and select IR sensor from the first drop-down and the pin to which it is connected in the second drop-down.

- If the sensor doesn’t detect any object in front, Tobi should say “No object detected”. Place a say block under the if arm and write “No object detected” in the space given.
- When it does, Tobi should say “object detected” for 2 seconds. Thus, place the say for block under the else arm and write “Object detected” and write 2 in the second blank space.
- To run the script continuously, we’ll use the forever block.
- Place a when flag clicked hat block above the forever block. It will ensure that the script runs when the green flag is clicked.
- Click the flag and bring an object in front of the sensor to test the script to ensure that it is working perfectly fine.
Below is the complete script: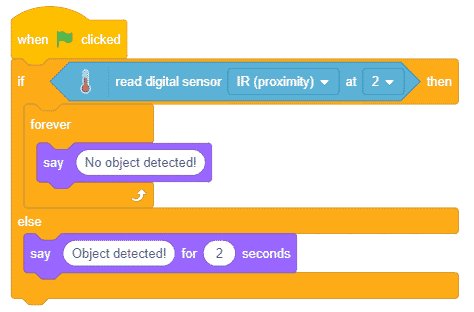
You can download the above script from here.
Working with the Upload Mode
Now, let’s make a script to use the IR sensor without having evive connected to the computer. For that, we’ll have to work in Upload mode.
- To work in the upload mode, click the toggle button.
- Now, add and if block to monitor the output obtained from the IR sensor. In the hexagonal space of the if arm add read digital sensor block.
- On detecting the object, evive’s buzzer should ring. Place the play tone on the block inside the space in the if arm and select a tone of your choice.
- Use a forever block to run the code continuously. Place the when evive starts up hat block to execute the program.
- Finally, upload the code using the upload button.
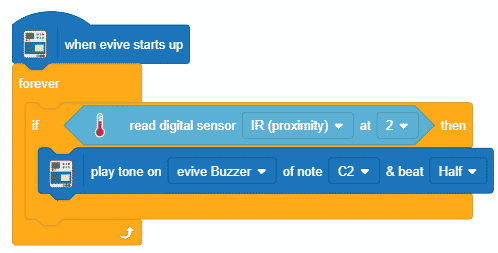
You can download the above script from here:

Conclusion
In conclusion, this tutorial was a comprehensive guide to learning about the IR sensor, how it works, and how to interface it with evive and program it with PictoBlox. We learned how to calibrate the sensor and read its values using evive’s menu. We also saw how to use it with the help of some different scripts in both online and upload modes. Hopefully, you now have a better understanding of the IR sensor and its various applications in real-time.


