Introduction
The Music module allows you to play tones, songs and other recorded audio files from your phone’s storage as per the command sent from the hardware device. You can send the command to play or stop an audio file. You can also give commands to play various audio files one by one in a queue.
Follow the steps below to play different audio files from this module:
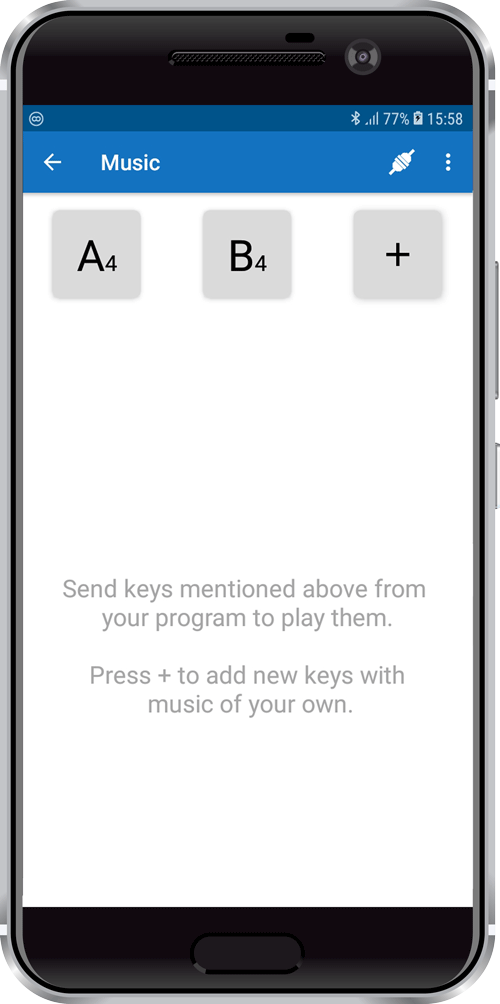
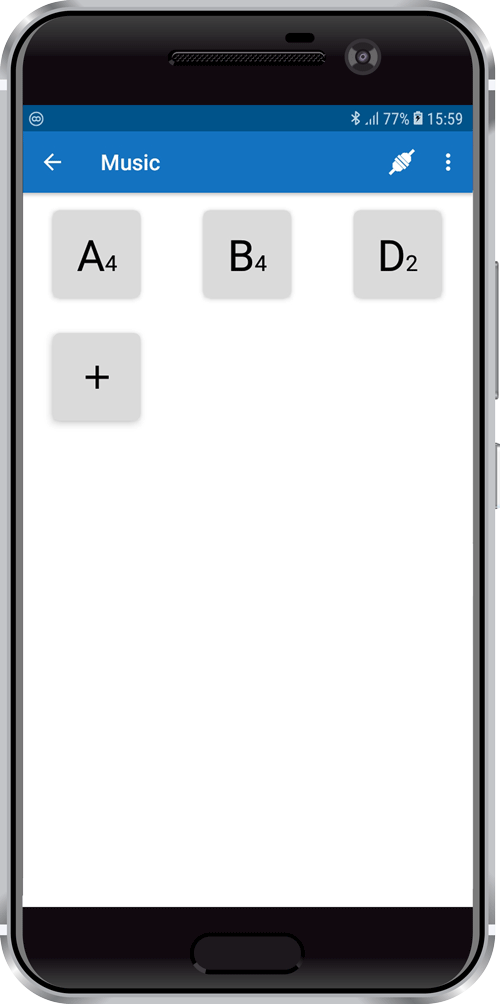
- As you open the music module you can see three tiles on the screen. Two tiles are named A4 and B4 and one tile has a ‘+’ mark on it. On clicking A4 or B4 tile, some music will be played. Here A4 and B4 are keys associated with those music files. You can add your own key tile by clicking on the tile marked ‘+’. This tile is an added tile.
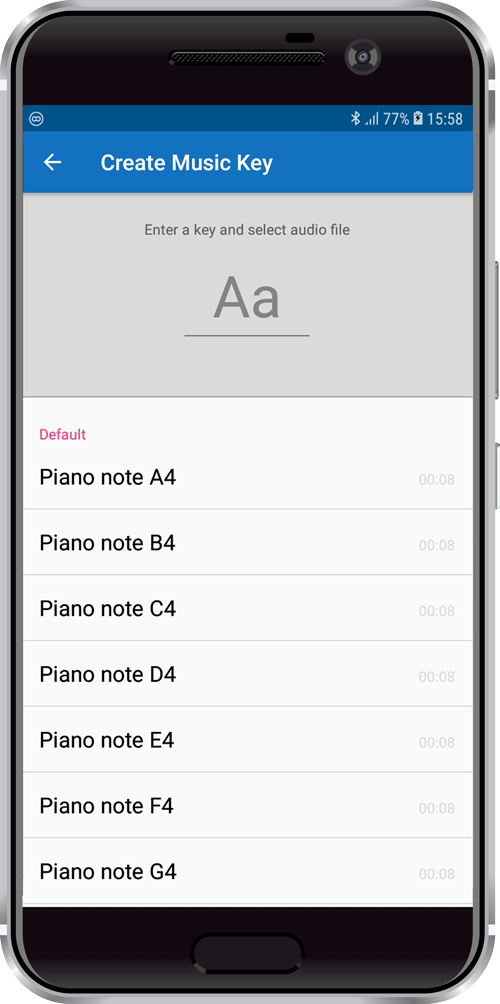
- To add audio files of your own choice click on Add tile. You can see a screen as shown below. There you can see a message above the text box “Enter a key and select audio files” informing you to enter the key name and then select a music file.
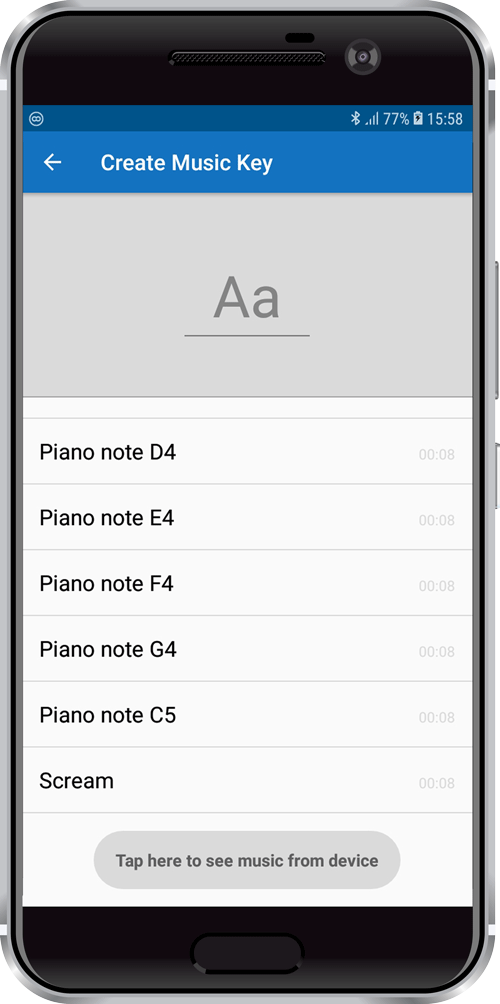
- You can select audio file either from the list provided below or from your phone storage. To select an audio file from phone storage scroll at the bottom of the list and select “Tap here to see music from device”.
- You will be asked for permission to access media files. Select “Allow” and proceed.
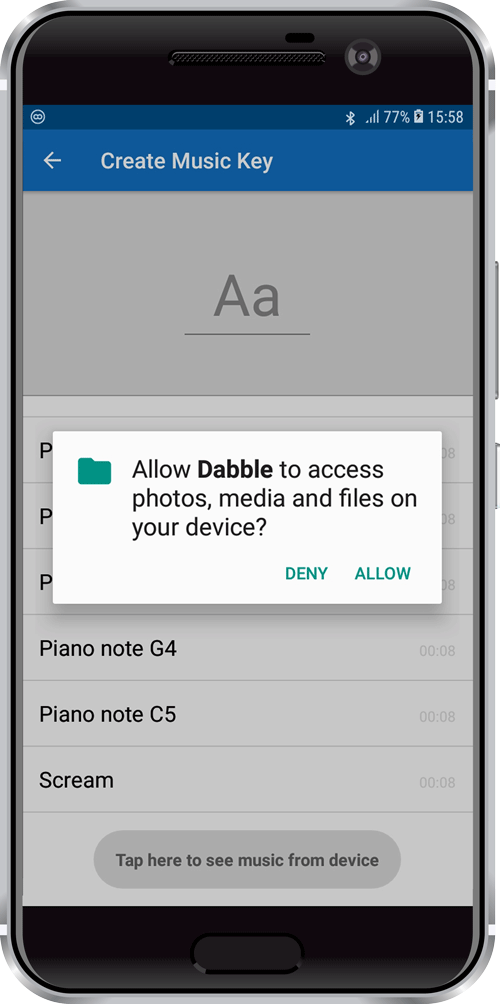
- You would see two different sections named “Default” and “Device” containing various music files.
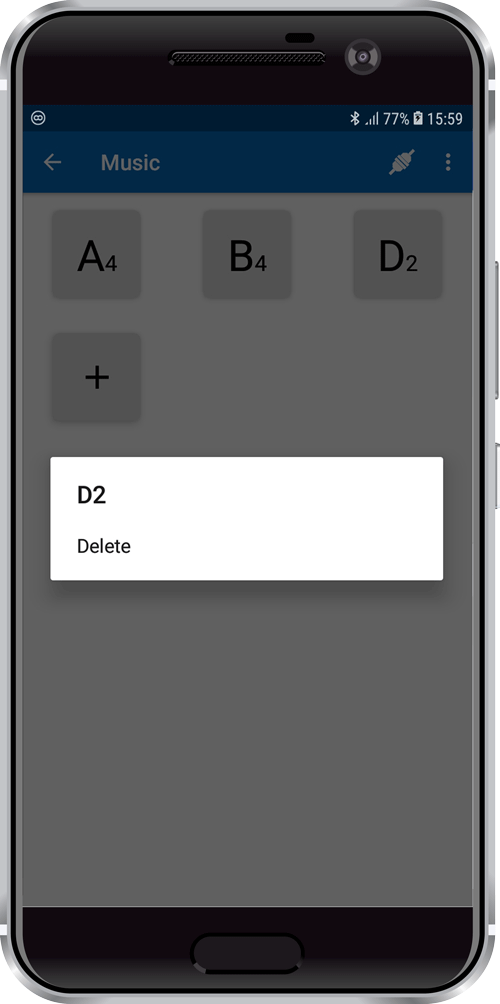
- Enter a key name say “D2” and select an audio file. As soon as you do this a new tile named “D2” is created and when you click on that tile your selected audio file will be played.
- You can also delete any music tile by doing a long press on that tile.
- In order to play these files from your hardware, you have to send these key names from your hardware. How to do this? It will be more clear from the explanations and examples as given below.
Arduino IDE Functions
Header
To include the Music module in the Arduino program, you have to include the following header:
#define CUSTOM_SETTINGS
#define INCLUDE_MUSIC_MODULEAfter defining the above mention headers, you have to include the dabble library:
#include <Dabble.h>You can download the zip of the Arduino Library for
- evive, Uno, Mega, and Nano – Dabble-Arduino
- ESP32 – Dabble-ESP32
depending on the board you are using.
Enabling Bluetooth Communication
To enable Bluetooth communication, you have to initialize serial communication using the following code:
- For evive and Arduino Mega, Uno, and Nano
Dabble.begin(Baud_Rate);Here Baud_Rate is the baud rate set for the Bluetooth module. With evive, you normally get 115200 baud rate modules.
- For ESP32
Dabble.begin("Bluetooth_Name");In place of Bluetooth_Name enter the name that you want to keep for Bluetooth of ESP32. The default name given in the library is “MyEsp32”.
Refreshing the data
To refresh the data that the device has got from the mobile app, you have to use the following line of code:
Dabble.processInput();Functions
- Music.play(key) – This function immediately plays the file with the key name passed as an argument in it.
- Music.addToQueue(key) – This function instructs the phone to play music associated with the key only after the completion of any ongoing music file. By using this command multiple times, you can create a list of various music files and play them one by one.
- Music.stop() – Stop playing all the music files.
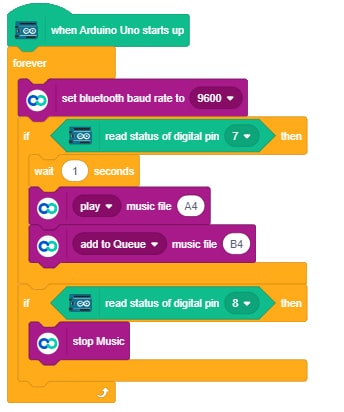
PictoBlox Blocks
There are two blocks available for the music module in PictoBlox.
- The “() music file ()” block is used to play the audio file for the key entered in the text box of the block. The drop-down of this block has two options:
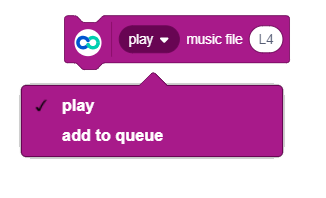
- play – Selecting this option means the music file written in the block will be immediately played as soon as the block is executed.
- add to Queue – Selecting this option means the music file written in the block will be executed only after completing playing the ongoing music file.
- stop music block stops all the music file that is played from mobile.


Examples
Arduino IDE Example for Music Module
evive
/*
  This code demonstrates how to use music module. Here a Tactile Switch 1 of evive is used for playing and stopping music in smartphone.
  A change in state of Tactile Switch 1 is read. With every press on Tactile Switch 1 state of music module will be toggled.If no music is played
  by music module then command to play music module will be sent and if currently music is being played then it will be stopped.

  You can reduce the size of library compiled by enabling only those modules that you want to
  use. For this first define CUSTOM_SETTINGS followed by defining INCLUDE_modulename.

  Explore more on: https://thestempedia.com/docs/dabble/

*/
#define CUSTOM_SETTINGS
#define INCLUDE_MUSIC_MODULE
#include <evive.h>
#include <Dabble.h>

bool playMusic = false;
uint8_t musicSignalPin = TACTILESW1;
bool currentStatusOfPin = 0, prevStatusOfPin = 0; //status of musicSignalPin
bool musicIsOn = false;

void setup() {
  pinMode(musicSignalPin, INPUT);
  Dabble.begin(115200);  //Change this baudrate as per your bluetooth baudrate.
}

void loop() {
  Dabble.processInput();           //this function is used to refresh data obtained from smartphone.Hence calling this function is mandatory in order to get data properly from your mobile.
  currentStatusOfPin = digitalRead(musicSignalPin);
  if (currentStatusOfPin == 0 &&  prevStatusOfPin == 1) //detecting change in state Tactile Switch 1
  {
    delay(500); // debouncedelay
    playMusic = !(playMusic);
  }
  if (playMusic == true)
  {
    if (musicIsOn == false)
    {
      Music.play("A4");         //assigned key for Piano Note A4
      Music.addToQueue("B4");   //assigned key for Piano Note B4
      Music.addToQueue("C4");   //assigned key for Piano Note C4
      Music.addToQueue("D4");   //assigned key for Piano Note D4
      Music.addToQueue("E4");   //assigned key for Piano Note E4
      Music.addToQueue("F4");   //assigned key for Piano Note F4
      Music.addToQueue("G4");   //assigned key for Piano Note G4
      Music.addToQueue("C5");   //assigned key for Piano Note C5   //Select your own music files, assign them key and write this key as written here for various piano notes.
      musicIsOn = true;
    }
  }
  if (playMusic == false)
  {
    Music.stop();
    musicIsOn = false;
  }
  prevStatusOfPin = currentStatusOfPin;
}
Mega, Uno, and Nano
/*
  This code demonstrates how to use music module. Here a push button is used for playing and stopping music in smartphone.
  A push button is connected on an internally pulled up digital pin. And a change in state of pin is read.
  With every press on push button state of music module will be toggled.If no music is played by music module then
  command to play music module will be sent and if currently music is being played then it will be stopped.

  You can reduce the size of library compiled by enabling only those modules that you want to
  use. For this first define CUSTOM_SETTINGS followed by defining INCLUDE_modulename.

  Explore more on: https://thestempedia.com/docs/dabble/

*/
#define CUSTOM_SETTINGS
#define INCLUDE_MUSIC_MODULE
#include <DabbleESP32.h>

bool playMusic = false;
uint8_t musicSignalPin = 2;
bool currentStatusOfPin = 0, prevStatusOfPin = 0; //status of musicSignalPin
bool musicIsOn = false;

void setup() {
  pinMode(musicSignalPin, INPUT_PULLUP);
  Dabble.begin("MyEsp32");  //set bluetooth name of your device
}

void loop() {
  Dabble.processInput(); //this function is used to refresh data obtained from smartphone.Hence calling this function is mandatory in order to get data properly from your mobile.
  currentStatusOfPin = digitalRead(musicSignalPin);
  if (currentStatusOfPin == 0 &&  prevStatusOfPin == 1) //detecting change in state of pin due to push button
  {
    delay(500); // debouncedelay
    playMusic = !(playMusic);
  }
  if (playMusic == true)
  {
    if (musicIsOn == false)
    {
      Music.play("A4");         //assigned key for Piano Note A4
      Music.addToQueue("B4");   //assigned key for Piano Note B4
      Music.addToQueue("C4");   //assigned key for Piano Note C4
      Music.addToQueue("D4");   //assigned key for Piano Note D4
      Music.addToQueue("E4");   //assigned key for Piano Note E4
      Music.addToQueue("F4");   //assigned key for Piano Note F4
      Music.addToQueue("G4");   //assigned key for Piano Note G4
      Music.addToQueue("C5");   //assigned key for Piano Note C5   //Select your own music files, assign them key and write this key as written here for various piano notes.
      musicIsOn = true;
    }
  }
  if (playMusic == false)
  {
    Music.stop();
    musicIsOn = false;
  }
  prevStatusOfPin = currentStatusOfPin;
}
ESP32
/*
This code demonstrates how to use music module. Here a push button is used for playing and stopping music in smartphone.
A push button is connected on an internally pulled up digital pin. And a change in state of pin is read.
With every press on push button state of music module will be toggled.If no music is played by music module then
command to play music module will be sent and if currently music is being played then it will be stopped.
You can reduce the size of library compiled by enabling only those modules that you want to
use. For this first define CUSTOM_SETTINGS followed by defining INCLUDE_modulename.
Explore more on: https://thestempedia.com/docs/dabble/
*/
#define CUSTOM_SETTINGS
#define INCLUDE_MUSIC_MODULE
#include <DabbleESP32.h>
bool playMusic = false;
uint8_t musicSignalPin = 2;
bool currentStatusOfPin = 0, prevStatusOfPin = 0; //status of musicSignalPin
bool musicIsOn = false;
void setup() {
pinMode(musicSignalPin, INPUT_PULLUP);
Dabble.begin("MyEsp32"); //set bluetooth name of your device
}
void loop() {
Dabble.processInput(); //this function is used to refresh data obtained from smartphone.Hence calling this function is mandatory in order to get data properly from your mobile.
currentStatusOfPin = digitalRead(musicSignalPin);
if (currentStatusOfPin == 0 && prevStatusOfPin == 1) //detecting change in state of pin due to push button
{
delay(500); // debouncedelay
playMusic = !(playMusic);
}
if (playMusic == true)
{
if (musicIsOn == false)
{
Music.play("A4"); //assigned key for Piano Note A4
Music.addToQueue("B4"); //assigned key for Piano Note B4
Music.addToQueue("C4"); //assigned key for Piano Note C4
Music.addToQueue("D4"); //assigned key for Piano Note D4
Music.addToQueue("E4"); //assigned key for Piano Note E4
Music.addToQueue("F4"); //assigned key for Piano Note F4
Music.addToQueue("G4"); //assigned key for Piano Note G4
Music.addToQueue("C5"); //assigned key for Piano Note C5 //Select your own music files, assign them key and write this key as written here for various piano notes.
musicIsOn = true;
}
}
if (playMusic == false)
{
Music.stop();
musicIsOn = false;
}
prevStatusOfPin = currentStatusOfPin;
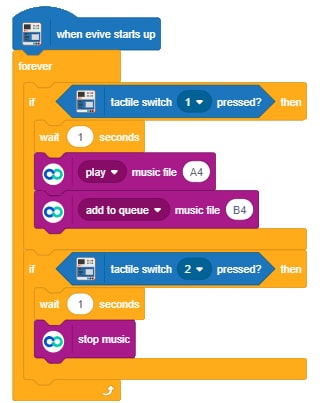
}PictoBlox Example for Music Module
evive
Arduino Uno