Introduction
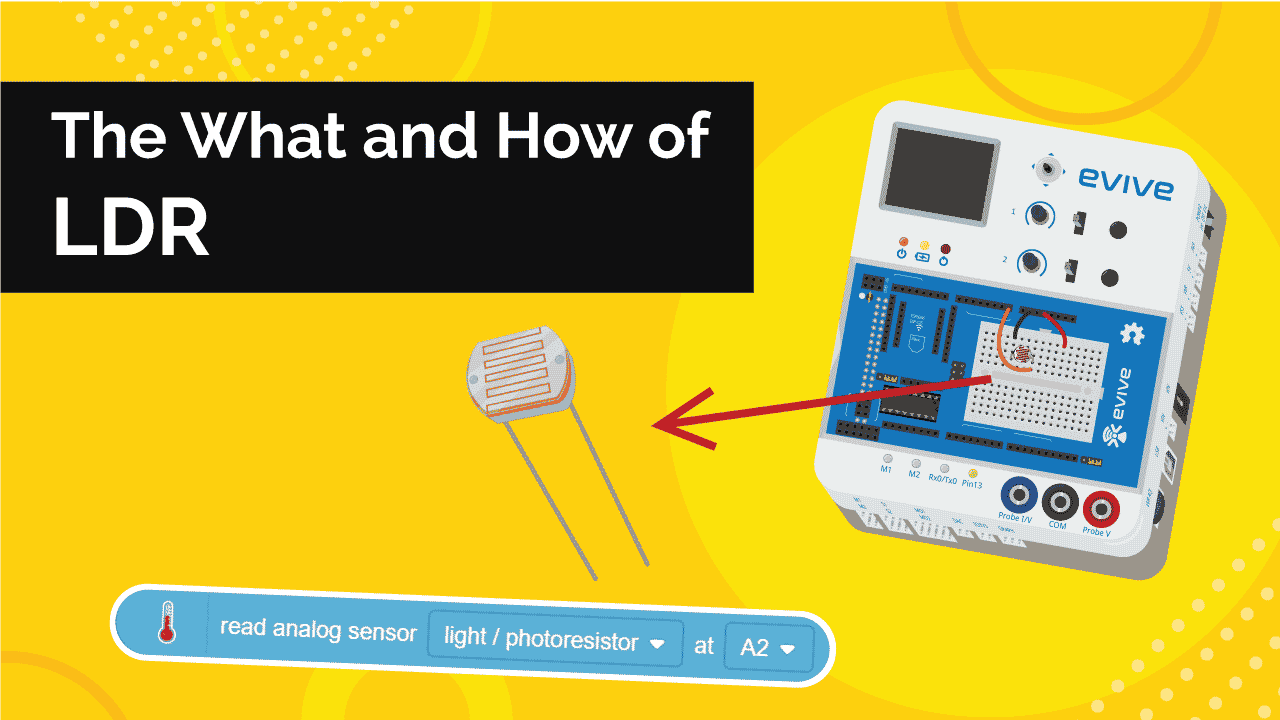
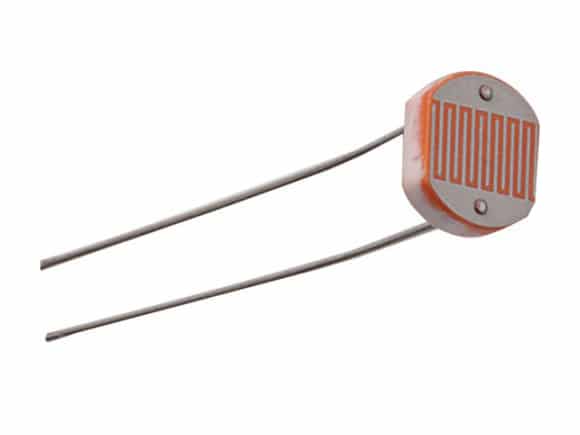
LDRs are tiny light-sensing devices also known as photoresistors. An LDR is a resistor whose resistance changes as the amount of light falling on it changes. The resistance of the LDR decreases with an increase in light intensity. This property allows us to use them for making light sensing circuits. Learn what is LDR, how does it work, how to interface it with evive and program it in PictoBlox – our Scratch blocks-based graphical programming platform with advanced hardware interaction abilities, and finally what exciting DIY projects you can make using the LDR available in the evive Starter Kit.
To work in PictoBlox, you’ll first need to download it from HERE.
Ready? Set. Go!
What is LDR or Photoresistor?
Let’s begin by understanding what is LDR and how does LDR works.
LDR is an acronym for Light Dependent Resistor. LDRs are tiny light-sensing devices also known as photoresistors. An LDR is a resistor whose resistance changes as the amount of light falling on it changes. The resistance of the LDR decreases with an increase in light intensity, and vice-versa. This property allows us to use them for making light sensing circuits.c
For using an LDR, we always have to make a voltage divider circuit. When the value of resistance of LDR increases in comparison to the fixed resistance, the voltage across it also increases.
What are Signals?
But before we move ahead, let’s talk a little about signals.
A signal is anything that carries some sort of information. It can be an action, a sound, or a type of movement.
Any signal can be classified as:
- Analog Signal
- Digital Signal
Analog Signal
An analog signal is a signal that represents ALL of the possible values in a given range as it varies with respect to time; it is analogous to the time-varying quantity it represents.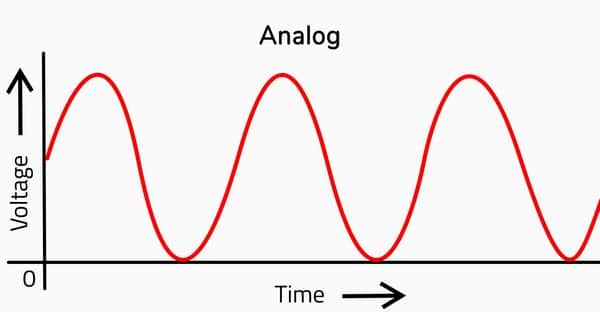
Digital Signal
On the contrary, a digital signal is a signal that represents a quantity as a series of discontinuous values.
The digital signal can represent only 2 values: ‘HIGH‘ and ‘LOW‘.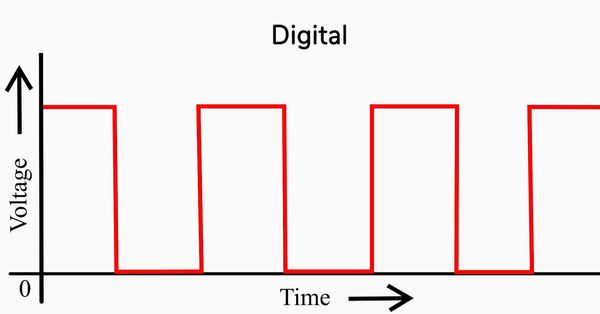
An LDR is an analogous device; its resistance changes gradually, and not in discontinuous steps,
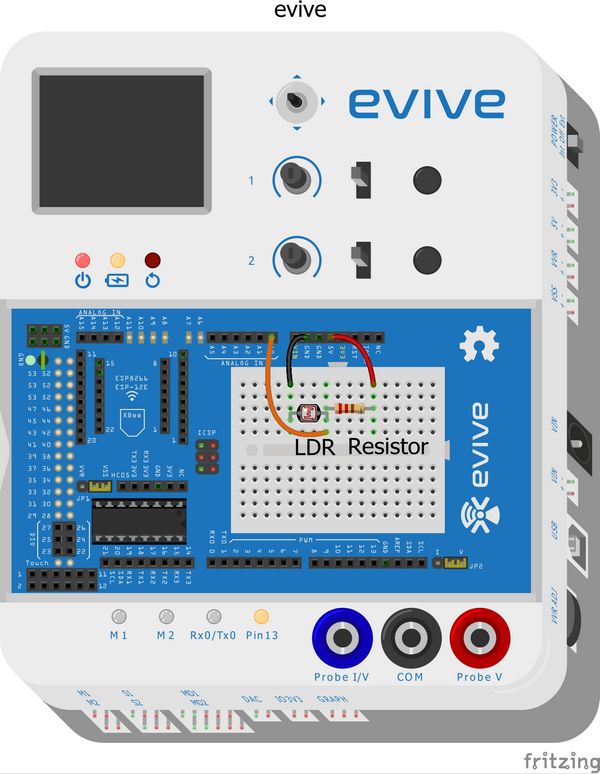
Interfacing an LDR with evive
Now that we have a little idea about how does an LDR work, let’s take a look at how to interface it with evive and see it in action.
- Connect the LDR and 4.7k ohm resistor in series.
- Connect the 5V pin to the first leg of the LDR.
- Connect the ground pin to the end of the resistor.
- Connect the common leg of LDR and resistor to the A0 pin on evive.
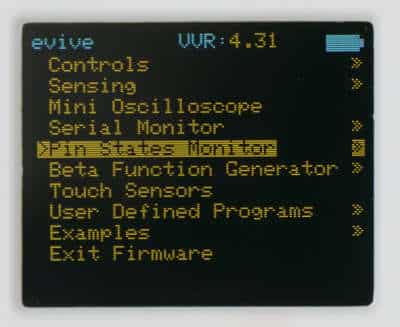
Visualizing the LDR values on evive’s screen
Now, that we have connected LDR to evive, let’s visualize the change in the resistance of the LDR on evive’s pin state monitor.
- Switch ON evive. In its menu, navigate to pin state monitor.
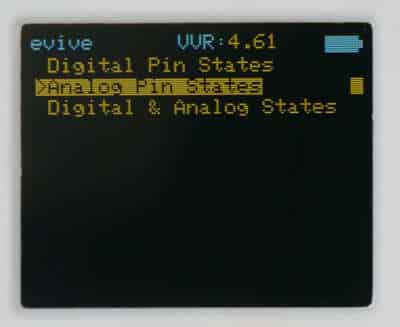
- Select analog pin states.
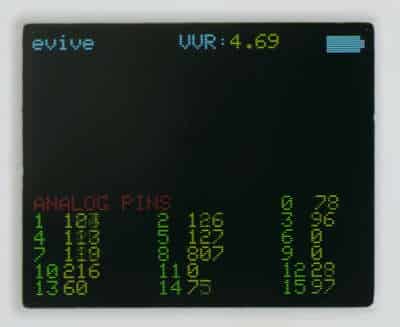
- Observe the value in front of the A0 pin. As the light decreases the value also decreases.
Working with the LDR in Real-Time
Now, we have connected our photoresistor to evive, We’re going to create a script to change the backdrop of PictoBlox’s Stage according to the amount of light incident on the LDR.
Follow the steps to write the script to make the backdrop looks like day when the incident amount of light is more and it should seem night when the light incident on the LDR is less than a certain amount or none.
- Open PictoBlox. Connect evive/your prototyping board to the computer using the USB cable.
- Click on the board button and select evive from the drop-down.
- Next, from the dialogue box that appears, select the appropriate serial port.
- Open the backdrop library and select two backdrops: we are selecting Metro and Night City with Street for day and night respectively.
- Select Tobi.
- To obtain the values from LDR, we will use a read analog sensor () at () block from the Sensor’s palette and select light/photoresistor from the drop-down. Select the pin to which it is connected from the second dropdown.

- To check whether the incident light is less or more, use an if-else block. To compare the value obtained from the photoresistor to a certain value, select less than operator block. In to the first blank space, place the read analog sensor () block and write 100 in the second space.
- If it is less than 100, the backdrop should change to Night City With Street. Thus, from the costume palette select switch backdrop to () block and select Nigth City With Street from the drop-down.

- Otherwise, we will keep Metro as our backdrop. Thus, duplicate the switch backdrop to () block and place it below the else arm. Finally, select Metro from the drop-down.

- To make the script run forever, we will use the forever block around the entire code.
- Now, place a when flag clicked hat block above the forever block. It will ensure that the script runs when the green flag is clicked.

You can download the entire code to make the LED blink in real-time here.
Controlling Pin 13 LED using an LDR
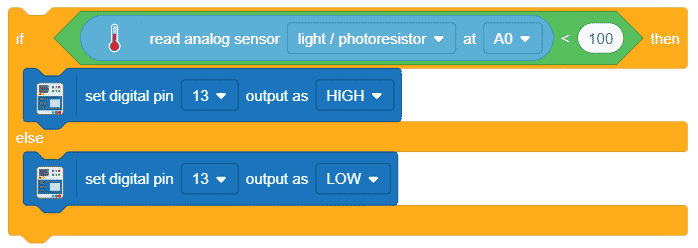
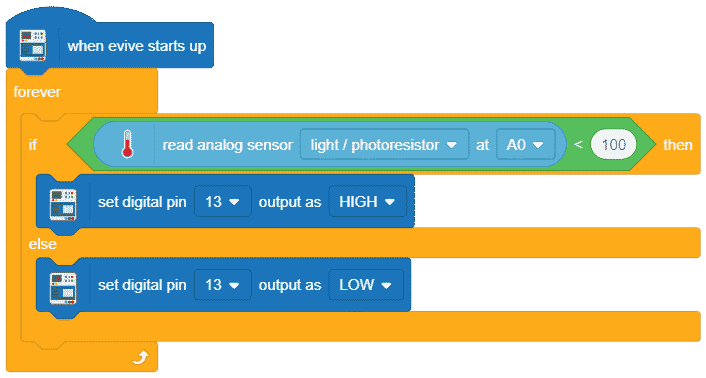
In this example, we’re going to use an LDR to turn ON the pin 13 LED on evive. If the intensity of light is more than a value predefined, the LED will turn ON; otherwise, it will remain OFF. Follow the steps below to write the script to control the LDR/photoresistor without evive being connected to the computer.
- Switch to the Upload Mode.
- If the value obtained from LDR is less than 100 then the Pin 13 LED of evive should turn ON, else it should remain OFF.
- To check whether the incident light is less or more, use an if-else block. To compare the value obtained from the photoresistor to a certain value, select less than operator block. In to the first blank space, place the read analog sensor () block and write 100 in the second space.
- To turn the pin 13 LED ON, drag-and-drop set digital pin () output as () block from the evive palette. By default, pin 13 is selected. Select HIGH from the second drop-down to turn the LED ON.

- The LED will remain OFF, if the value obtained from the photoresistor in more than 100. Thus, duplicate the set digital pin block and place it below the else arm.
- To turn the LED OFF, select LOW from the drop-down.
- Add a forever block around the script to run it forever.
- Finally, add when flag clicked hat block to execute the program.
- Upload the code to evive using Upload Code button.
You can download the PictoBlox program from here.
Conclusion
In this lesson, we learned what is LDR, how to interface it with evive and program it in PictoBlox, and finally what exciting DIY projects you can make using the LDR available in the evive Starter Kit. We also understood signals, analog and digital signals, and visualized the LDR values on evive‘s screen. We also wrote a script to change the backdrop of PictoBlox‘s Stage according to the amount of light incident on the LDR and a script to control the LDR/photoresistor without evive being connected to the computer. We have seen that an LDR is a versatile device and can be used for various applications.


