Introduction
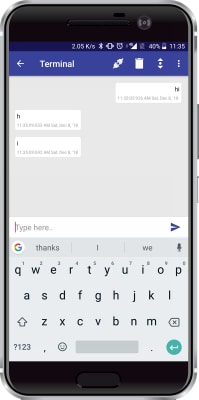
The terminal module allows you to both send data to the hardware device and receive data from the hardware device.
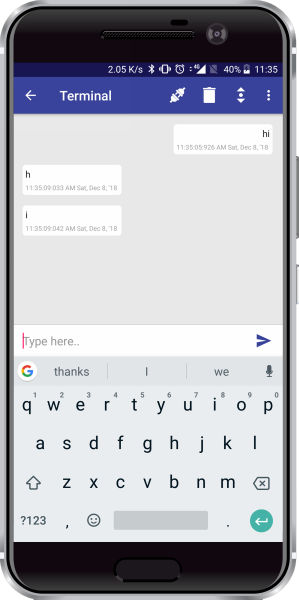
This module is similar to the serial monitor where you see the data sent and received from the device in real-time.
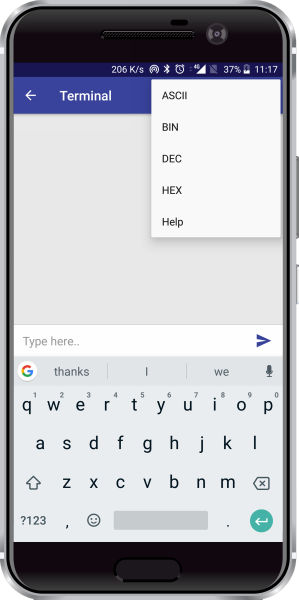
Options for Displaying Data
You can display the sent and received data on the terminal in the following formats:
- ASCII
- Binary
- Decimal
- Hexadecimal
You can toggle between the options by clicking on the tree verticle dots on the top right side of the screen and clicking on the option.
Functions for Arduino IDE
Header
To include the Terminal module in the Arduino program, you have to include the following header:
#define CUSTOM_SETTINGS
#define INCLUDE_TERMINAL_MODULE
After defining the above mention headers, you have to include the dabble library:
#include <Dabble.h>
You can download the zip of Arduino Library for
- evive, Uno, Mega, and Nano – Dabble-Arduino
- ESP32 – Dabble-ESP32
depending on the board you are using.
Enabling Bluetooth Communication
To enable Bluetooth communication, you have to initialize serial communication using the following code:
- For evive and Arduino Mega, Uno, and Nano
Dabble.begin(Baud_Rate);
Here Baud_Rate is the baud rate set for the Bluetooth module. With evive, you normally get 115200 baud rate HC-05 or HM-10 modules.
- For ESP32
Dabble.begin("Bluetooth_Name");In place of Bluetooth_Name enter the name that you want to keep for Bluetooth of ESP32. The default name given in the library is “MyEsp32”.
Refreshing the data
To refresh the data that the device has got from the mobile app, you have to use the following line of code:
Dabble.processInput();
Functions
Following are the function available for the Terminal module:
- Terminal.available(): This function tells if there is new data present in the terminal queue or not. It returns 0 if there is no data, and 1 if there is data present.
- Terminal.read(): This function returns the first byte available in the terminal queue. This function returns one character at a time.
- Terminal.readString(); This function returns the whole string of data available on the Terminal.
- Terminal.compareString(String text): This function takes a string in the argument and compares whether the string available in the Terminal is the same or not. If the string matches, it returns 1, otherwise returns 0.
- Terminal.readNumber(): This function reads the last number available in the Terminal and returns its value in int data type.
- Terminal.print(data): This function sends the argument to the mobile app.
- Terminal.println(data): This function sends the argument to the mobile app with a newline added at the end of the message.
PictoBlox (Scratch) Blocks
You can use the terminal in the following three ways.
- To compare a string of data: There is a boolean block “is data from terminal()”, using this you can compare a string received from the terminal.

- To send data to the terminal: There is a stack block “send () to terminal”, using this you can send a string of data to the terminal.

- To receive a number from the terminal: There is a reporter block “get Number from terminal”, It will always return a number. Using this, You can receive any number from the terminal.


Examples
Arduino IDE Example for Terminal Module
The example given below shows how to carry out a general communication between the Terminal module and your board.
- Upload the code and open Serial Monitor.
- Send any data from the Serial Monitor. You will be able to see it on your terminal screen. Similarly, if send any data from the terminal will be displayed on Serial Monitor.
Code for all boards is given below. Copy the code as per your board. You can also find the code by navigating to “Files>>Examples>>Dabble>>” and selecting the “Terminal” example as per your board.
evive
/*
   Terminal Module is like a chat box. It allows you to send and receive commands between your
   board and smartphone.

   You can reduce the size of library compiled by enabling only those modules that you
   want to use. For this first define CUSTOM_SETTINGS followed by defining
   INCLUDE_modulename.

   Explore more on: https://thestempedia.com/docs/dabble/terminal-module/
*/
#define CUSTOM_SETTINGS
#define INCLUDE_TERMINAL_MODULE
#include <evive.h>
#include <Dabble.h>
String Serialdata = "";
bool dataflag = 0;
void setup() {
  Serial.begin(250000);       // make sure your Serial Monitor is also set at this baud rate.
  Dabble.begin(115200);       //Enter baudrate of your bluetooth.Connect bluetooth on Bluetooth port present on evive.
}

void loop() {

  Dabble.processInput();             //this function is used to refresh data obtained from smartphone.Hence calling this function is mandatory in order to get data properly from your mobile.
  while (Serial.available() != 0)
  {
    Serialdata = String(Serialdata + char(Serial.read()));
    dataflag = 1;
  }
  if (dataflag == 1)
  {
    Terminal.print(Serialdata);
    Serialdata = "";
    dataflag = 0;
  }
  if(Terminal.available())
  {
    while (Terminal.available() != 0)
    {
      Serial.write(Terminal.read());
    }
    Serial.println();
  }
}
Mega, Uno, and Nano
/*
   Terminal Module is like a chat box. It allows you to send and receive commands between your
   board and smartphone.
   NOTE:
   1)For Arduino Mega Connect Bluetooth on Serial3 pins.
   2)For Arduino Uno/Nano library uses SoftwareSerial,hence pin 2 and pin 3 are used
   as RX and TX pins respectively on SoftwareSerial.Hence with arduino Uno
   follow below connections for bluetooth.
   UNO  - BLUETOOTH
   2    - TX
   3    - RX
   3)For Uno/Nano keep bluetooth Baudrate below 38400.

   You can reduce the size of library compiled by enabling only those modules that you want
   to use. For this first define CUSTOM_SETTINGS followed by defining INCLUDE_modulename.

   Explore more on: https://thestempedia.com/docs/dabble/terminal-module/
*/

#define CUSTOM_SETTINGS
#define INCLUDE_TERMINAL_MODULE
#include <Dabble.h>
String Serialdata = "";
bool dataflag = 0;
void setup() {
  Serial.begin(9600);       // make sure your Serial Monitor is also set at this baud rate.
  Dabble.begin(9600);  //Change this baudrate as per your bluetooth baudrate. Connect bluetooth on digital pin 2(RX) and 3(TX) for Uno/Nano and on Serial3 pins for Mega.
}

void loop() {
  Dabble.processInput();             //this function is used to refresh data obtained from smartphone.Hence calling this function is mandatory in order to get data properly from your mobile.      //this function is used to refresh data obtained from smartphone.Hence calling this function is mandatory in order to get data properly from your mobile.
  while (Serial.available() != 0)
  {
    Serialdata = String(Serialdata + char(Serial.read()));
    dataflag = 1;
  }
  if (dataflag == 1)
  {
    Terminal.print(Serialdata);
    Serialdata = "";
    dataflag = 0;
  }
  if(Terminal.available())
  {
    while (Terminal.available() != 0)
    {
      Serial.write(Terminal.read());
    }
    Serial.println();
  }
}
ESP32
/*
Terminal Module is like a chat box. It allows you to send and receive commands between your
board and smartphone.
You can reduce the size of library compiled by enabling only those modules that you
want to use. For this first define CUSTOM_SETTINGS followed by defining
INCLUDE_modulename.
Explore more on: https://thestempedia.com/docs/dabble/terminal-module/
*/
#define CUSTOM_SETTINGS
#define INCLUDE_TERMINAL_MODULE
#include <DabbleESP32.h>
String Serialdata = "";
bool dataflag = 0;
void setup() {
Serial.begin(115200); // make sure your Serial Monitor is also set at this baud rate.
Dabble.begin("MyEsp32"); //set bluetooth name of your device
}
void loop() {
Dabble.processInput(); //this function is used to refresh data obtained from smartphone.Hence calling this function is mandatory in order to get data properly from your mobile.
while (Serial.available() != 0)
{
Serialdata = String(Serialdata + char(Serial.read()));
dataflag = 1;
}
if (dataflag == 1)
{
Terminal.print(Serialdata);
Serialdata = "";
dataflag = 0;
}
if (Terminal.available() != 0)
{
while (Terminal.available() != 0)
{
Serial.write(Terminal.read());
}
Serial.println();
}
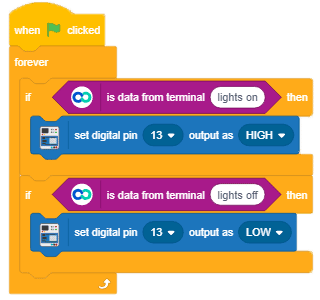
}PictoBlox Example for Terminal Module
In this example, you will learn how to switch ON or OFF pin 13 led of your board by sending the “lights on” and “lights off” commands using Dabble’s Terminal module. Below is the script in Stage mode in Pictoblox.

This script will run on evive but for Mega, Uno, and Nano add the “set Bluetooth baud rate to” block below “when flag clicked” block. The rest of the script remains the same. For now, PictoBlox does not support ESP32; however, it will be added soon.