
Introduction
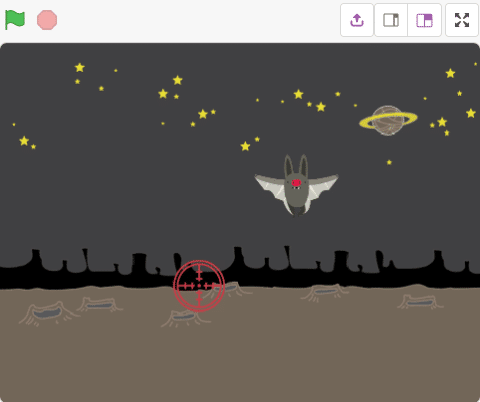
Who doesn’t love games! But nothing can beat the fun of playing games which you make all by yourself! Yes, you heard it! In this project, you’re going to make your very own game using PictoBlox. The logic is simple: you have to aim at (not so) nasty-looking bats that appear from anywhere in space. As soon as you aim at them, they will disappear. The more bats you aim at in the given time, the higher will be your score.
So, what are you waiting for? Let’s begin!
Understanding the Game
For any game to be amusing, it needs to have a character and a set-up. So will ours. Below are all the elements that will be necessary to make our game fun and interesting:
The Bat Sprite:
Just like Tobi, the coding bear (which is default), we can have many other sprites, one of which is the bat sprite. Bats will fly around the stage one at the time and we will aim at them.
The Aim Sprite:
We need something to aim at the bats with; this is where the aim sprite comes into the picture. We will move the aim sprite using a Joystick. When the aim sprite will touch a bat, it will disappear.
Score:
Your score, i.e. the number of bats you aim correctly at, will be displayed at the top left corner.
Timer:
It will show the time remaining before the bats stop coming and the game is over.
A Little About PictoBlox
PictoBlox is a graphical programming software based on Scratch 3.0 that makes learning how to code easy and fun. It allows you to interface and control evive with your computer and even upload code to it.
You can download PictoBlox from here.
PictoBlox, like Scratch, has the following basic elements:
- Sprite
- Stage
- Blocks
- Script
It also has the following extensions that contain special blocks using which you can control evive:
- evive extension: The blocks in this extension allow you to control the inbuilt functionalities of evive such as the tactile switches, slide switches, potentiometer, motors, 5-way navigation key, touch inputs and Real Time Clock.
- Dabble extension: This extension has all the blocks that enable evive to communicate with Dabble.
- Actuators extension: The blocks in this extension enable you to control the actuators such as DC motors and servos connected to evive.
- Sensors extension: This extension allows you to control sensors connected to evive.
- evive Display extension: This extension allows you to control the display on evive screen (change color, font size, and font color), draw shapes, write text, and display values on the screen.
- IoT extension: The blocks in this extension allow you to make IoT-based projects such as home automation, monitoring temperature, etc.
- Lighting extension: This extension enables you to manipulate colors of an RGB LED strip.
- Communication extension: The blocks in this extension allow serial communication.
PictoBlox has two modes in which you can work:
- Stage Mode: In this mode, you can write scripts for the sprite and board and control it in real time. If you disconnect the board, you cannot control it anymore.
- Upload Mode: This mode allows you to write scripts and upload them to your board so that you can control even when it is not connected to your PC/laptop.
In this project, we will work in stage mode.
Setting Up the Stage and the Bat Sprite
First things first, let us select the backdrop for our stage and the bat sprite. Without them, there would be no game. At the bottom-right corner of the screen, You will see a purple button with an image and a ‘+’ sign. Click on the icon which says Choose a Backdrop. A list of backdrops will appear. The backdrop we want is titled space. Click on it. The stage will change to the space background.
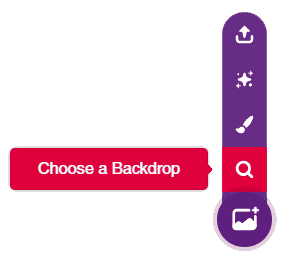
Time to choose the sprite. right below the stage, you will see another purple button. Take the cursor over it and select Choose a Sprite; then select the Bat sprite.
![]()
Now there are two sprites: the bat and Tobi, As much as we love our dear friend, we will have to let go of him. Right click on the icon for Tobi (below the stage) and click on delete option.
Now the stage is set for us to start with our game.
Creating the Bat Animation
The bat we created right now has stationary wings. Surely, an animal that flies must know how to flap its wings. Let us then create an animation so that the bat flaps its’ wings while flying. Switch to the Costumes tab. Observe that, there are four costumes; we will use the first two.
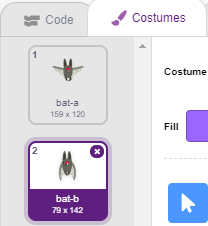
Try to quickly switch between the two costumes by clicking the first costume and then the second one in succession. You will get a glimpse of how the bat should look while flying. We will now write a script for this animation.
To make the bat look like it’s flying, we need to switch between costumes quickly. PictoBlox has a block called switch costume to which can be used for switching costumes. The code is straight forward now:

The bat switches between its costume every 0.2 seconds which gives us an impression that it is flapping its wings.
Bat Birth, Movement, and Death Script
According to our game’s logic, once we touch the bat with the aim sprite it will disappear and a new bat will spawn; we will have to then aim at that bat and so on. Here’s what we want to happen next (or what should happen with every subsequent bat):
- The new bat should spawn at a random point on the Stage.
- The bat should steadily increase in size while emerging.
- The bat should fly around randomly and we will have to aim at it by adjusting the position of the aim sprite (using a Joystick).
- Once we have given the player enough time to aim, the bat should start to disappear (provided the player still isn’t able to aim) gradually i.e. decrease in size and eventually disappear.
PictoBlox has blocks for changing sizes and random motion etc. The script for the bat is shown below:
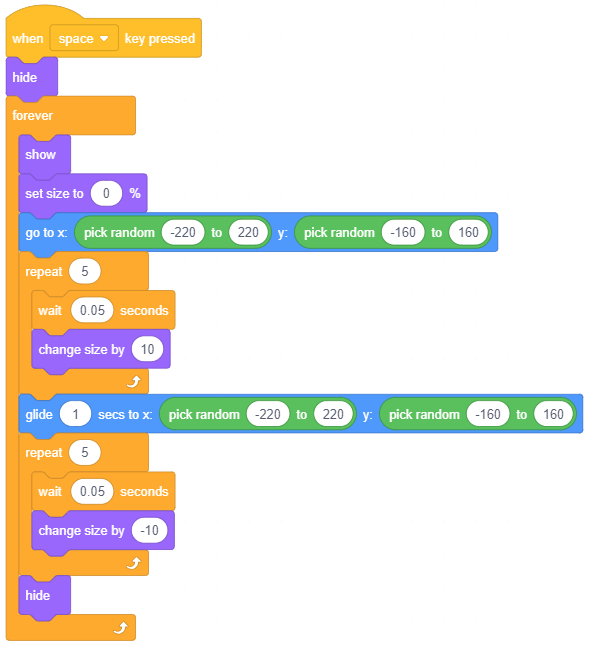
Read through the script and you’ll see it’s quite self-explanatory.
Creating the Aim Sprite and Variables
We are now done with the bat’s activities in the game. Now let us move to the next important aspect of the game: the Aim sprite. You can select it from the sprite library.
Again, the first step will be to bring the sprite into the game. Its procedure is the same as that for the bat sprite. You can adjust the size of the sprite (using blocks in the Looks palette) if it seems too big or too small to you.
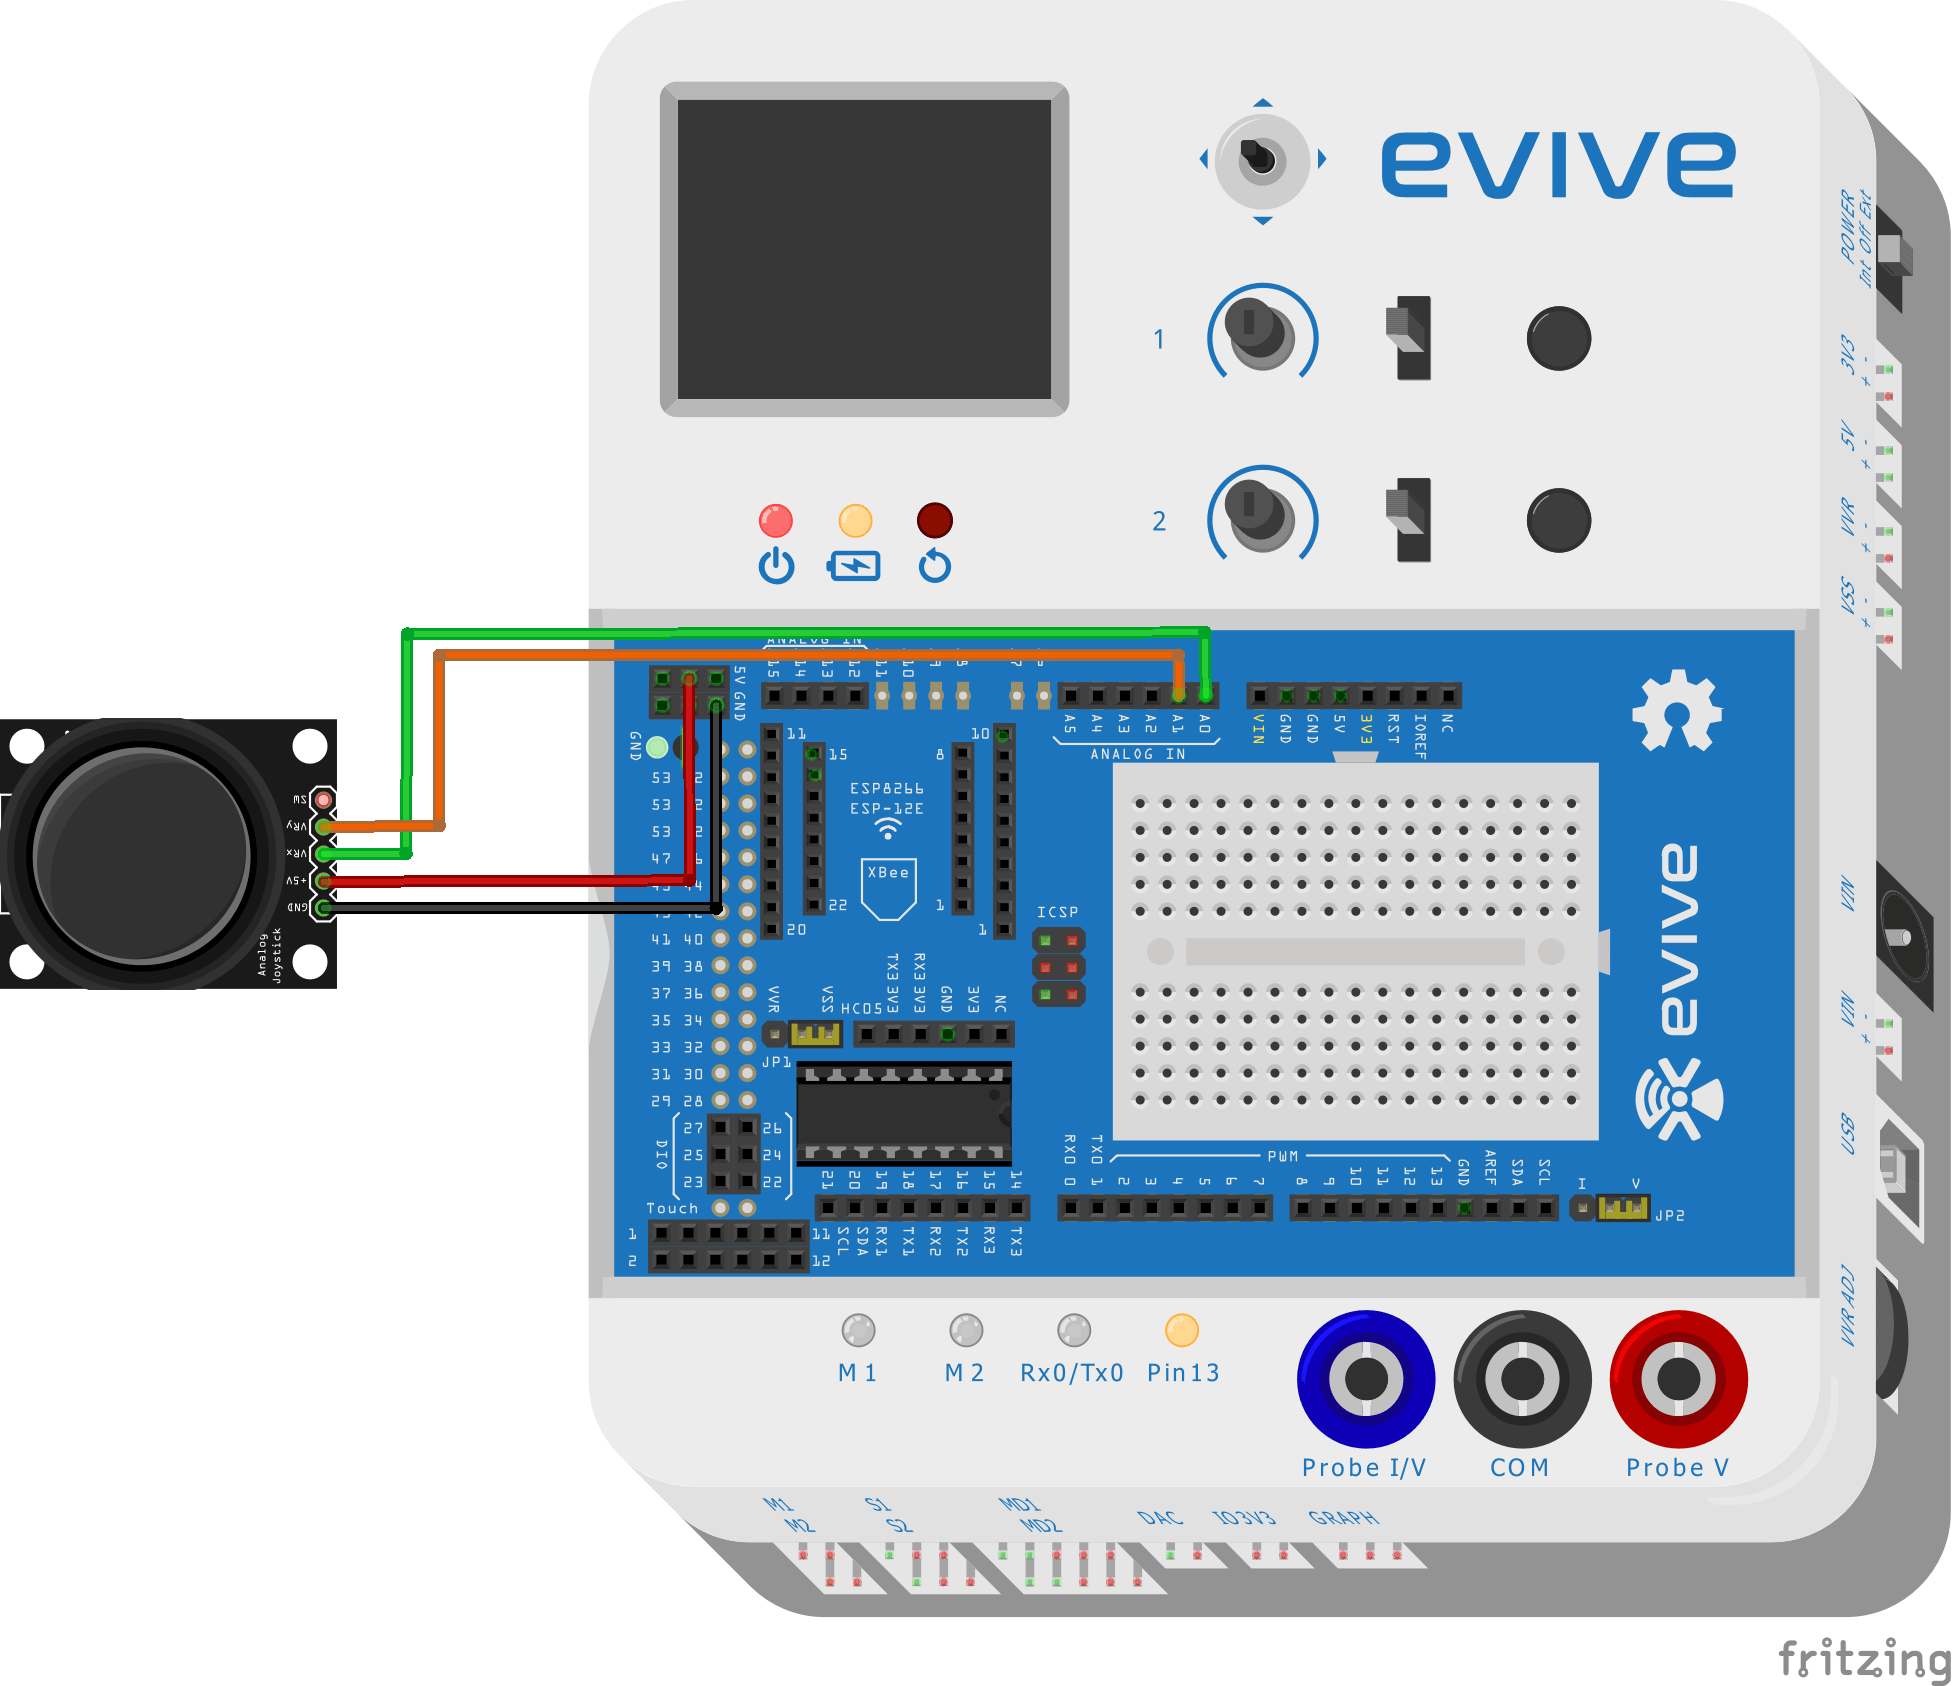
Circuit Diagram for Interfacing the Joystick with evive

A Joystick has two potentiometers (a potentiometer is a resistor which varies its’ value upon rotating a knob; recall Mr Ohm trying to stop flowing water in Mr Volta and Mr Ampere’s irrigation project) which allow the user to move it along the X and Y axes. It also has a switch which gets active when user center press on the joystick. Given below is the joystick circuit:

- Black Wire: Connected to Ground (GND)
- Red Wire: Connected to 5V (VCC)
- Blue Wire: X-axis potentiometer output (VRx)
- Green Wire: Y-axis potentiometer output (VRy)
- Orange Wire: Switch output (SW)
Script for Aim Control
We will be writing code for the aim sprite. Please make sure that it is selected.
Select the board as evive from the Menubar if you haven’t selected it yet.
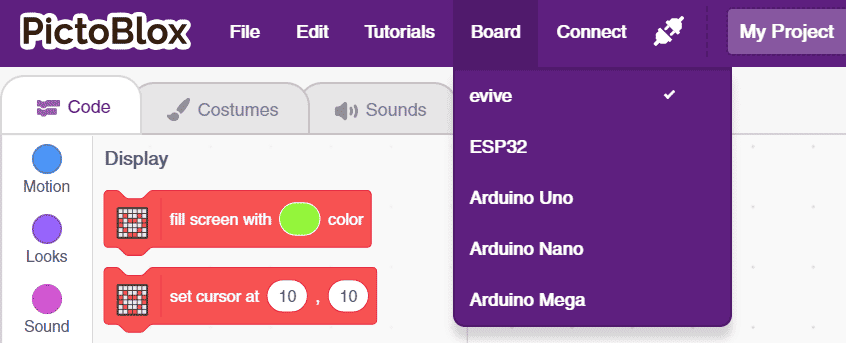
This will add the evive, evive Display, Actuators and Sensors, on the block palette.
Connect your evive and upload the firmware onto evive.

In PictoBlox, we can read analog values using the read analog pin () block available in the evive palette.
To control the movement of the aim sprite we will create two variables which keep track of its’ X-coordinate and Y-coordinate. Let’s call these variables XPosition and YPosition. To create them, go to the Variables palette and select Make a Variable. The following dialogue box will appear:
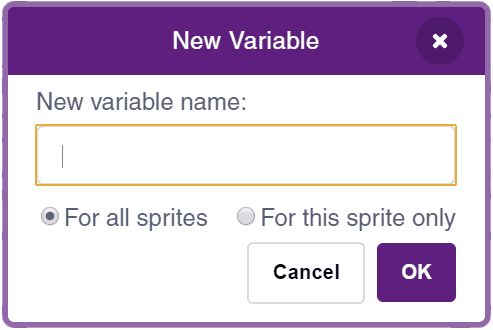
Write the name and click OK. You will observe the new blocks along with a few other in the palette. The set block, for example, can change the value of the variable. The value stored in these variables will depend on the input we give to the Joystick.
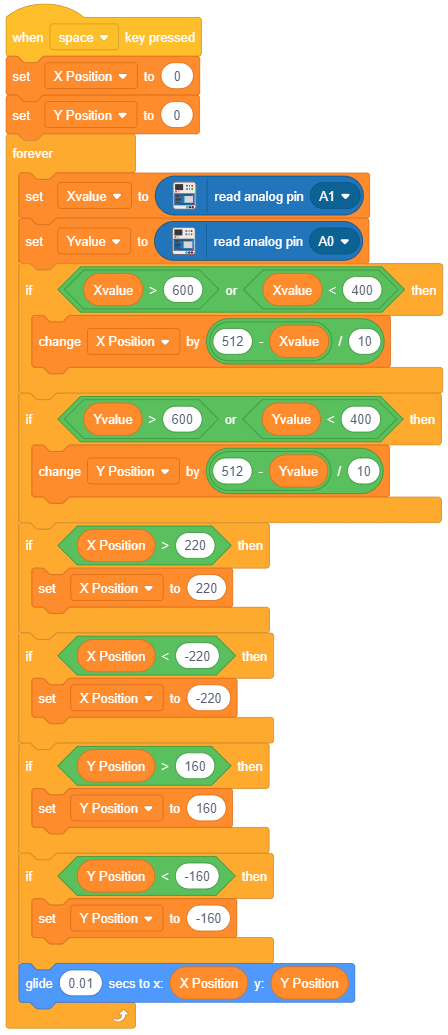
Now, variables XPosition and YPosition will be changed directly according to the values read by the analog pins A0 and A1 respectively. The mean position of the potentiometer is at center hence a reading around 512 is expected at the analog pins. (the analog pins divide complete voltage range into 2^10-1 i.e. 1023 parts, starting from 0 to 1023. A value of, say 300 will mean voltage equal to 5*300/1023 Volts, mean value will be about 1023/2 i.e. ~512 ) You can refer to the script given below. Also, the sign is not an issue as the resulting outputs will be either positive or negative and will hence cover the entire range.
Make 2 more variables, Xvalue and Yvalue to store the readings from the joystick.
Again, all the scripts we have written till now and will write in this project will run simultaneously as long as they have the same hat block.
Scoring Script
Time for a script to keep score. The logic is simple: As soon as the aim sprite touches the bat, the score will increase by one.
There is a touching block available in the Sensing palette in PictoBlox that checks if the sprite you are writing the script for touches a particular element of the Stage. Select aim from the drop-down list of the touching block. Now this block will check whether the bat touches the aim sprite or not.
Next, create a variable Score to store the score.
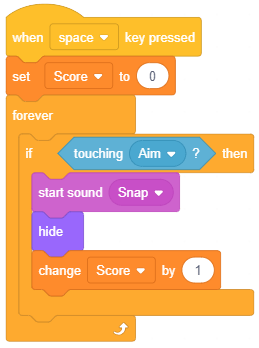
The code above will serve two purposes:
- Keep track of Score
- Recall the script for the bat we wrote. That script assumed throughout that the player wouldn’t hit the bat so it had no clause pertaining to that. That small yet instrumental detail is taken care of in here. Not only will we increase the score but we will also “hide” the bat sprite when it touches aim.
In the Variables palette, you will also see the variable list; check (tick) the small box beside Score and uncheck the boxes beside XPosition and YPosition. The values of the variables you have selected will be displayed on the top left corner of the stage.
Timer Script
Finally, the Timer script! We will give the player a limited amount of time to score as high as possible. The timer will count how many seconds are remaining on the game. Create a variable Timer and check the box in front of it (to display time remaining to the user). Every second the time remaining should decrease by 1.
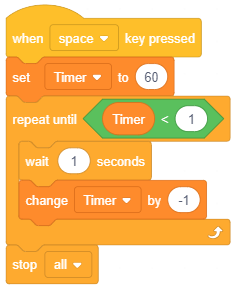
Initially, the Timer will be set to 60, i.e. we are giving the player 60 seconds. We will now decrement the time remaining by 1 every second. Therefore, we will wait for one second before decreasing it by 1. Also, we want all activity to stop once the Timer reaches zero. Hence, we will repeat this loop until the Timer reaches zero (use the repeat until block). Once that loop exits we will stop all activity using the stop block.
Let’s Play!
With this, your game is now ready!
Try adding sounds and effects to the game every time a bat is correctly aimed at. Try Displaying Game Over on a black screen when the Timer reaches zero. The possibilities and modifications are infinite and restricted only by your imagination and creativity.
Have fun!


🏅⭐ 1-47 screenshot")

 1-18 screenshot")


