Introduction
Touch sensors, as the name suggests, sense, or detect a touch, i.e. a physical contact made by something, typically a human. Unlike a button or switch, touch sensors are more sensitive, and are often able to respond differently to different kinds of touch, such as tapping, and swiping.
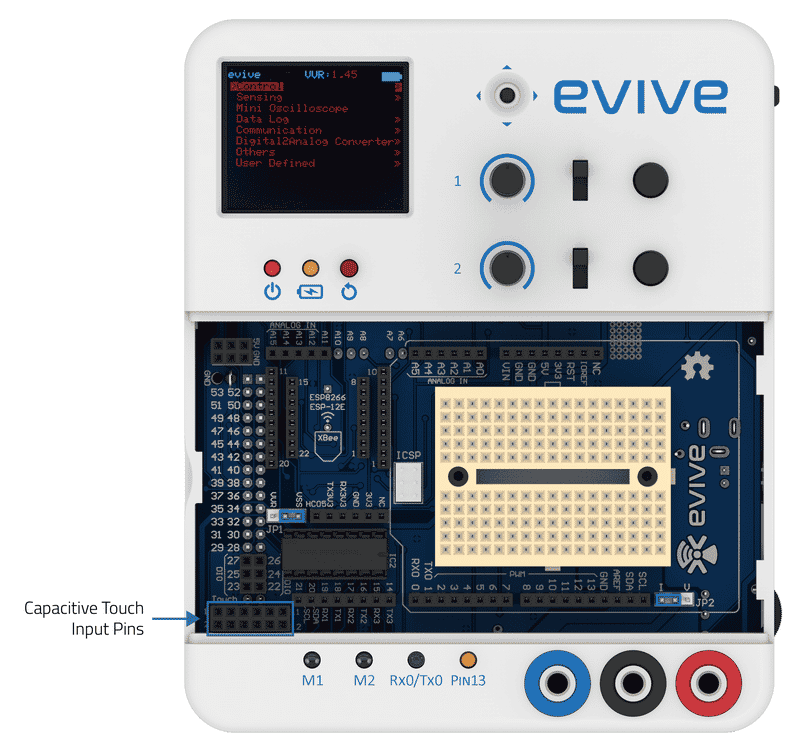
evive has 12 touch inputs, which are interfaced via the MPR121 chip using the SPI interface. The touch library is easy-to-use, and you can just plug wire from the outputs to any conducting surface, and get a touch-sensitive surface!
Working Principle
A touch sensor works in a way similar to a tactile (momentary) switch. When someone or something touches the sensor, there is contact between the touch surface and the lower surface of the sensor and the circuit is complete. As a result, current flows through the circuit. When there is no contact between the two surfaces the circuit is open and no current flows.
Capacitive touch sensors are one of the most commonly used types of touch sensors. They are widely used in portable electronic devices such as Smartphones and MP3 players. The capacitive touch sensors are designed keeping in mind the fact that human beings have a certain amount of free charge. The sensor, when not touched has a certain amount of charge that is the reference. Whenever you touch the surface of the sensor, the amount of charge at the surface goes beyond the set reference and the sensor is activated.
Programming in Arduino IDE
To use touch inputs in Arduino IDE, you have to evive Library.
Example
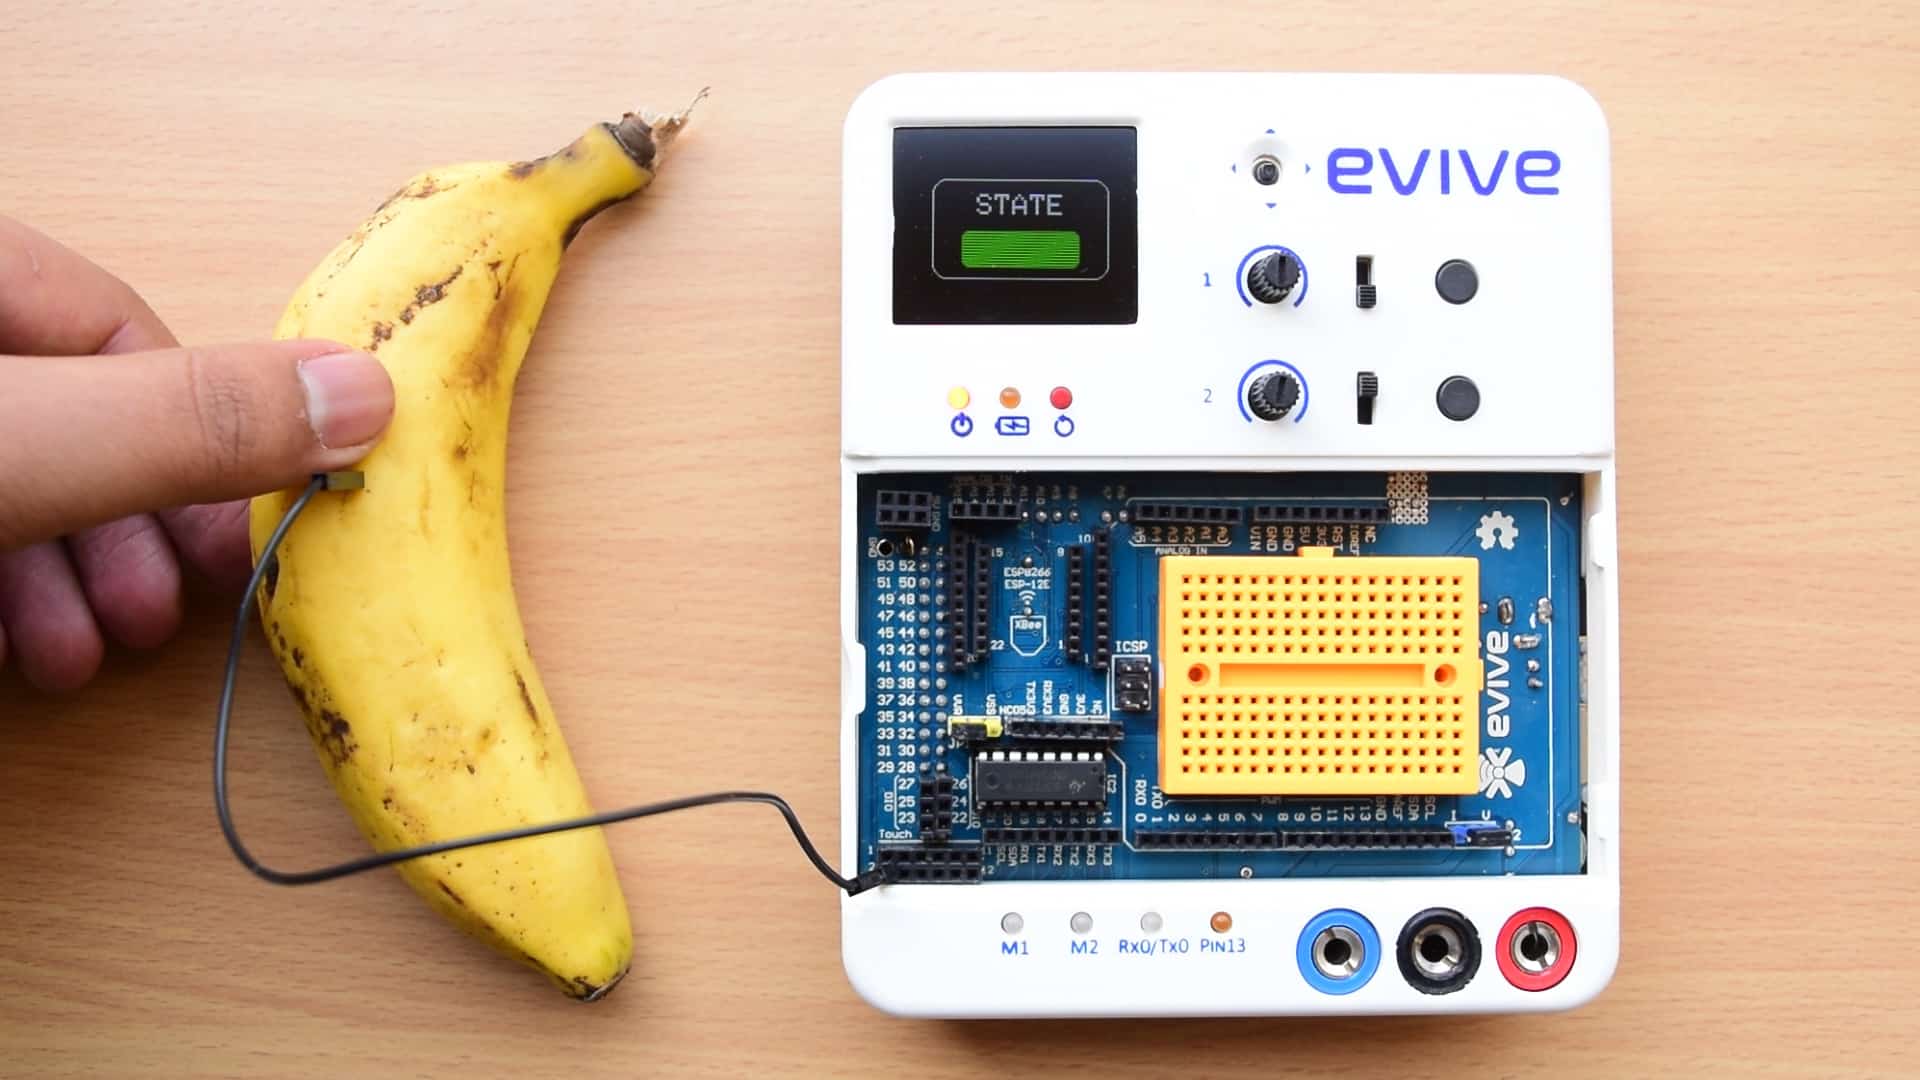
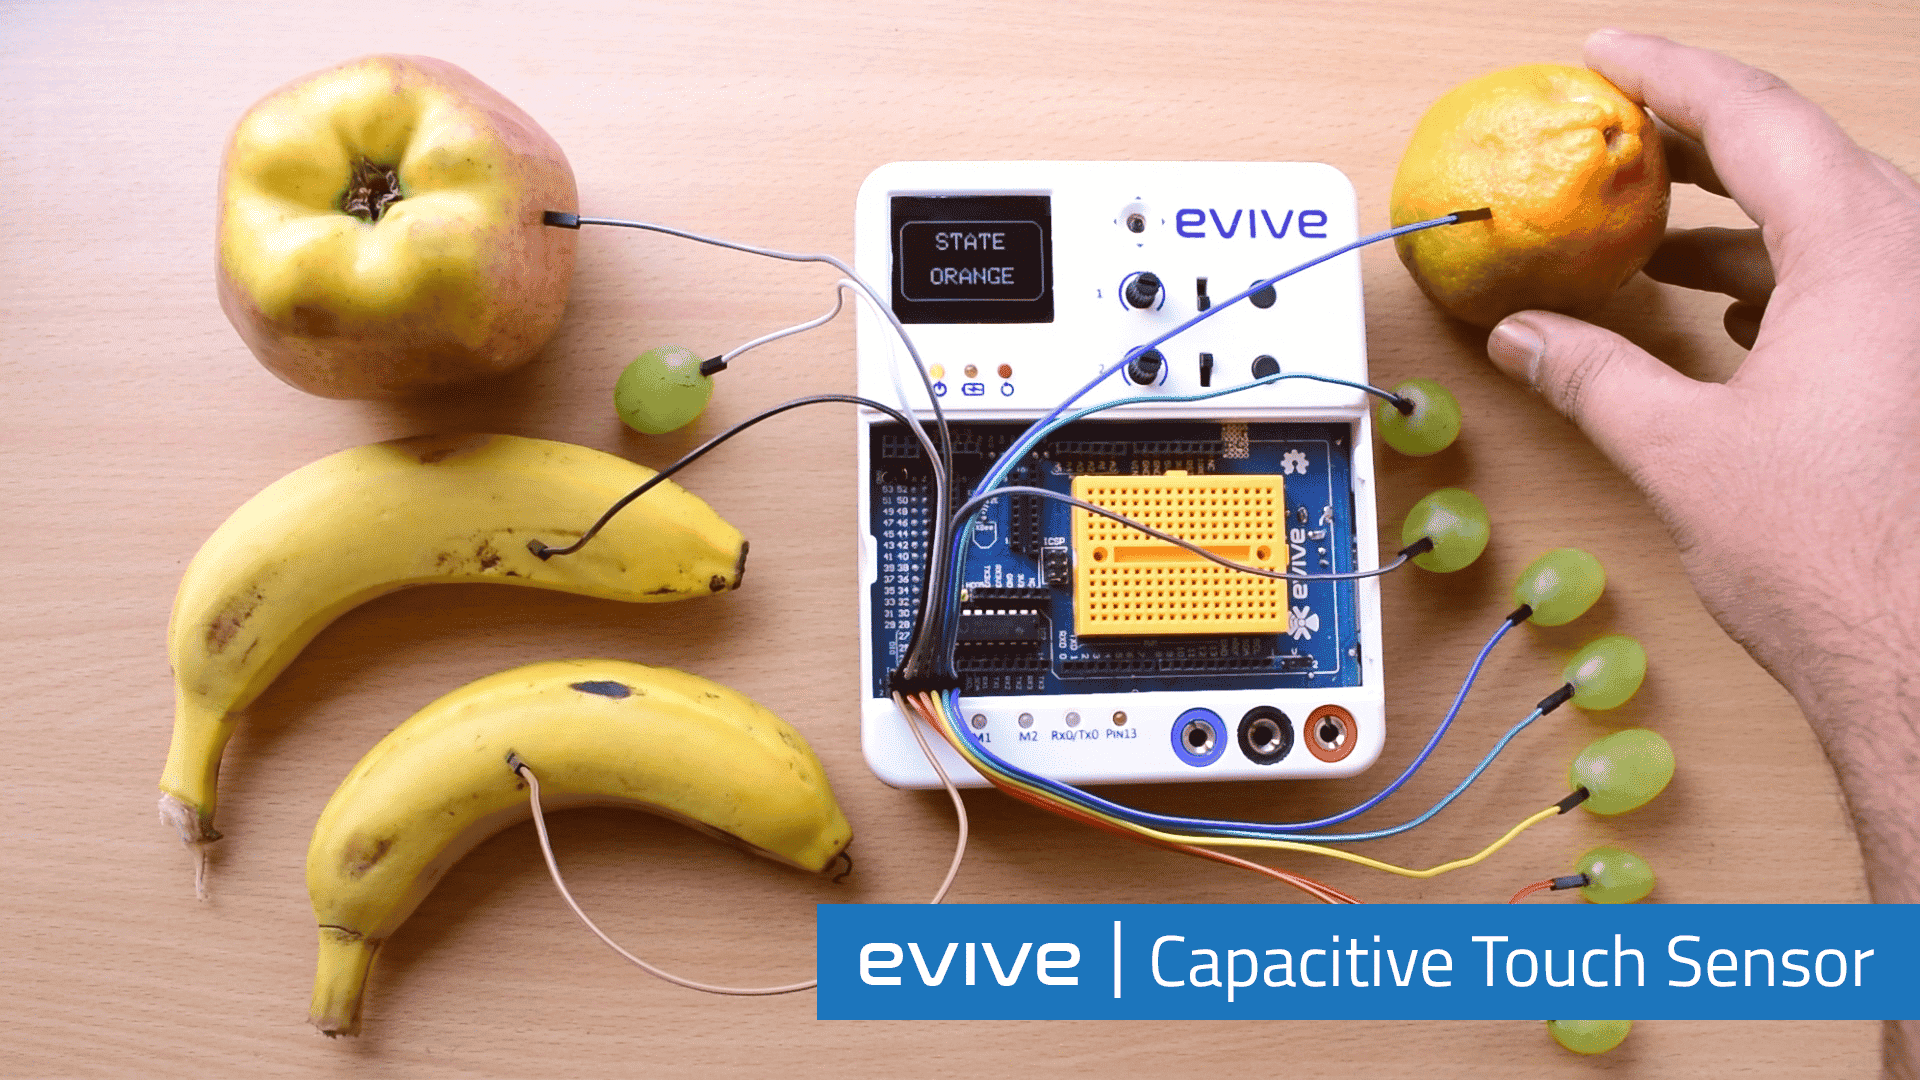
This code detects if someone has touched a banana attached to channel 1 of Touch inputs and displays the state on the TFT Screen.
/*
   evive Touch TFT Display

   This code detects if someone have touched banana attached to channel 1
   of Touch inputs and display the state on TFT Screen.

   Created by Pankaj Kumar Verma
   On 13 Mar, 2017
   Modified by Nihar Shah, Agilo Research.
   On 30 Dec, 2017
*/

#include <evive.h>
void setup() {
  // put your setup code here, to run once:
  tft_init(INITR_GREENTAB);              // initialize a ST7735S chip, black tab
  tft.fillScreen(ST7735_BLACK);
  touchPins.begin(0x5A);
}

void loop() {
  tft.drawRoundRect(20, 30, 120, 68, 10, ST7735_WHITE);
  tft.setTextColor(ST7735_WHITE);
  tft.setTextSize(2);
  tft.setCursor(50, 40);
  tft.println("STATE");
  if (touchPins.isTouched(1))
    tft.fillRoundRect(40, 65, 80, 25, 5, ST7735_GREEN);
  else
    tft.fillRoundRect(40, 65, 80, 25, 5, ST7735_RED);
}
Programming in PictoBlox
To get the state of touch pins in Scratch, you have to use channel () touched block. Channel () touched block can be found under the Robots palette in the extension evive Inbuilt tools. If the specified channel is touched, the block returns “True”, else it returns false.
![]()
Example 1
Playing Piano on the evive buzzer

Example 2: Making Tobi Move Using Touch Sensor
In this activity, we’re going to control Tobi’s appearance with the help of evive’s touch sensor. Take two male-to-male jumper wires. Connect one end of the first wire to Capacitive touch input pin 1. This pin has 1 written beside it. Connect the second wire to Capacitive touch input pin 2. It is right below Capacitive touch input pin 1.
When you touch the end of the wire connected to pin 1, Tobi will appear and start moving. When you touch the end of the other, he will disappear.

Follow the steps below to write the script:
- Connect evive to your computer and open PictoBlox; if already open and working on a project, save that project. Then, click on New.
- Go to the toolbar and click on the Board menu. Then select evive as your board.
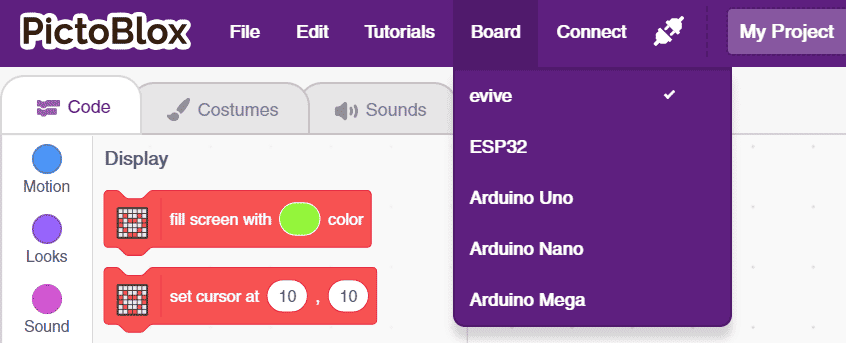
- Next, click on the Connect menu, and from the fly-out menu, select the Port to which evive is connected e.g. COMXX or ttyXX.
 Once you select the port, the icon beside the Connect tab will become connected.
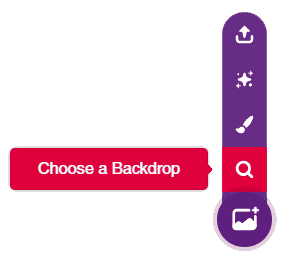
- Click on the Choose a Backdrop button. Then, select any backdrop of your choice from the backdrop library.
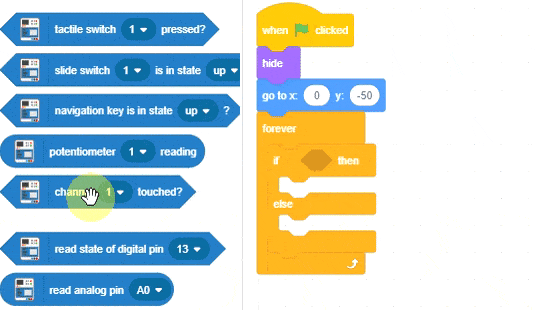
- Go to the Events palette and drag and drop the when flag clicked block.
- Next, go to the Looks palette and drag and drop the hide block.
- Go to the Motion palette and drag and drop the go to x: () y: () block below the hide block; set the x and y coordinates as 0 and –50 respectively.
- Then, go to the Control palette and drag and drop the forever block.
- Drag and drop the if-else block below the forever block.
- Go to the evive palette and drag and drop the channel () touched block inside the diamond-shaped space of the if-else block; channel 1 is set as default.
- Next, go to the Looks palette and drag and drop the show block below the if arm of the if-else block.
- Below the show block, drag and drop the switch costume to () block from the Looks palette and select Tobi walking 1 from the drop-down menu.

- Then, go to the Control palette and drag and drop the wait () seconds block below the switch costume to () block. Write 0.1 in the space.
- Go back to the Looks palette and drag and drop the next costume block below the wait () secs block.
- Repeat steps 14 and 15 two more times.
- Repeat step 14.
- Go to the Control palette and drag and drop the if the block below the else arm of the first if-else block.
- Go to the Robots palette and drag and drop the channel () touched block from the evive Inbuilt Tools extension inside the diamond-shaped space of the second if block; select 2 from the drop-down menu.
- Next, go to the Looks palette and drag and drop the hide block.
Below is the complete script: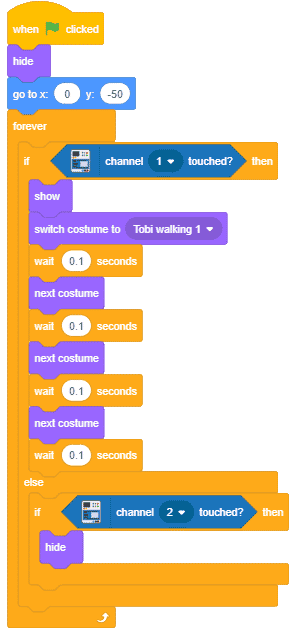
Click on the green flag on the top right corner of the stage to run the script.
Click on the red octagon, next to the green flag to stop the script.
Conclusion
In conclusion, touch sensors are a type of input device used to detect physical contact with a surface. They can be used to detect a variety of touch events, such as tapping, swiping, and more. evive has 12 touch inputs, which are interfaced via the MPR121 chip using the SPI interface. Programming touch inputs in Arduino IDE and PictoBlox is simple and easy. With this, you can make a variety of projects, such as playing the piano on evive‘s buzzer and controlling Tobi‘s appearance with the help of the touch sensor.


