Introduction
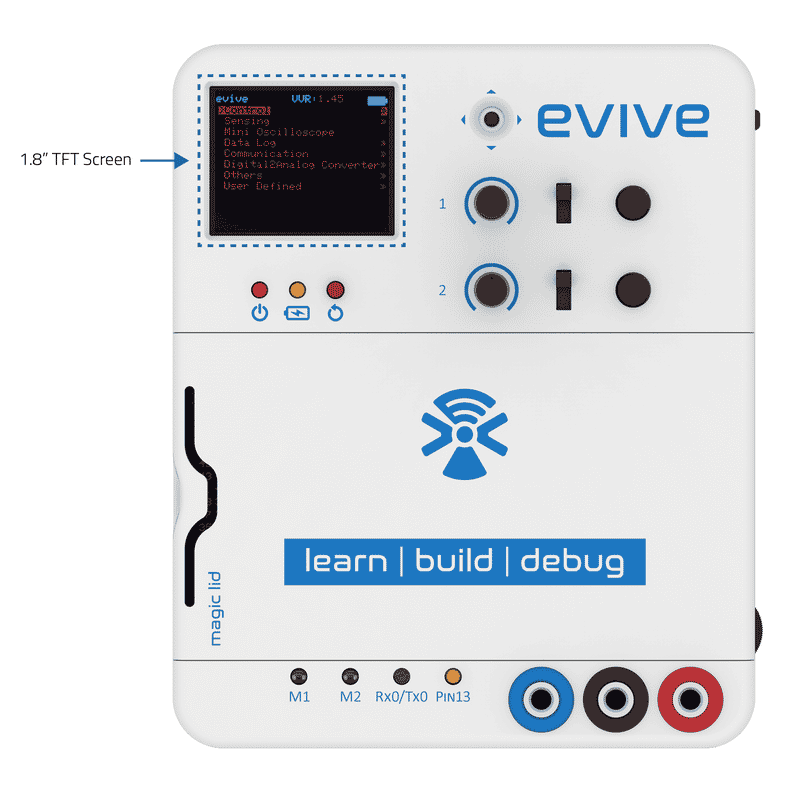
evive has a TFT display for visual feedback. Visual feedback is very useful for electronics projects and prototyping. It helps you with
- debugging your code
- displaying data
- asking for user feedback
- giving an aesthetic appearance to your project
evive has a 1.8″ TFT Display with 128 x 160 color pixel. This TFT uses ST7735R TFT driver to display 18-bit color (262,144 shades).
Controlling TFT Display in Scratch
You can do the following on evive’s TFT screen:
- write on the screen
- draw different shapes on the screen
- add colour in the shapes you draw
- change screen colour
- change text colour
- change text size
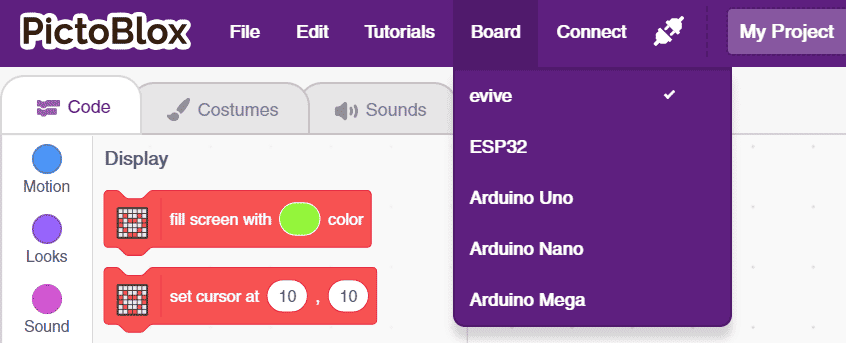
You can perform the above on the TFT screen with the help of the following blocks that are available under Display palette:
[table “” not found /]Examples Showing How to Work with TFT Display
Activity 1: Displaying Text

Follow the steps below to write the script:
- Connect evive to your computer and open PictoBlox; if already open and working on a project, save that project. Then, click on New.
- Go to the toolbar and click on the Board menu. Then select evive as your board.
- Next, click on the Connect menu and from the fly-out menu, select the Port to which evive is connected e.g. COMXX or ttyXX.
 Once you select the port, the icon beside the Connect tab will become connected.
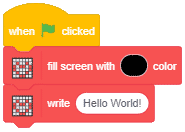
- Go to the Events palette and drag and drop the when flag clicked block.
- Go to the Display palette and drag and drop the fill screen with () color block below the when flag clicked block. You can change the background color if you want to by clicking on the color and moving the sliders in the drop-down menu.
- Then, go to the Display palette and drag and drop the write () block below the fill screen with () color block. Note that if you don’t write any text, then the default text, i.e. ‘Hello World’ will be displayed on the screen.
Below is the complete script with the text to be displayed as the default text:
Click on the green flag to run the script.
Click on the red octagon, next to the green flag to stop the script.
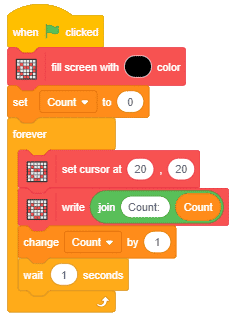
Activity 2: Displaying Count
Follow the steps below to write the script:
- Go to the Events palette and drag and drop the when flag clicked block.
- Go to the Display palette and drag and drop the fill screen with () color block below the when flag clicked block. You can change the background color if you want to by clicking on the color and moving the sliders in the drop-down menu.
- Go to the Variables palette and create a variable Count. Then, drag and drop the set () to () block below the fill screen with () color block.
- Then, go to the Control palette and drag and drop the forever block below the set () to () block.
- Drag and drop the Set cursor at ()() block inside the forever block, and set the cursor at 20,20.
- Then, drag and drop the write () block. Inside the space of this block, drag and drop the join ()() block from the Operators palette. In the first space of this block write ‘Count: ‘, and in the second space drag and drop the Count variable block.
- Go to the Data&Block palette and drag and drop the change () by () block below the write () block.
- Then, go to the Control palette and drag and drop the wait () secs block below the change () by () block.
Below is the complete script:
Click on the green flag to run the script.
Click on the red octagon, next to the green flag to stop the script.
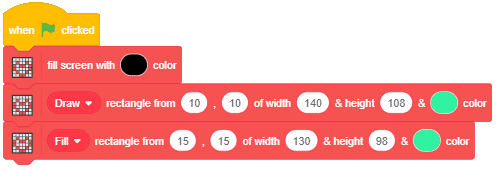
Activity 3: Drawing Shapes
Follow the steps below to write the script:
- Go to the Events palette and drag and drop the when flag clicked block.
- Go to the Display palette and drag and drop the fill screen with () color block below the when flag clicked block. You can change the background color if you want to by clicking on the color and moving the sliders in the drop-down menu.
- Then, drag and drop the () rectangle from ()() width () height () color () block below the fill screen with () color block and select Draw from its drop-down menu.
- Next, drag and drop the same block again and let the function remain as Fill. Set the coordinate as 15,15, the width as 130, and the height as 98. Select any color of your choice from the drop-down menu.
Below is the complete script:
Click on the green flag to run the script.
Click on the red octagon, next to the green flag to stop the script.
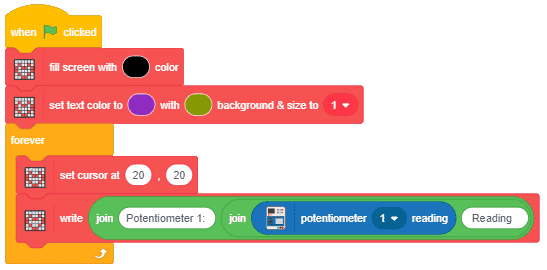
Activity 4: Displaying Potentiometer’s Reading
Follow the steps below to write the script:
- Go to the Events palette and drag and drop the when flag clicked block.
- Go to the Display palette and drag and drop the fill screen with () color block. Then, select any color of your choice from the drop-down menu.
- Drag and drop the set text colour () with background () & size to () block below the fill screen with () color block.
- Then, go to the Control palette and drag and drop the forever block.
- Go to the Display palette and drag and drop the set cursor at () block inside the forever block; set the cursor at 20 , 20.
- Now, drag and drop the write () block below the Set cursor at () block. Inside the space of the write () block drag and drop the join () () block from the Operators palette. Next, write Potentiometer Reading: in the first space of the join () () block. In its second space, drag and drop another join () () block. Inside the first space of the second join () () block, drag and drop the potentiometer () reading block and select 1; in the second space write ‘ Reading ‘ with three spaces.
Below is the complete script:
Click on the green flag to run the script.
Click on the red octagon, next to the green flag to stop the script.
Conclusion
In this lesson, we learned how to control the evive TFT Screen using PictoBlox. We saw how to display text, shapes, and the potentiometer’s reading on the screen. We also learned how to change the screen color, text color, and text size. With all this knowledge, you can now control the evive TFT Screen to create amazing projects and prototypes.


