Introduction
The Gamepad Controller Module is one of the input modules, using which user can give commands to the board using buttons and analog joystick present in different layouts:
- Digital Mode
- Joystick Mode
- Accelerometer Mode
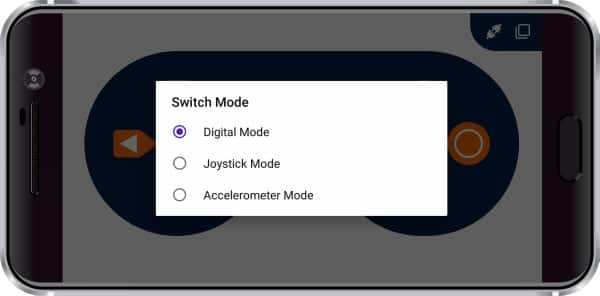
You can toggle between the different modes using setting option present on the top right corner of the module.
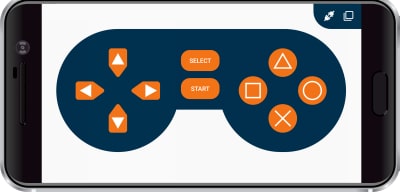
Digital Mode
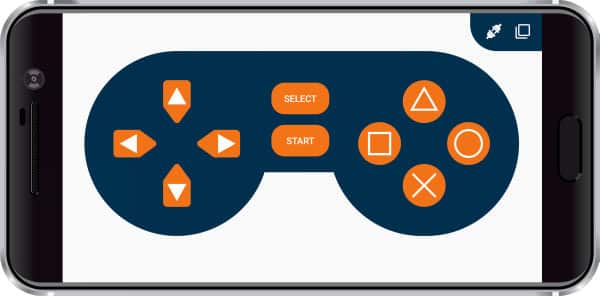
The digital mode is the default mode when the module opens. It has 10 digital buttons whose data is sent to the device when they are pressed or released.
- Up
- Down
- Left
- Right
- Triangle
- Cross
- Square
- Circle
- Select
- Start
Only the digital state of each button is sent to the device, whether it is pressed or not.
Joystick Mode
The joystick mode has both buttons and joystick in the layout.
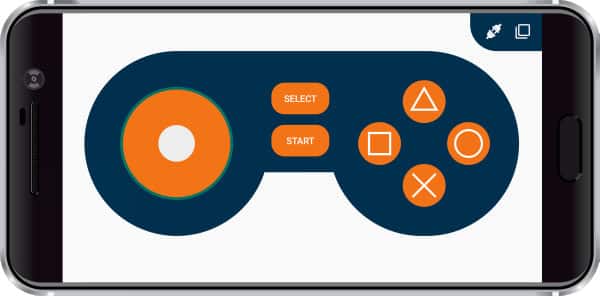
The joystick is present on the left side of the layout. It sends 4 data to the device:
- X value: The value of the x position (on the horizontal axis) of the white dot in the joystick. It is an integer value and varies from -7 to 7. At the center, the value is 0.
- Y value: The value of the y position (on the verticle axis) of the white dot in the joystick. It is an integer value and varies from -7 to 7. At the center, the value is 0.
- Radial value: The distance from the center of the joystick. This value varies from 0 to 7. At the center, the value is 0 and on the perimeter of the joystick, the value is 7.
- Angle: The angle is the angle between the positive x-axis and the line joining the center and the current position of the dot. It varies from 0 to 360 at a step of 15 degrees.
The buttons work the same as the digital mode. Only 6 digital buttons are present in the joystick Mode:
- Triangle
- Cross
- Square
- Circle
- Select
- Start
Accelerometer Mode
The accelerometer mode is pretty the same as the analog mode, the only difference is that the joystick present in this mode is controlled with the accelerometer sensor present in the phone.
The values given to the hardware device are the same as the joystick: 4 analog values and 6 digital values.
Arduino IDE Functions
Header
To include the GamePad module in the Arduino program, you have to include the following header:
#define CUSTOM_SETTINGS
#define INCLUDE_GAMEPAD_MODULE
After defining the above mention headers, you have to include the dabble library:
#include <Dabble.h>
You can download the zip of Arduino Library for
- evive, Uno, Mega, and Nano – Dabble-Arduino
- ESP32 – Dabble-ESP32
depending on the board you are using.
Enabling Bluetooth Communication
To enable Bluetooth communication, you have to initialize serial communication using the following code:
- For evive and Arduino Mega, Uno and Nano
Dabble.begin(Baud_Rate);
Here Baud_Rate is the baud rate set for the Bluetooth module. With evive, you normally get 115200 baud rate modules.
- For ESP32
Dabble.begin("Bluetooth_Name");In place of Bluetooth_Name enter the name that you want to keep for Bluetooth of ESP32. The default name given in the library is “MyEsp32”.
Refreshing the data
To refresh the data that the device has got from the mobile app, you have to use the following line of code:
Dabble.processInput();
Gamepad Functions
Following are the function available for the GamePad module:
[table “” not found /]
PictoBlox Blocks
Digital Mode
To use GamePad in digital mode, you will need a boolean block is () pressed on gamepad? block.
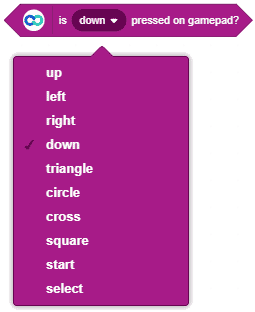
You just have to choose a button from the dropdown i.e Up, Down, Left, Right, Triangle, Circle, Cross, Square, Start or Select.


Joystick & Accelerometer Mode
To use GamePad as a regular Joystick, you have to use a reporter block “get () from Gamepad”.
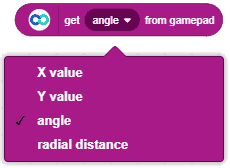
In its drop-down, you will find 4 things i.e. X Value, Y Value, Angle, and Radial Distance. Using these 4 values, you can develop a logic to control the left side of the Gamepad, and the rest 6 digital controls will work similarly to digital mode.

Example
Arduino IDE
In order to explain how to use the functions available for this module the data returned from this function is printed on Serial Monitor. Follow the steps given below:
- Copy code from below as per your board in Arduino IDE.
- Upload code
- Connect with Dabble via Bluetooth and open Gamepad.
evive
/*
   Gamepad module provides three different mode namely Digital, JoyStick and Accerleometer.

   You can reduce the size of library compiled by enabling only those modules that you want to
   use. For this first define CUSTOM_SETTINGS followed by defining INCLUDE_modulename.

   Explore more on: https://thestempedia.com/docs/dabble/game-pad-module/
*/
#define CUSTOM_SETTINGS
#define INCLUDE_GAMEPAD_MODULE
#include <evive.h>
#include <Dabble.h>
void setup() {
  // put your setup code here, to run once:
  Serial.begin(250000);      // make sure your Serial Monitor is also set at this baud rate.
  Dabble.begin(115200);      //Enter baudrate of your bluetooth.Connect bluetooth on Bluetooth port present on evive.
}

void loop() {
  Dabble.processInput();             //this function is used to refresh data obtained from smartphone.Hence calling this function is mandatory in order to get data properly from your mobile.
  Serial.print("KeyPressed: ");
  if (GamePad.isUpPressed())
  {
    Serial.print("UP");
  }

  if (GamePad.isDownPressed())
  {
    Serial.print("DOWN");
  }

  if (GamePad.isLeftPressed())
  {
    Serial.print("Left");
  }

  if (GamePad.isRightPressed())
  {
    Serial.print("Right");
  }

  if (GamePad.isSquarePressed())
  {
    Serial.print("Square");
  }

  if (GamePad.isCirclePressed())
  {
    Serial.print("Circle");
  }

  if (GamePad.isCrossPressed())
  {
    Serial.print("Cross");
  }

  if (GamePad.isTrianglePressed())
  {
    Serial.print("Triangle");
  }

  if (GamePad.isStartPressed())
  {
    Serial.print("Start");
  }

  if (GamePad.isSelectPressed())
  {
    Serial.print("Select");
  }
  Serial.print('\t');

  int a = GamePad.getAngle();
  Serial.print("Angle: ");
  Serial.print(a);
  Serial.print('\t');
  int b = GamePad.getRadius();
  Serial.print("Radius: ");
  Serial.print(b);
  Serial.print('\t');
  float c = GamePad.getXaxisData();
  Serial.print("x_axis: ");
  Serial.print(c);
  Serial.print('\t');
  float d = GamePad.getYaxisData();
  Serial.print("y_axis: ");
  Serial.println(d);
  Serial.println();
}
Mega, Uno, and Nano
/*
   Gamepad module provides three different mode namely Digital, JoyStick and Accerleometer.

   You can reduce the size of library compiled by enabling only those modules that you want to
   use. For this first define CUSTOM_SETTINGS followed by defining INCLUDE_modulename.

   Explore more on: https://thestempedia.com/docs/dabble/game-pad-module/
*/
#define CUSTOM_SETTINGS
#define INCLUDE_GAMEPAD_MODULE
#include <Dabble.h>
void setup() {
  // put your setup code here, to run once:
  Serial.begin(250000);      // make sure your Serial Monitor is also set at this baud rate.
  Dabble.begin(9600);      //Enter baudrate of your bluetooth.Connect bluetooth on Bluetooth port present on evive.
}

void loop() {
  Dabble.processInput();             //this function is used to refresh data obtained from smartphone.Hence calling this function is mandatory in order to get data properly from your mobile.
  Serial.print("KeyPressed: ");
  if (GamePad.isUpPressed())
  {
    Serial.print("UP");
  }

  if (GamePad.isDownPressed())
  {
    Serial.print("DOWN");
  }

  if (GamePad.isLeftPressed())
  {
    Serial.print("Left");
  }

  if (GamePad.isRightPressed())
  {
    Serial.print("Right");
  }

  if (GamePad.isSquarePressed())
  {
    Serial.print("Square");
  }

  if (GamePad.isCirclePressed())
  {
    Serial.print("Circle");
  }

  if (GamePad.isCrossPressed())
  {
    Serial.print("Cross");
  }

  if (GamePad.isTrianglePressed())
  {
    Serial.print("Triangle");
  }

  if (GamePad.isStartPressed())
  {
    Serial.print("Start");
  }

  if (GamePad.isSelectPressed())
  {
    Serial.print("Select");
  }
  Serial.print('\t');

  int a = GamePad.getAngle();
  Serial.print("Angle: ");
  Serial.print(a);
  Serial.print('\t');
  int b = GamePad.getRadius();
  Serial.print("Radius: ");
  Serial.print(b);
  Serial.print('\t');
  float c = GamePad.getXaxisData();
  Serial.print("x_axis: ");
  Serial.print(c);
  Serial.print('\t');
  float d = GamePad.getYaxisData();
  Serial.print("y_axis: ");
  Serial.println(d);
  Serial.println();
}
ESP32
/*
   Gamepad module provides three different mode namely Digital, JoyStick and Accerleometer.

   You can reduce the size of library compiled by enabling only those modules that you want to
   use. For this first define CUSTOM_SETTINGS followed by defining INCLUDE_modulename.

   Explore more on: https://thestempedia.com/docs/dabble/game-pad-module/
*/
#define CUSTOM_SETTINGS
#define INCLUDE_GAMEPAD_MODULE
#include <DabbleESP32.h>
void setup() {
  // put your setup code here, to run once:
  Serial.begin(115200);      // make sure your Serial Monitor is also set at this baud rate.
  Dabble.begin("MyEsp32");       //set bluetooth name of your device
}

void loop() {
  Dabble.processInput();             //this function is used to refresh data obtained from smartphone.Hence calling this function is mandatory in order to get data properly from your mobile.
  Serial.print("KeyPressed: ");
  if (GamePad.isUpPressed())
  {
    Serial.print("Up");
  }

  if (GamePad.isDownPressed())
  {
    Serial.print("Down");
  }

  if (GamePad.isLeftPressed())
  {
    Serial.print("Left");
  }

  if (GamePad.isRightPressed())
  {
    Serial.print("Right");
  }

  if (GamePad.isSquarePressed())
  {
    Serial.print("Square");
  }

  if (GamePad.isCirclePressed())
  {
    Serial.print("Circle");
  }

  if (GamePad.isCrossPressed())
  {
    Serial.print("Cross");
  }

  if (GamePad.isTrianglePressed())
  {
    Serial.print("Triangle");
  }

  if (GamePad.isStartPressed())
  {
    Serial.print("Start");
  }

  if (GamePad.isSelectPressed())
  {
    Serial.print("Select");
  }
  Serial.print('\t');

  int a = GamePad.getAngle();
  Serial.print("Angle: ");
  Serial.print(a);
  Serial.print('\t');
  int b = GamePad.getRadius();
  Serial.print("Radius: ");
  Serial.print(b);
  Serial.print('\t');
  float c = GamePad.getXaxisData();
  Serial.print("x_axis: ");
  Serial.print(c);
  Serial.print('\t');
  float d = GamePad.getYaxisData();
  Serial.print("y_axis: ");
  Serial.println(d);
  Serial.println();
}
PictoBlox
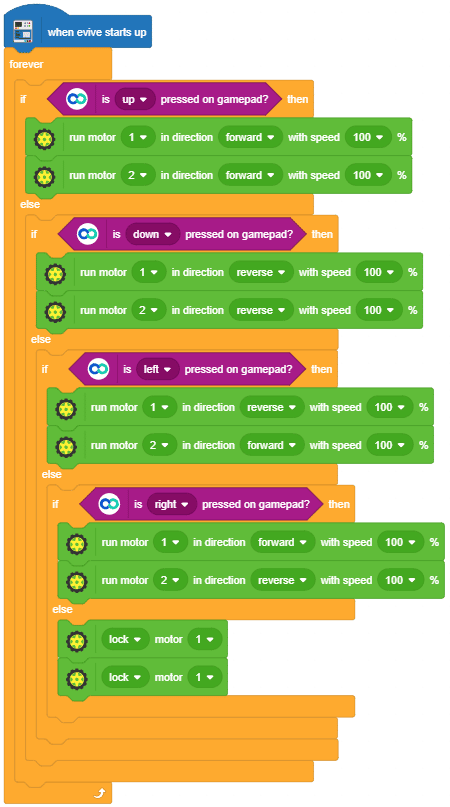
Digital Mode
In this example, we are controlling a robot using the digital mode. The robot is the same as we build the one in this project: https://thestempedia.com/project/smartphone-controlled-mobile-robot.
Given below is the full script of the same:
You can download the PictoBlox program from here:
- evive: Smartphone Controlled Robot with Dabble
- Arduino Uno: Smartphone Controlled Robot with Dabble for Arduino Uno
In this example, we are displaying all the parameters on the evive Display.
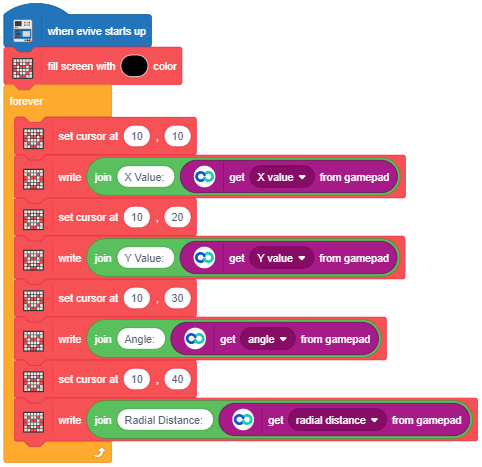
You can download the Scratch Program from here: Gamepad Module Analog value Display evive


