
Introduction
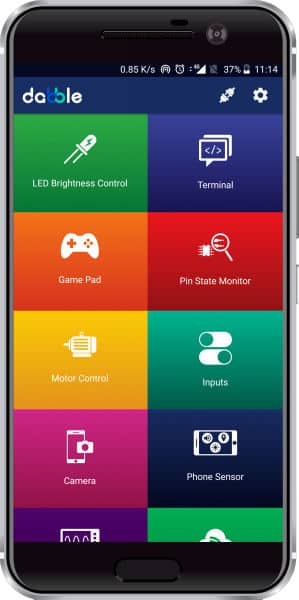
Dabble App transforms your Smartphone into a virtual I/O device and lets you control hardware using Bluetooth, communicate with it, and access sensors like accelerometer, GPS, proximity, and other features of your Smartphone.
You can use Dabble as a Bluetooth Controller App for Arduino Uno-Mega-Nano, ESP32, and evive for making various DIY projects or IoT applications.
You can write the program in Arduino IDE or PictoBlox (graphical programming based on Scratch 3.0). Examples of codes are also provided in the Arduino library of Dabble.
This getting started guide will help you to understand the required hardware/modules, wiring diagram, connecting the board/Bluetooth module with mobile, and how to use Dabble library/extension.
| Sr.No | Module Name | Module Description |
|---|---|---|
| 1 | LED Brightness Control | Control brightness of LEDs. |
| 2 | Terminal | Send and receive commands over Bluetooth. |
| 3 | GamePad | Control devices in analog (Joystick), digital, and accelerometer mode. |
| 4 | Pin State Monitor | Remotely monitor the live status of devices and debug them. |
| 5 | Motor Control | Control actuators such as the DC motor and servo motor. |
| 6 | Inputs | Provide analog and digital inputs via buttons, knobs, and switches. |
| 7 | Camera | Use the camera of your Smartphone for taking photos and videos, face recognition and color picking. |
| 8 | Phone Sensor | Access different sensors of your Smartphone such as the accelerometer, gyroscope, proximity sensor, magnetometer, light meter, sound meter, GPS, temperature sensor, and barometer to make projects and conduct experiments. |
| 9 | Oscilloscope | Visualize and analyze the input and output signals given to the device using the oscilloscope module. |
| 10 | IoT | Make the Internet of Things possible. |
| 11 | Music | Receive commands from the device and play tones, songs, or other recorded files on your Smartphone. |
Supported Development Boards
Dabble is compatible with the following prototyping boards:
- evive
- Arduino boards like Mega, Uno, and Nano
- Esp32 (ESP-WROOM-32, ESP32 development board, etc.)
Supported Bluetooth Modules
HC-05, HC-06, HM-10, and AT-09 are the supported Bluetooth modules with evive and other Arduino boards. Hence hardware libraries and scratch extensions are developed as per the behavior of these modules. Brief descriptions of these modules are given in the table below:
| Bluetooth Module | It's working |
|---|---|
| HC-05 | It is a Serial Port Protocol Bluetooth working on Bluetooth protocol "Bluetooth V2.0+EDR". |
| HC-06 | This is also a Serial Bluetooth module with Bluetooth protocol "Bluetooth V2.0+EDR". It differs from HC-05 in terms of a few hardware configurations and a fact that it can only be used as a slave. |
| HM-10 | It follows Bluetooth protocol BLE 4.0. Due to the low energy protocol data transfer rate on HM-10 is slower compared to HC-05 and HC-06. |
| ESP32 | It is a low-power system on a chip microcontroller with dual-mode Bluetooth and integrated Wi-Fi. ESP32-WROOM-32, ESP32-WROVER, ESP32-DevKitC or any development board based on Espressif ESP32 will work with Dabble. |

Hardware Setup
The first and foremost thing is connecting the Bluetooth module to the development board.
A circuit diagram for connecting the Bluetooth module with different boards is given below. Choose the board with which you want to set up your Dabble app.
Diagrams mainly show setup with HC-05 however same pin connection setup goes for HM-10 and HC-06.
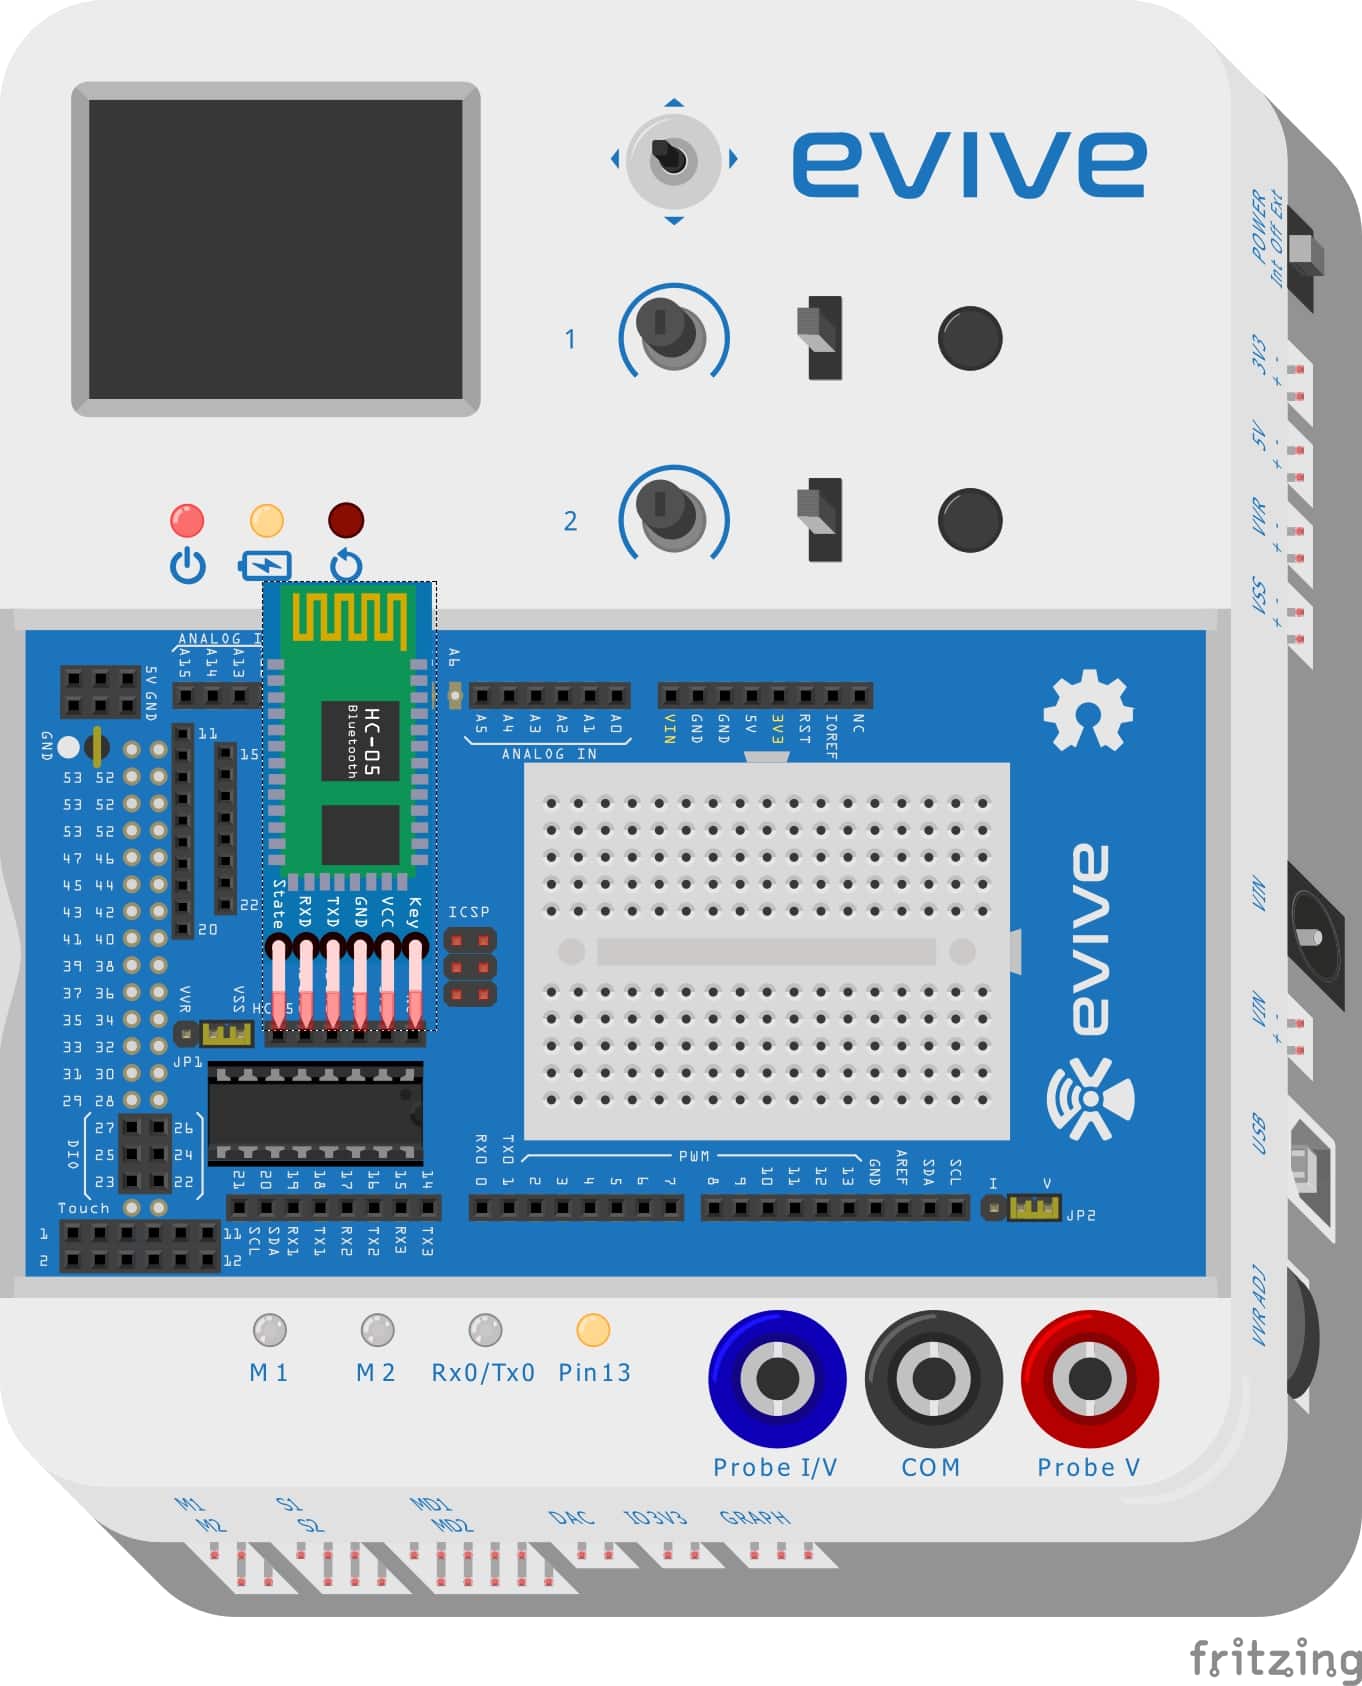
evive
Components Required
- evive
- HC05 Module
Circuit Diagram
You have to connect the HC05 Bluetooth module to evive’ Bluetooth headers in the following way:
Arduino Uno
Components Required
- Arduino Uno
- HC05 Module
- Jumper Cable – Male to Female
Circuit Diagram
You have to connect the HC05 Bluetooth module to Arduino Uno in the following way:
- GND of HC05 to GND of Arduino Uno
- VCC of HC05 to 5V of Arduino Uno
- TX of HC05 to Digital Pin 2 of Arduino Uno
- RX of HC05 to Digital Pin 3 of Arduino Uno

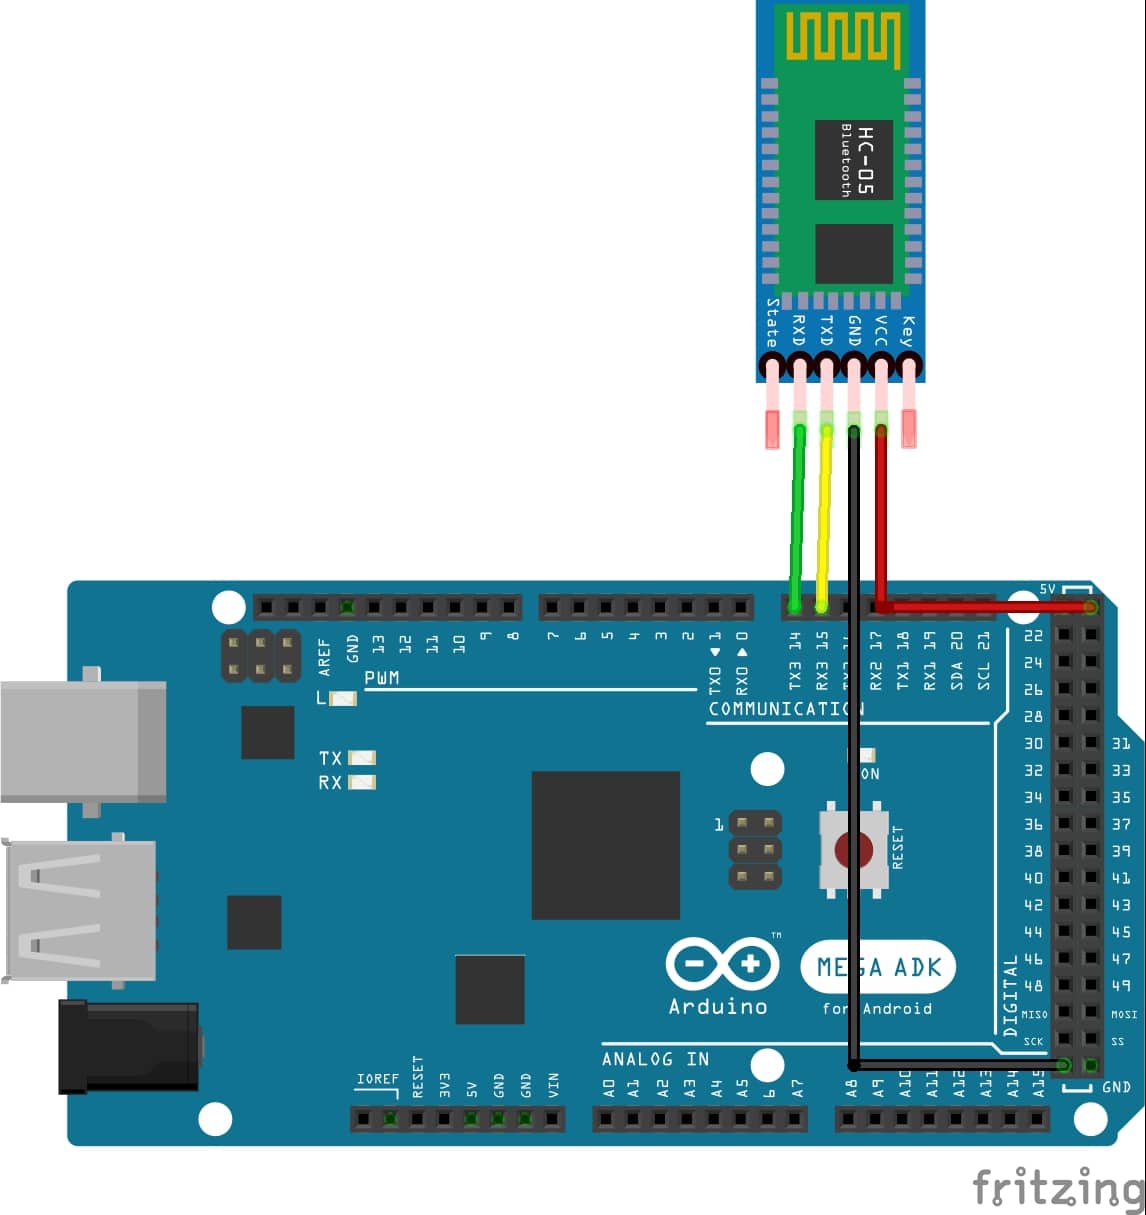
Arduino Mega
Components Required
- Arduino Mega 2560
- HC05 Module
- Jumper Cable – Male to Female
Circuit Diagram
You have to connect the HC05 Bluetooth module to Arduino Mega in the following way:
- GND of HC05 to GND of Arduino Mega
- VCC of HC05 to 5V of Arduino Mega
- TX of HC05 to Digital Pin 15 of Arduino Mega
- RX of HC05 to Digital Pin 14 of Arduino Mega
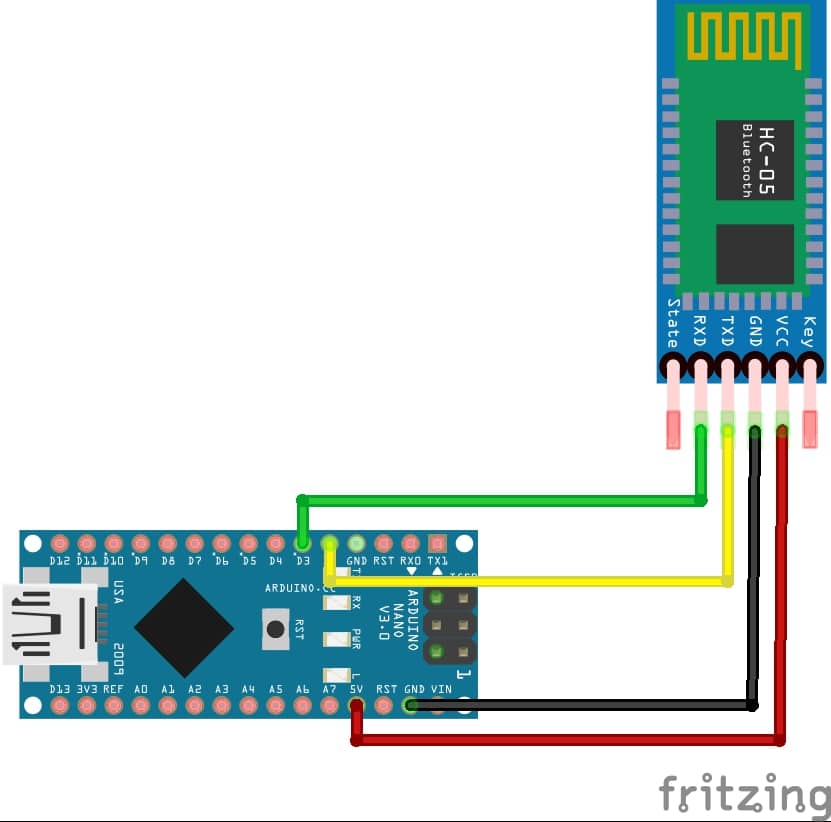
Arduino Nano
Components Required
- Arduino Nano
- HC05 Module
- Jumper Cable – Male to Female
Circuit Diagram
You have to connect the HC05 Bluetooth module to Arduino Nano in the following way:
- GND of HC05 to GND of Arduino Nano
- VCC of HC05 to 5V of Arduino Nano
- TX of HC05 to Digital Pin 2 of Arduino Nano
- RX of HC05 to Digital Pin 3 of Arduino Nano
ESP32
ESP32 has onboard Bluetooth, that supports BT classic as well as Bluetooth Low Energy (BLE). Hence there is no need for any external hardware setup for Bluetooth on Esp32.
Install Dabble in your Smartphone
- Android: Dabble is available for the Android user functioning on Android version 5.0.0 and above. Download here.
- iOS: It is compatible with iPhone, iPad, and iPad touch and requires iOS 12.2 and above. Download here.
Connecting Dabble with Hardware
After successfully installing the Dabble, follow the below guidelines for connecting Dabble with your Bluetooth module.
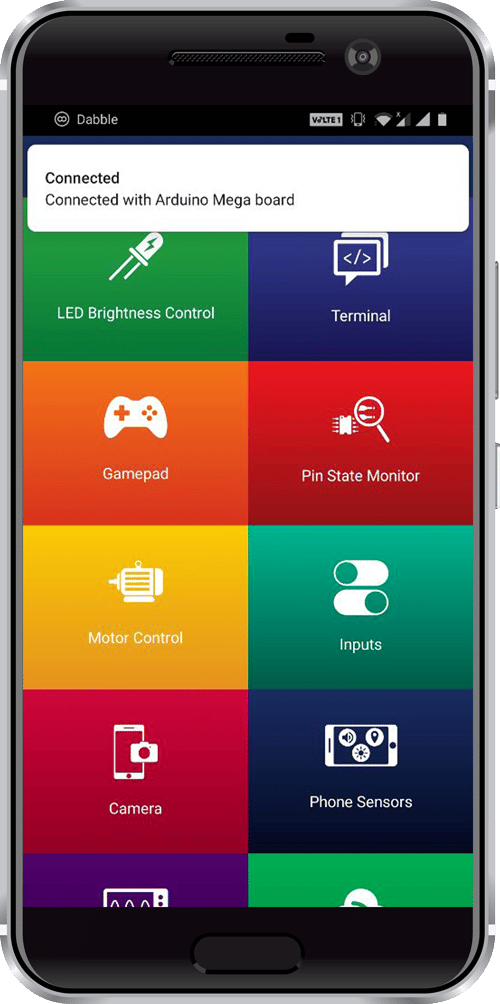
- As soon as you open the app you can see a series of introduction slides appearing in your smartphone that gives you a brief overview of how to interact with Dabble. Go through them.
- Click on the Connect icon that appears at the top right corner of your screen beside the Settings icon. As soon as you click on the Connect icon a dialog box appears asking for permission of turning on location in your smartphone. Grant the location access permission and then follow the process as shown below:
- In the above process, you can see the app was connected to Bluetooth named “evive”. Similarly, you will be able to see the name of your Bluetooth module in the list.
Note: A dialog box asking for the Bluetooth password may appear. Enter your Bluetooth module password if you have kept any password or try some default passwords like 0000 or 1234 in the case of HC-05 and HC-06 and try 000000 or 123456 for HM-10.Note: If you are facing some trouble in connecting your module then first try to pair the module from your smartphone’s Bluetooth settings. Follow the troubleshooting page for guidance.
- As soon as the app is connected to your Bluetooth module you can see the notification in your smartphone telling you which board you have connected.
- After reading notification go to the Settings icon in your app. You will be able to see information like your app version, hardware library version, and the name of the hardware board your smartphone is connected to.
If you face any issues, visit the troubleshooting page of Dabble for a detailed solution to your problems.
Programming the boards
Arduino IDE – For evive, Arduino Uno, Nano and Mega
After successfully installing Dabble in your smartphone and pairing it with the Bluetooth module, it is now time to follow a few final steps for establishing communication between your smartphone and the hardware. For working with Dabble on Arduino IDE, you need to first install Dabble Arduino library for Arduino boards or DabbleESP32 library.
Get Dabble Library for your Hardware
You can get the Dabble library for Arduino IDE by clicking on this zip file.
Now follow below-mentioned steps for adding Dabble library in Arduino Ide:
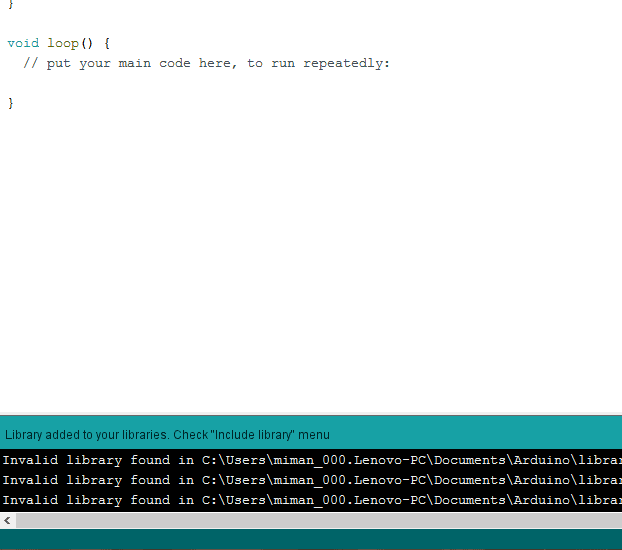
- Open Arduino IDE and navigate to Sketch>>Include Library>> Add .ZIP library.

- A dialogue box as shown in the image below appears. Select your zip folder from the location where it was downloaded and then click “Open”.
-
As soon as the library is installed you can see “Library added to your libraries. Check “Include library”menu.” message at bottom of your Arduino IDE screen.
Flash code to your Board
In this section, we will use a very basic “LED Brightness Control” module and control onboard led pin 13 present on evive and Arduino boards.
At first, let’s look at the user interface of LED Brightness Control” present in your smartphone.
This module allows you to control the output of the digital pins in two ways:
- If the pin is a digital pin with no PWM support, then you can control the HIGH and LOW state of the LED by clicking on the ON/OFF icon present in the center of the module.
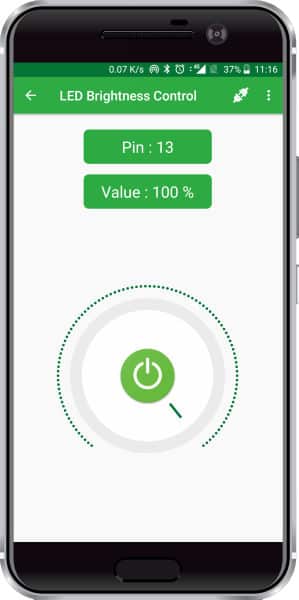
- If the digital pin is a PWM pin, then you can also control the brightness of the LED, using the module. You can adjust the brightness value between 0 to 100 using the potentiometer type knob with the green bar as seen in the image.
Since we are going to control LED pin 13 and it is a PWM pin hence we will be able to turn led ON/OFF and also vary its brightness with potentiometer knob.
- Now navigate to “File>Examples>Dabble” there you can see the other three sub-folders namely “BluetoothBaudSettings”, “evive” and “Uno_Nano_Mega”.
- Depending upon your board type navigate to that subfolder there you can see “LedBrightnessControl” example open that example.

Before running this example code make sure that you know the baud rate of your Bluetooth module. If you don’t know your Bluetooth module baud rate and are using the HC-05 module then go to “BluetoothBaudSettings” folder and open example code as per your board type and read Baud Settings of your Bluetooth module.
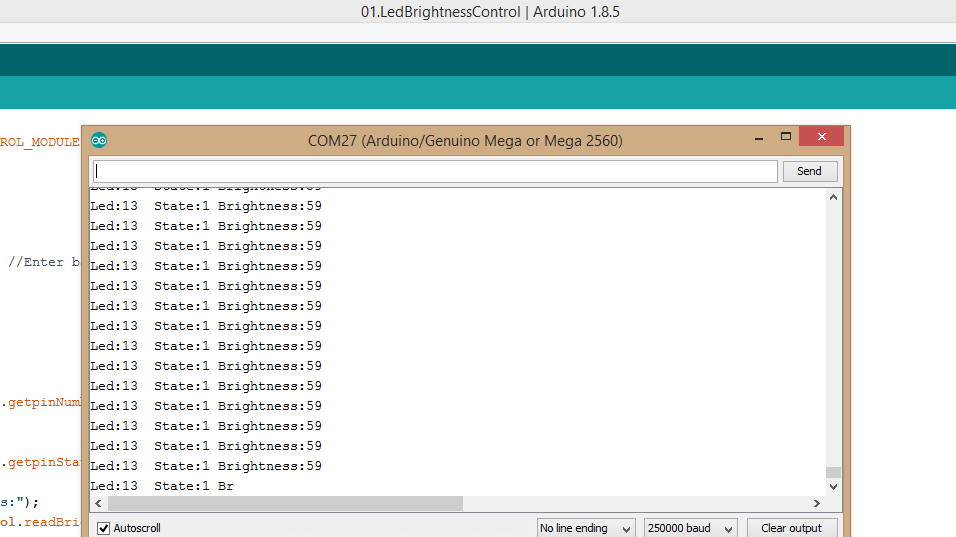
Depending on board types default baud rate used in example codes is 115200 for evive and 9600 for Mega, Uno and Nano boards. If your current baud rate settings don’t match these cases then at first change your baud rate to either of these values as per your board.#define CUSTOM_SETTINGS #define INCLUDE_LEDCONTROL_MODULE #include <evive.h> #include <Dabble.h> void setup() { Serial.begin(250000); Dabble.begin(115200); //Enter baudrate of your bluetooth.Connect bluetooth on Bluetooth port present on evive. } void loop() { Dabble.processInput(); Serial.print("Led:"); Serial.print(LedControl.getpinNumber()); Serial.print('\t'); Serial.print("State:"); //0 if led is Off. 1 if led is On. Serial.print(LedControl.getpinState()); Serial.print('\t'); Serial.print("Brightness:"); Serial.println(LedControl.readBrightness()); } - Upload the LedBrightnessControl code on your board. Now press ON/OFF button in LED Brightness Control Module to turn led on or off. And move the knob to vary the brightness of your Led.
- Also, you can open your serial monitor to see data like pin Number, Led State and Brightness control value transmitted from your smartphone.
Now, let’s look at the basic structure of the above-written code. There are four basic parts of your code namely – Header, Initialize Bluetooth communication, Refreshing Data, and Functions. Codes for all the modules can be categorized in these parts.
Header
In this part, you define certain macros names depending upon which module you want to use. There are unique define terms(macro) made for each module. Go through all module examples to know them.
For example, to use the LED Control module in the Arduino program, you have to define the following header:
#define CUSTOM_SETTINGS
#define INCLUDE_LEDCONTROL_MODULE
After defining the above mention headers, you have to include the dabble library:
#include
Enabling Bluetooth Communication
To enable Bluetooth communication, you have to initialize serial communication using the following code:
Dabble.begin(Baud_Rate);
Here Baud_Rate is the baud rate set for the Bluetooth module. With evive, you normally get 115200 baud rate modules and for other boards Baud_Rate is set to 9600. You must keep your Bluetooth baud rate same as Baud_Rate.
Refreshing the data
To refresh the data that the device gets from the mobile app, you have to use the following line of code:
Dabble.processInput();
This function is included in the loop of each example code for processing the data obtained from your mobile.
In this example, this function changes the state and the brightness of the LED.
Functions
As shown in the example code it prints data like pin number, its state and brightness on Serial Monitor. For this it uses the following functions:
- LedControl.getpinNumber(): This function returns the pin selected for LED Brightness control in the mobile app. The function returns int data type.
- LedControl.getpinState(): The function returns the state of the pin set by the user in the mobile app. This function returns the following output:
- 1 if the state is set to ON
- 0 if the state is set to OFF
- LedControl.readBrightness(): This function returns the brightness value set by the user in the mobile app. It returns int data type with a value ranging between 0 and 100.
If you don’t want to read data coming from your phone and just want to execute Led module functioning then you can avoid the use of these functions in your code.
This module also allows you to change pin which you are controlling. For this tap on the “Pin” button and write your desired pin number. You can also change brightness value by tapping on “Value” and entering the desired value.
PictoBlox (Scratch) – For evive, ESP32, Arduino Uno, Nano, and Mega
Enabling Dabble Extension in PictoBlox
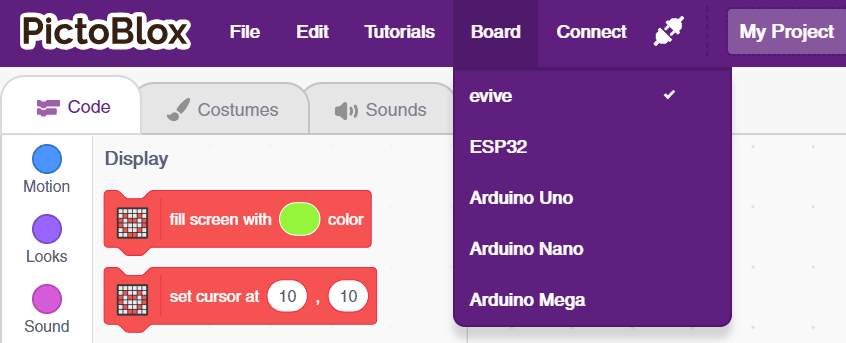
- Open PictoBlox.
- Go to the board menu and select the appropriate board for your project.
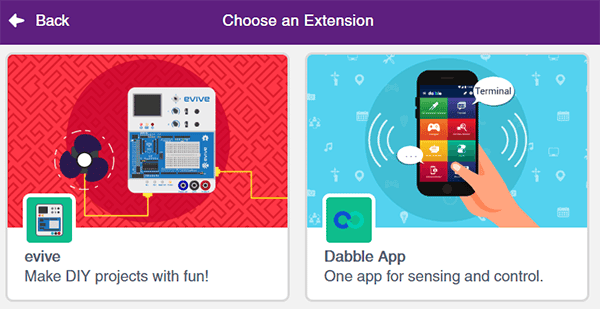
- Click on add extension on the left bottom corner. A new window will open showing all the extensions. Select the Dabble extension.
New blocks will come in the block palette for the Dabble App: https://ai.thestempedia.com/extension/dabble/
You can work on two modes in Pictoblox while using Dabble App:
- Stage Mode: In this mode, you can write scripts for the sprite and board and control it in real time. If you disconnect the board, you cannot control it anymore.
- Upload Mode: This mode allows you to write scripts and upload them to your board so that you can control even when it is not connected t your PC/laptop.
Example – Enabling LED Control
In this section, we will use a very basic “LED Brightness Control” module and control onboard led pin 13 present on evive or Arduino boards.
At first, let’s look at the user interface of LED Brightness Control” present in your smartphone.
This module allows you to control the output of the digital pins in two ways:
- If the pin is a digital pin with no PWM support, then you can control the HIGH and LOW state of the LED by clicking on the ON/OFF icon present in the centre of the module.
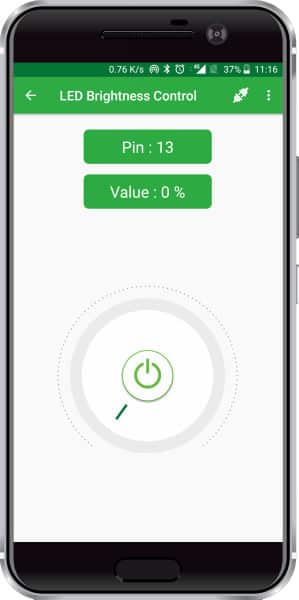
LED Brightness module controlling digital pin 13. The current state of LED is set to OFF. LED Brightness module controlling digital pin 13. The current state of LED is set to ON. - If the digital pin is a PWM pin, then you can also control the brightness of the LED, using the module. You can adjust the brightness value between 0 to 100 using the potentiometer type knob with the green bar as seen in the image.
Make the following program to enable LED control:
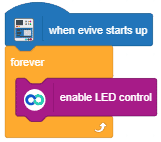
Switch to the Upload mode, by clicking on the toggle switch right above the stage.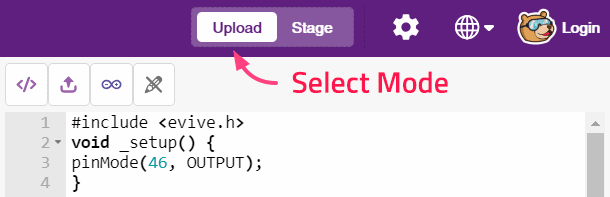
On doing so, the Arduino code will appear instead of the stage. In the Upload mode, there are three buttons replace the green flag and red octagon from the Stage mode. The second button is to upload the code to evive. Click on the button and upload the code.

Connect your app and control the LED.
Arduino IDE – For ESP32
This section will guide you on using Gamepad module of Dabble with ESP32. You can download library Dabble-ESP32 for working with different Dabble modules. For working on ESP32 with Arduino IDE you first have to install ESP32 board on Arduino IDE. If you don’t know anything about ESP32 board installation then first refer getting started with ESP32.
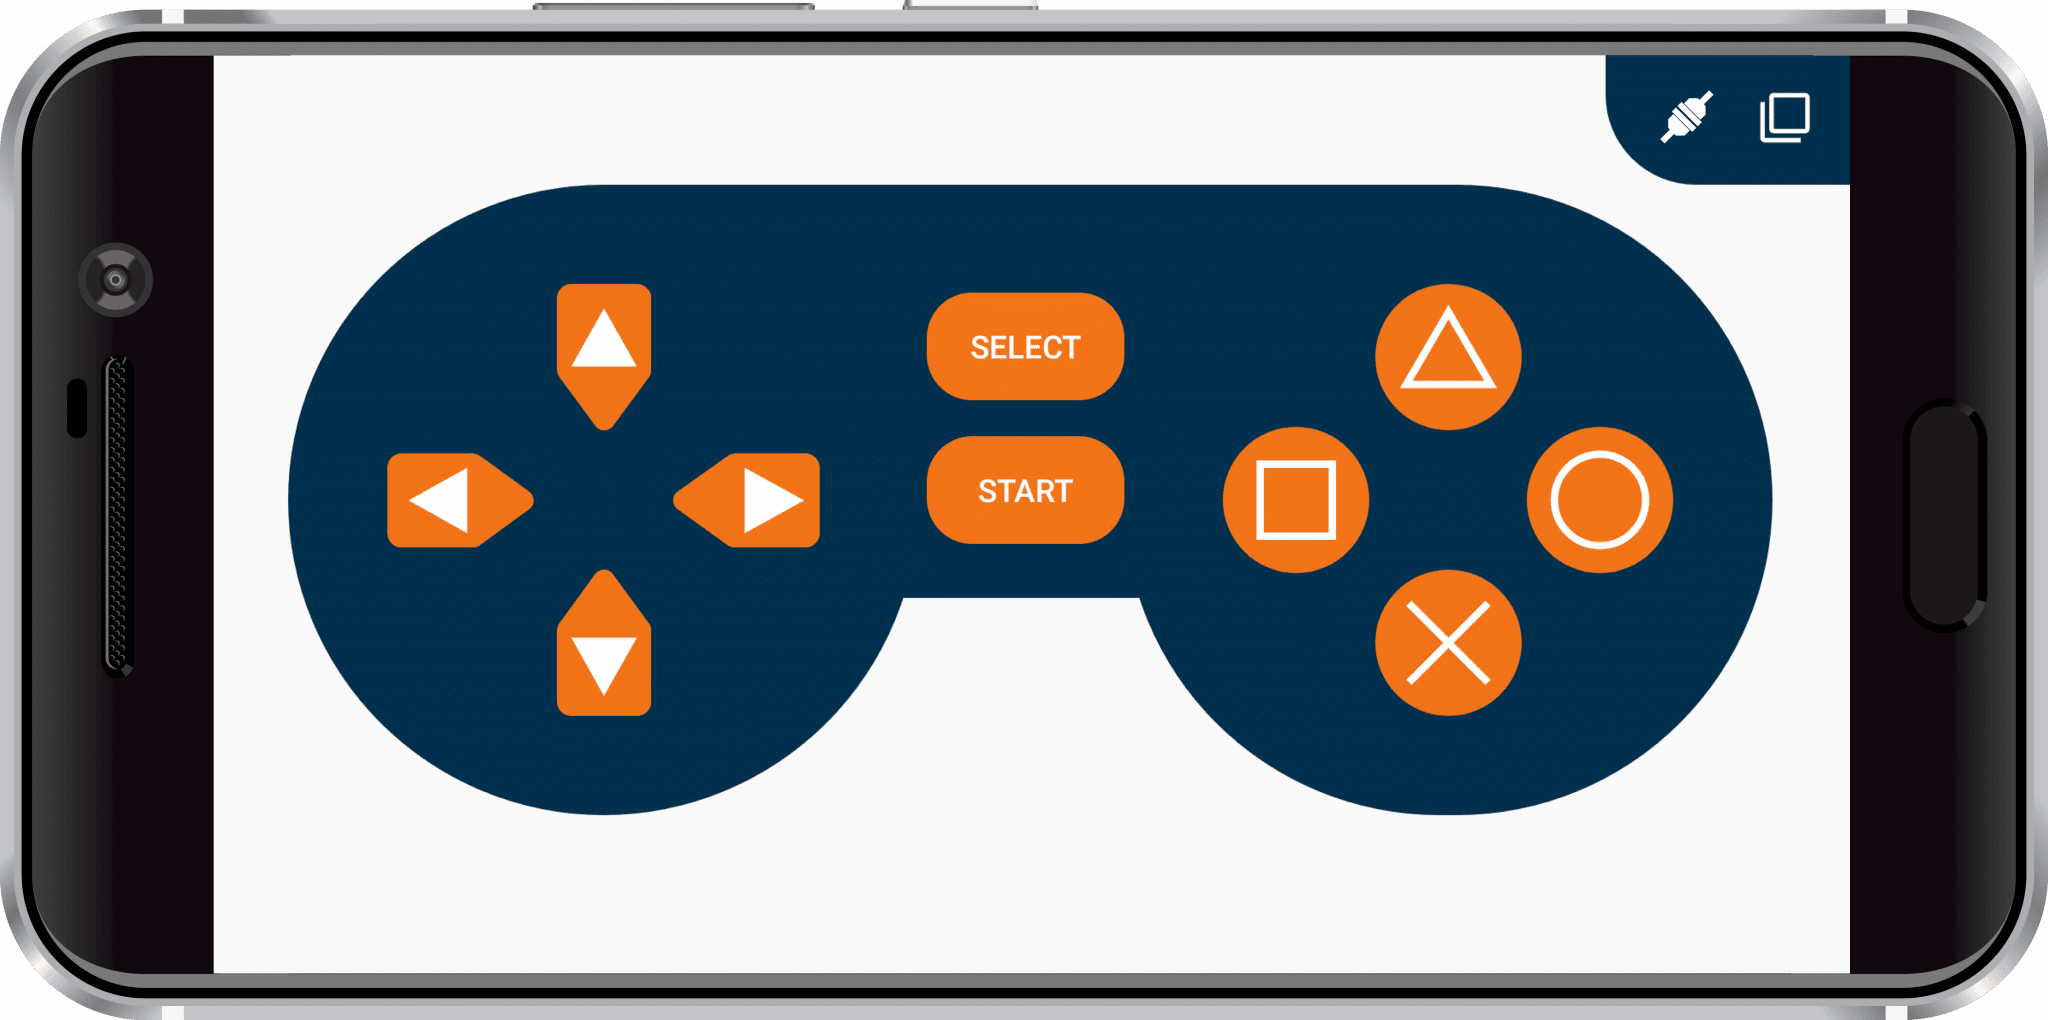
The image above shows Digital Mode of Gamepad Module. There are two more modes present in this module. You can go to the Gamepad module description to explore more about it.
Add the downloaded zip file of the library to Arduino IDE. To learn how to add zip file of the library to Arduino IDE follow this link. After successfully installing library go to “File>Examples>DabbleESP32>03.Gamepad”.
Functions
begin(Bluetooth_Name) – initializes BLE(Bluetooth Low Energy) on ESP32 with the name written in place of “Bluetooth_Name”.
processInput() – This function should be continuously called in the loop to refresh data received from Dabble app.
| Function | Return Type | Function Brief Description | Returning Value |
|---|---|---|---|
| isUpPressed() | Boolean | The function tells whether the Up button is pressed or not. | 1 when Up button is pressed; 0 when Up button is not pressed. |
| isDownPressed() | Boolean | The function tells whether the Down button is pressed or not. | 1 when Down button is pressed; 0 when Down button is not pressed. |
| isLeftPressed() | Boolean | The function tells whether the Left button is pressed or not. | 1 when Left button is pressed; 0 when Left button is not pressed. |
| isRightPressed() | Boolean | The function tells whether the Right button is pressed or not. | 1 when Right button is pressed; 0 when Right button is not pressed. |
| isTrianglePressed() | Boolean | The function tells whether the Triangle button is pressed or not. | 1 when Triangle button is pressed; 0 when Triangle button is not pressed. |
| isCirclePressed() | Boolean | The function tells whether the Circle button is pressed or not. | 1 when Circle button is pressed; 0 when Circle button is not pressed. |
| isCrossPressed() | Boolean | The function tells whether the Cross button is pressed or not. | 1 when Cross button is pressed; 0 when Cross button is not pressed. |
| isSquarePressed() | Boolean | The function tells whether the Square button is pressed or not. | 1 when Square button is pressed; 0 when Square button is not pressed. |
| isStartPressed() | Boolean | The function tells whether the Start button is pressed or not. | 1 when Start button is pressed; 0 when Start button is not pressed. |
| isSelectPressed() | Boolean | The function tells whether the Select button is pressed or not. | 1 when Select button is pressed; 0 when Select button is not pressed. |
| getAngle() | Integer | This function returns the angle value between the x-axis and the line joining the dot and the center of the joystick. | The value varies from 0 to 360 degrees with a step of 15 degrees. |
| getRadius() | Integer | The function returns the distance between the center of the joystick and the dot. | The value varies from 0 to 7. |
| getXaxis() | float | The function returns the x position of the dot on the joystick. | The value varies from -7 to 7. |
| getYaxis() | float | The function returns the y position of the dot on the joystick. | The value varies from -7 to 7. |
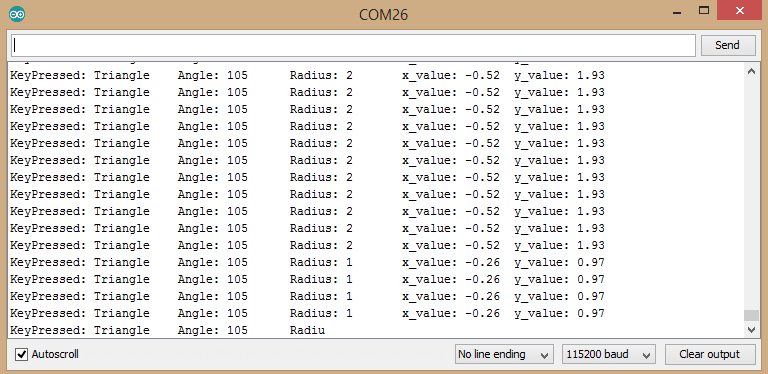
Code Explanation
The example code present in the library shows all the functions that can be used in getting different parameters transmitted from Gamepad. To explain this data received from the various function is printed on Serial Monitor.
Conclusion
In conclusion, Dabble App is a great way to transform your Smartphone into a virtual I/O device and lets you control hardware using Bluetooth, communicate with it, and access sensors like the accelerometer, GPS, proximity, and other features of your Smartphone. You can use Dabble with Arduino Uno–Mega–Nano, ESP32, and evive and write code in Arduino IDE or PictoBlox (graphical programming based on Scratch 3.0). With this guide, you should now have a better understanding of the required hardware/modules, wiring diagram, connecting the board/Bluetooth module with mobile, and how to use Dabble library/extension.


