Introduction
This phone sensor module allows you to access the following inbuilt sensors of your smartphone: Accelerometer, Gyroscope, Proximity sensor, Magnetometer, Light meter, Sound meter, GPS, Temperature sensor and Barometer.
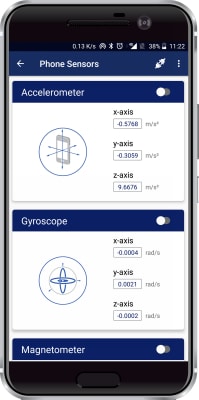
Accelerometer
Senses the acceleration acting on your Smartphone in all three directions (X-axis, Y-axis, and Z-axis) in m/s2.
Gyroscope
Senses the angular velocity in all three directions (X-axis, Y-axis, and Z-axis) in rad/s.
Magnetometer
Senses the magnetic field acting in all three directions (X-axis, Y-axis, and Z-axis) in µT. It can be used to move robots in a specific direction.
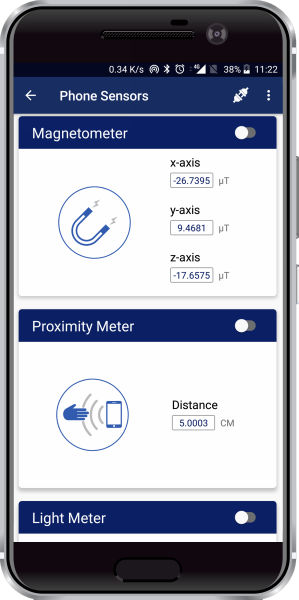
Proximity sensor
Senses if there is an object near your Smartphone. If the object is nearby, 0.0000CM is displayed. Otherwise, a different number depending on the default setting of your phone is displayed.
Light meter
Senses the light falling on your Smartphone in Lux.
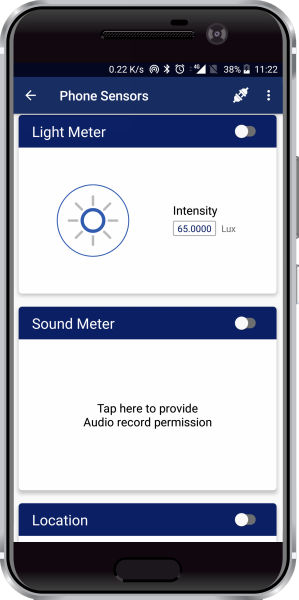
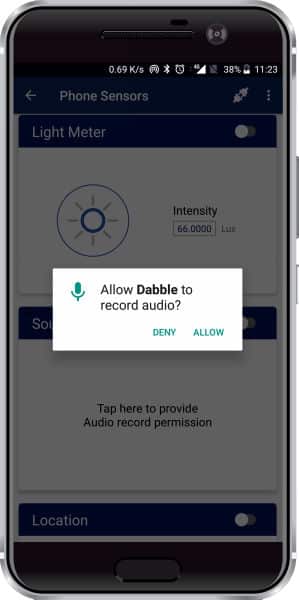
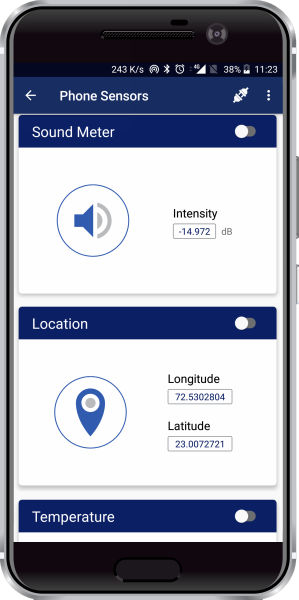
Sound meter
Senses the intensity of nearby sound in dB. The module will ask you to provide audio record permission.
GPS
Shows the Longitude and Latitude of your current location. The module will ask you to provide location access permission.
Temperature sensor
Senses the temperature.
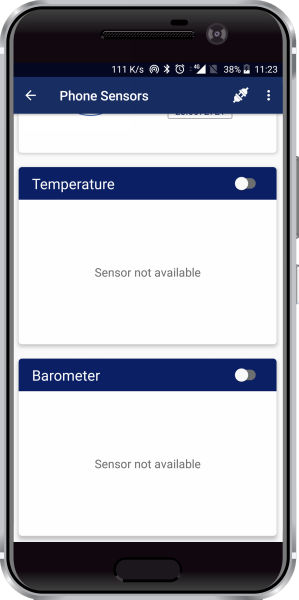
Barometer
Senses the pressure.
Arduino IDE Functions
Header
To include the GamePad module in the Arduino program, you have to include the following header:
#define CUSTOM_SETTINGS
#define INCLUDE_DATALOGGER_MODULE
After defining the above mention headers, you have to include the dabble library:
#include <Dabble.h>
You can download the zip of Arduino Library for
- evive, Uno, Mega, and Nano – Dabble-Arduino
- ESP32 – Dabble-ESP32
depending on the board you are using.
Enabling Bluetooth Communication
To enable Bluetooth communication, you have to initialize serial communication using the following code:
- For evive and Arduino Mega, Uno, and Nano
Dabble.begin(Baud_Rate);Here Baud_Rate is the baud rate set for the Bluetooth module. With evive, you normally get 115200 baud rate modules. - For ESP32
Dabble.begin("Bluetooth_Name");In place of Bluetooth_Name enter the name that you want to keep for Bluetooth of ESP32. The default name given in the library is “MyEsp32”.
Refreshing the data
To refresh the data that the device has got from the mobile app, you have to use the following line of code:
Dabble.processInput();
Functions
| Function | Return Type | Brief Description |
|---|---|---|
| Sensor.getAccelerometerXaxis() | Float | Returns Accelerometer X value in m/s^2 |
| Sensor.getAccelerometerYaxis() | Float | Returns Accelerometer Y value in m/s^2 |
| Sensor.getAccelerometerZaxis() | Float | Returns Accelerometer Z value in m/s^2 |
| Sensor.getGyroscopeXaxis() | Float | Returns Gyroscope X value in rad/s |
| Sensor.getGyroscopeYaxis() | Float | Returns Gyroscope Y value in rad/s |
| Sensor.getGyroscopeZaxis() | Float | Returns Gyroscope Z value in rad/s |
| Sensor.getMagnetometerXaxis() | Float | Returns Magnetometer X value in uT |
| Sensor.getMagnetometerYaxis() | Float | Returns Magnetometer Y value in uT |
| Sensor.getMagnetometerZaxis() | Float | Returns Magnetometer Z value in uT |
| Sensor.getProximityDistance() | Float | Returns proximity sensor data. Returns 0 if the obstacle is ahead. |
| Sensor.getLightIntensity() | Float | Returns the light sensor data in Lux |
| Sensor.getSoundDecibels() | Float | Returns the sound sensor data in dB. |
| Sensor.getTemperature() | Float | Returns the temperature in degree celcius |
| Sensor.getBarometerPressure() | Float | Returns the barometer data in Pascals. |
| Sensor.getGPSlongitude() | Float | Returns the Longitude data. |
| Sensor.getGPSlatitude() | Float | Returns the Latitude data. |
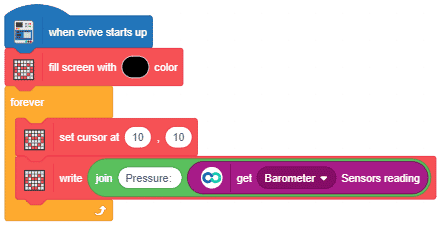
PictoBlox Blocks
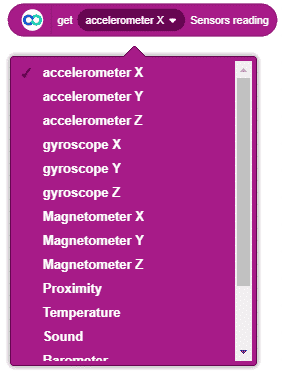
You can get the phone sensors using a reporter block “get () reading”.
![]()
In its drop-down, you will find various parameters related to phone sensors.


Examples
Arduino IDE
Accelerometer
This program displays the accelerometer reading on the TFT display:
/* Accelerometer block of Phone sensor module allows you to access your smartphone's accelerometer values.
   NOTE:
   1)For Arduino Mega Connect Bluetooth on Serial3 pins.
   2)For Arduino Uno/Nano library uses SoftwareSerial,hence pin 2 and pin 3 are used
   as RX and TX pins respectively on SoftwareSerial.Hence with arduino Uno
   follow below connections for bluetooth.
   UNO  - BLUETOOTH
   2    - TX
   3    - RX

   3)For Uno/Nano keep bluetooth Baudrate below 38400.

   You can reduce the size of library compiled by enabling only those modules that you want
   to use. For this first define CUSTOM_SETTINGS followed by defining INCLUDE_modulename.

   Explore more on: https://thestempedia.com/docs/dabble/phone-sensors-module/
*/

#define CUSTOM_SETTINGS
#define INCLUDE_SENSOR_MODULE
#include <Dabble.h>

void setup() {
  Serial.begin(9600);     // make sure your Serial Monitor is also set at this baud rate.
  Dabble.begin(9600);    //Change this baudrate as per your bluetooth baudrate. Connect bluetooth on digital pin 2(RX) and 3(TX) for Uno/Nano and on Serial3 pins for Mega.
}

void loop() {
  Dabble.processInput();             //this function is used to refresh data obtained from smartphone.Hence calling this function is mandatory in order to get data properly from your mobile.
  print_Accelerometer_data();
}

void print_Accelerometer_data()
{
  Serial.print("X_axis: ");
  Serial.print(Sensor.getAccelerometerXaxis(), 4);
  Serial.print('\t');
  Serial.print("Y_axis: ");
  Serial.print(Sensor.getAccelerometerYaxis(), 4);
  Serial.print('\t');
  Serial.print("Z_axis: ");
  Serial.println(Sensor.getAccelerometerZaxis(), 4);
  Serial.println();
}
PictoBlox
Accelerometer
Displaying the values of Accelerometer parameters on the TFT display.

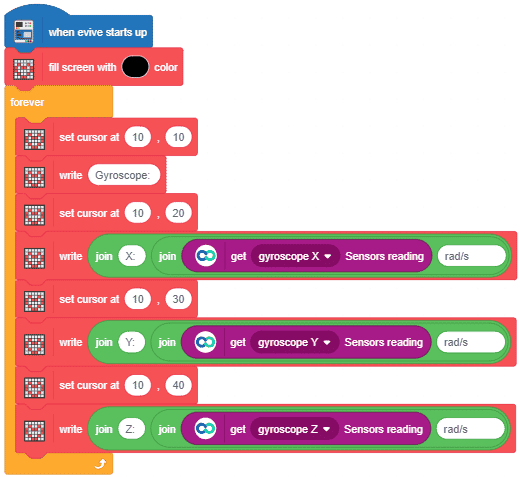
Gyroscope
Displaying the values of Gyroscope parameters on TFT display.
Magnetometer
Displaying the values of Magnetometer parameters on TFT display.

Light Meter
Displaying the Light parameter on TFT display.

Proximity Meter
Sensing proximity and playing a tone on Buzzer accordingly.

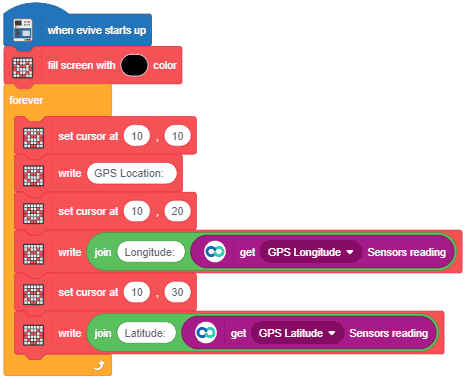
GPS Location
Displaying the values of GPS parameters on TFT display.
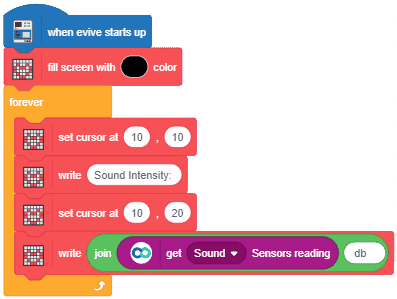
Sound Meter
Displaying the value of the sound parameter on the TFT display.
Temperature
Displaying the value of the Temperature parameter on the TFT display.

Barometer
Displaying the value of the Barometer parameter on the TFT display.