Introduction
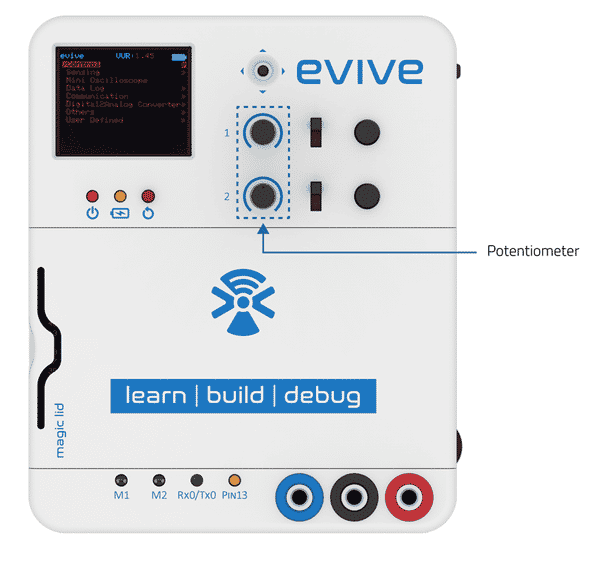
A potentiometer is nothing but a variable resistor, i.e. we can easily vary/change the value of the resistor by moving or turning the slider or the knob respectively. Since the movement of the slider or the knob is smooth and continuous, the change in the value of the resistance is smooth.
evive has two inbuilt 10kΩ knob potentiometers connected to Arduino Mega pins A9 and A10, respectively.
 With the help of the potentiometers, you can control the speed of a DC motor as well as the angle of a servo motor through evive’s firmware. You can also control the amplitude and frequency of a signal in a function generator.
How to read evive’s potentiometer in Scratch
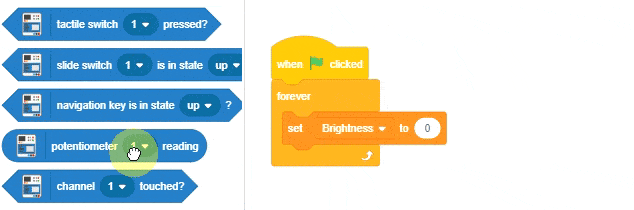
You can read evive’s potentiometer in PictoBlox with the help of a block in the evive palette known as the potentiometer () reading block.
![]()
Activity: Controlling the Brightness of pin 13 LED
Scratch Mode

Follow the steps below to write the script:
- Connect evive to your computer and open PictoBlox; if already open and working on a project, save that project. Then, click on New.
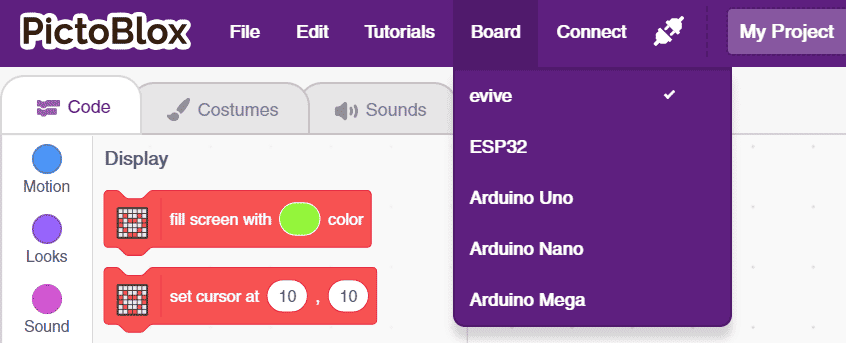
- Go to the toolbar and click on the Board menu. Then select evive as your board.
- Next, click on the Connect menu and from the fly-out menu, select the Port to which evive is connected e.g. COMXX or ttyXX.
 Once you select the port, the icon beside the Connect tab will become connected.
- Go to the Events palette and drag and drop the when flag clicked block.
- Next, go to the Control palette and drag and attach the forever block below the when flag clicked block.
- Then, go to the Variables palette and create a variable named Brightness and drag and drop the set () to () block inside the forever block; Brightness is set as default.
- Next, go to the evive palette and drag and drop the potentiometer () reading inside the space in the set () to () block; potentiometer 1 is set as default potentiometer.
- Then, drag and drop the set pwm pin () output as () block below the set () to () block. Inside this block, drag and drop the ()/() (division operator) block from the Operators palette.
- Inside the first space of the ()/() block, drag and drop the Brightness variable block; in the second space, drag write 4.
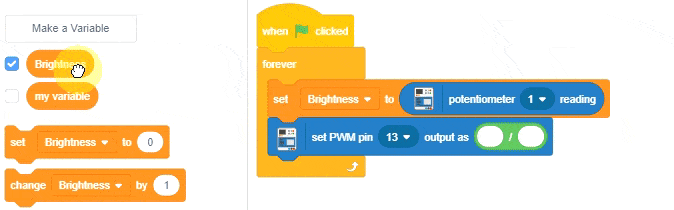
Below is the complete script:
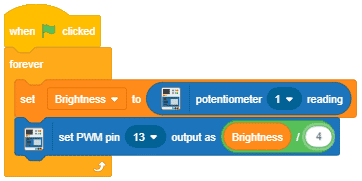
Click on the green flag to run the script and rotate the potentiometer to change the brightness of the LED.
Click on the red octagon, next to the green flag to stop the script.
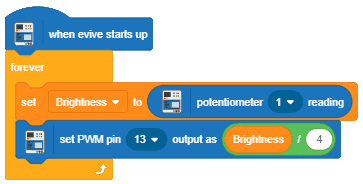
Upload Mode
Below is the script in Upload mode. All you need to do is replace the when flag clicked block with the when evive starts up block.
Conclusion
In this lesson, you learned how to read evive’s potentiometer in Scratch mode and Upload mode. You also learned how to control the brightness of a pin 13 LED using the potentiometer. By combining this knowledge with other blocks, you can create interesting projects that involve the use of potentiometers.


