In today’s rapidly evolving world, driven by ever-changing technology and digital advancements, coding has emerged as a formidable skill, driving innovation, problem-solving, and igniting creativity.
While conventional teaching methods often make coding appear intimidating, PictoBlox offers a refreshing approach by empowering users to effortlessly craft projects in AI, ML, AR, VR, IoT, and hardware using platforms such as Arduino, Microbit, LEGO, and Quarky.
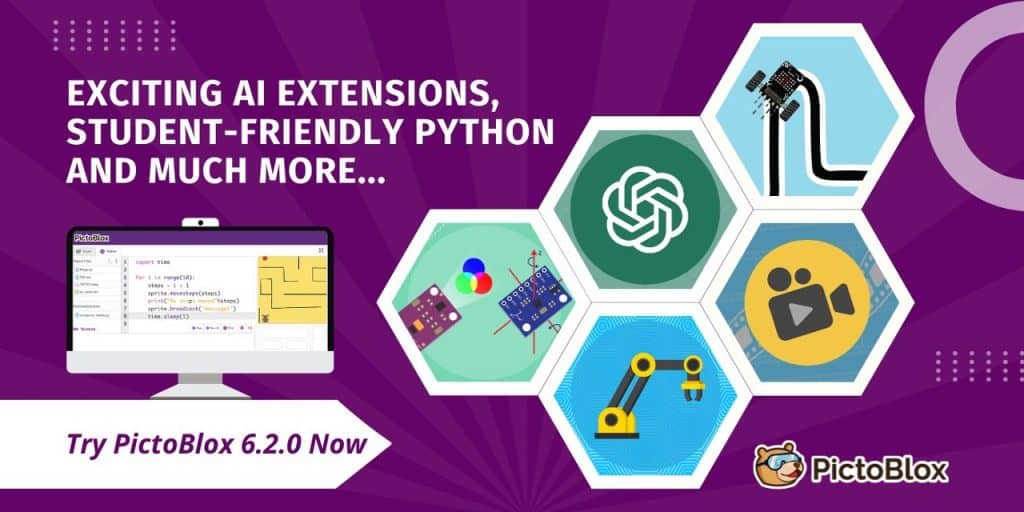
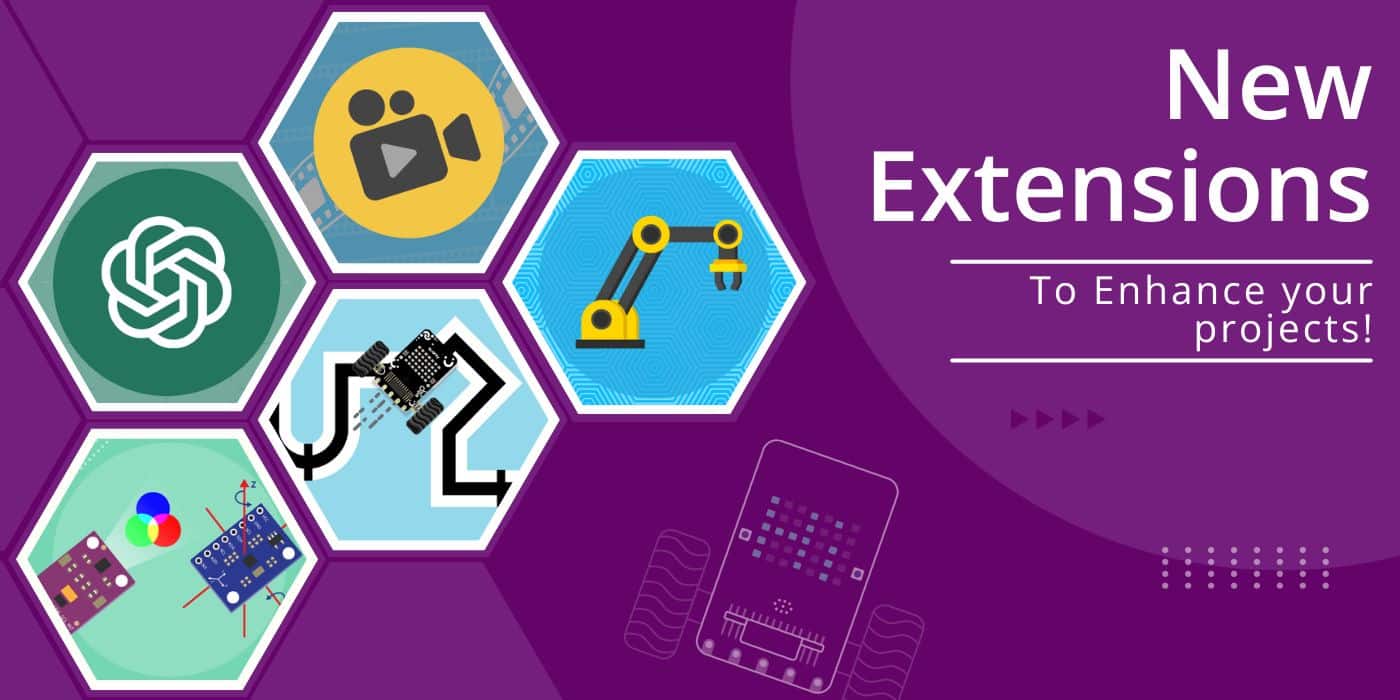
To continually enhance the coding experience, PictoBlox is in a state of constant evolution. The most recent update, PictoBlox 6.1.0 and 6.2.0, introduces additional features and resolves bugs to boost user productivity.
Let’s delve into the latest updates where you can download the latest PictoBlox versions 6.1.0 and 6.2.0 to explore its relevance to AI chatbots like ChatGPT, Video Player, Quarky Robotic Arm, Quarky Advanced Line Following, and Quarky Advanced Sensor. This feature allows schools to utilize videos from YouTube or upload their videos, making it a valuable addition to the platform.
This update acknowledges PictoBlox’s commitment to evolving with the digital landscape, certifying users to stay at the cutting edge of technology and innovation. Continue reading to learn how these new extensions can help you excel in Codeavour, the world’s biggest AI, coding, and robotics competition for school students.
Discover the Power of the Latest AI Extensions in PictoBlox
PictoBlox comes with a library of block palettes called extensions. These extensions help users access various program functions and enhance their experience. PictoBlox already has several fun extensions like Face detection, IoT, etc. It has recently introduced some new extensions in the latest update, which are,
- ChatGPT
- Video Player
- Quarky Robotic Arm
- Advance Line following the PID Algorithm
- Advanced Sensors for Precise Calibration
All New ChatGPT Extensions in PictoBlox
PictoBlox now has a ChatGPT extension for both block-based and Python-based coding environments. Users can now use the generative superpowers of ChatGPT to get answers just by entering a one- or two-word prompt. It allows users to learn the basic concept of how ChatGPT works and can be used for more technological advancements.
Let’s understand this further through an example:
We will use the ChatGPT extension to transform words into colorful emojis. Just type in the word or phrase you want to transform, and it will generate a delightful sequence of emojis that capture the essence of your text. Let’s see how users can utilize this function:
- Open PictoBlox and create a new file.
- Choose a suitable coding environment for block-based coding.
- Define a sprite, Tobi.
- Then, we create an instance of the ChatGPT model using the ChatGPT class.
- The sprite will ask you which word you want to convert into emojis.
- ChatGPT will respond based on its use of the getAIresponse block.
- The sprite will display the chosen word in emojis.
- Press the green flag to run the code.
Users can learn more about the ChatGPT extension in a step-by-step guide here.
Video Player Extension in PictoBlox
With the integration of the Video Player extension, users can now play any video present on the internet just by pasting the URL of that particular video in the block. One can also play offline videos and create a playlist by uploading it directly from their computer.
Let’s see a step-by-step process for how users can use this extension:
- Click on Add Extension.
- Select the Video Player Extension.
- After the extension is selected, users can play a video by uploading it from their storage system, any YouTube video, or any video on the internet just by pasting its URL.
- Video Control Blocks help with basic control of the video, like play, pause, playback speed, and many more.
- Video Playlist Blocks help users make their own personalized video playlists and control them.
Quarky Robotic Arm Extension
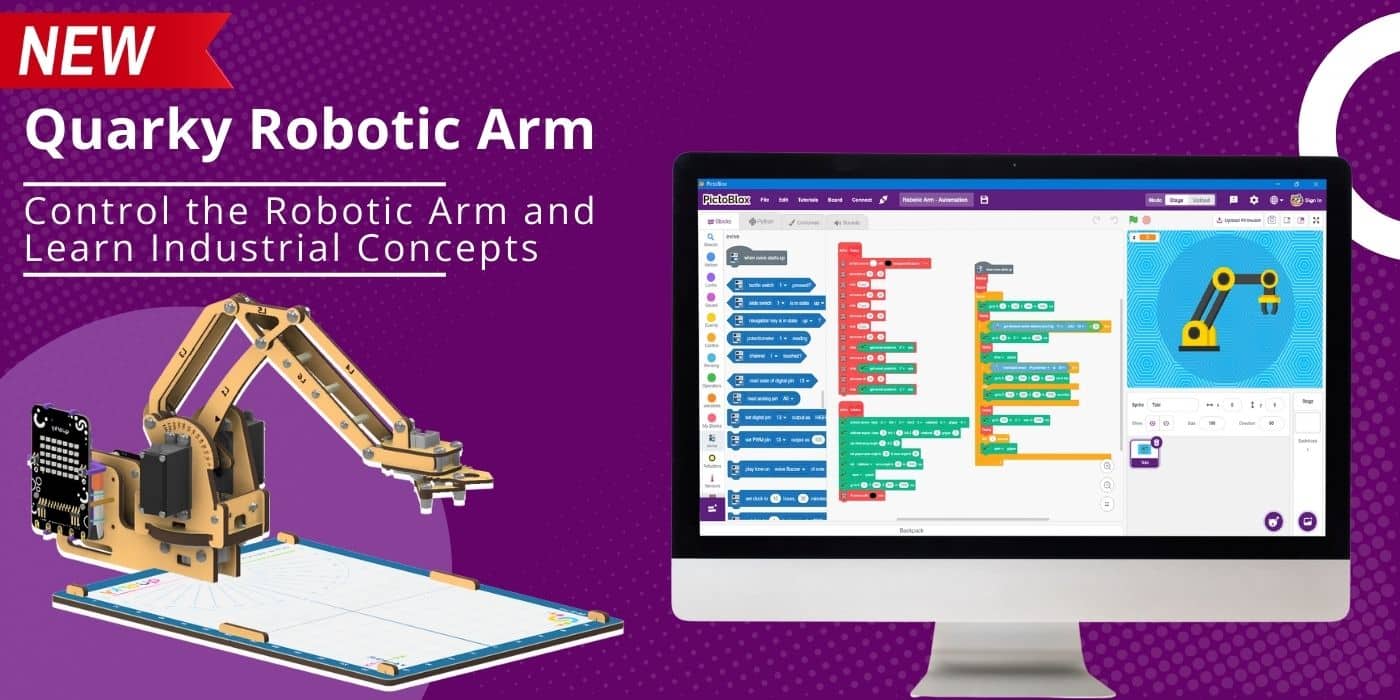
PictoBlox users can now programme and create projects with a new Quarky extension named Quarky Robotic Arm. This feature fits perfectly for those who wish to learn advanced robotics concepts with a fun-filled learning-by-doing approach.
Let’s understand this further through an example:
Using PictoBlox to control a Quarky robotic arm wirelessly using keyboard keys is a great example of what activities can be done with the Quarky Robotic Arm extension.
Let’s see a step-by-step guide on how users can code for this extension:
- Open the PictoBlox application.
- Select the Block Coding Environment.
- Click on the robotic arm extension available in the left corner.
Following are the steps to code the project:
- When the green flag is clicked, the robotic arm initializes and goes to the home position. Then we set the gripper open and close angles for the project. A variable named time is created to control the speed of the gripper. Finally, a loop is implemented, calling custom blocks for controlling the X-axis, Y-axis, Z-axis, and gripper controls.
- X Axis Control block moves the gripper on the X-axis.
- Y Axis Control block moves the gripper on the Y-axis.
- Z Axis Control block moves the gripper on the Z-axis.
- Gripper Control blocks open or close the gripper on command.
- Run the program to test the code.
Users can learn more about the Quarky Robotic Arm extension in a step-by-step guide here.
Advance Line following the PID Algorithm
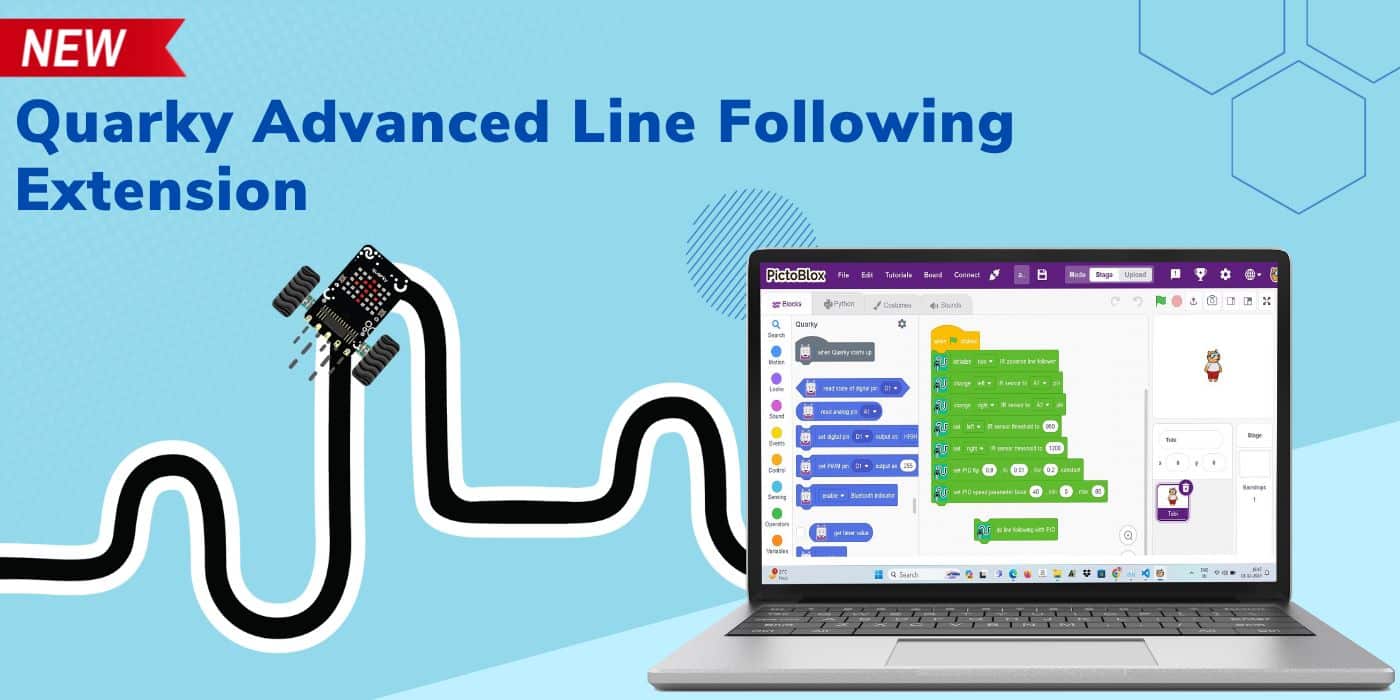
In the advanced line-following extension, users can achieve rapid and efficient line tracking through two distinct approaches with Quarky: one employing Adaptive Feedback with PID (Proportional-Integral-Derivative) for precise and responsive navigation, and the other without adaptive feedback and PID, relying on a straightforward method. These dual strategies cater to users with varying preferences, allowing for a flexible and dynamic experience in optimizing line-following performance based on individual needs and scenarios.
But what is a PID Algorithm? A PID line follower is like a smart robot that can follow a line on the ground. Imagine drawing a black line on a white surface, and you want a robot to stay on it as it moves. That’s where PID (Proportional, Integral, Derivative) control comes in. Continue reading to learn about PID parameters and functions.
Set PID Line Following Parameter
- For Block Coding Select set PID Kp Block and set the parameters

2. For Python Programming use the following function:
Python function: setPIDconstantparameter(0.8,0.01,0.2)
PID control of the line follower consists of proportional, integral, and derivative functions to improve the robot’s movement.
Proportional: This part helps the robot make small adjustments based on how far it is from the line. If it’s too far to the right, it steers left, and if it’s too far to the left, it steers right.
Integral: The integral part looks at how long the robot has been off the line. If it has been off for a while, the integral part helps to make a bigger correction to bring it back on track.
Derivative: The derivative part predicts future errors by looking at the rate at which the robot moves away from the line. This helps the robot make smooth adjustments and avoid overshooting the line.
So, the PID controller combines these three components to continuously adjust the robot’s movements, keeping it as close to the line as possible. It’s like a robot always learning and fine-tuning its path to stay on track.
Think of it as a smart system that balances and corrects itself as it moves, ensuring it follows the line accurately. PID line followers are commonly used in robotics competitions and educational settings to teach about control systems and automation.
If you initialize a three-IR line following, use kp >= 7 for a better result
Set PID Speed Line Following Parameter
- For Block Coding select set PID speed parameter base, and set the following parameter

2. For Python programming, use the following function:
Python function: setPIDspeedparameter(40,0,80)
Base speed is the speed of the line following.
Min. Speed is the minimum motor speed when the robot is turning.
Max. Speed is the maximum motor speed when the robot turns, and the black line is detected.
Do line following with PID
- For Block Coding select do line following with PID block.
2. For Python Programming use the following function:
Python function:- dolinefollowingwithPID()
The function initiates the line following using the PID algorithm and stops the robot when the checkpoint is detected. You must set the IR threshold to stop the robot at the checkpoint. Adjust the PID parameters for optimal line-following performance. You must set the PID speed and constant parameters to start the line following.
Notes:
- Set the correct threshold for the IR sensor for better results.
- If your robot is not stopping at the checkpoint or not following the line, consider making modifications to align the external IR sensor parallel to the caster wheel.
- Experiment with the PID speed parameter and overall speed value to achieve better line following.
- Please ensure the position of your external IR sensor is not placed too high from the ground and not too low; you need to calibrate on the arena.
Click here to learn more about the Advance Line Following extension in a step-by-step guide.
Advanced Sensors for Precise Calibration
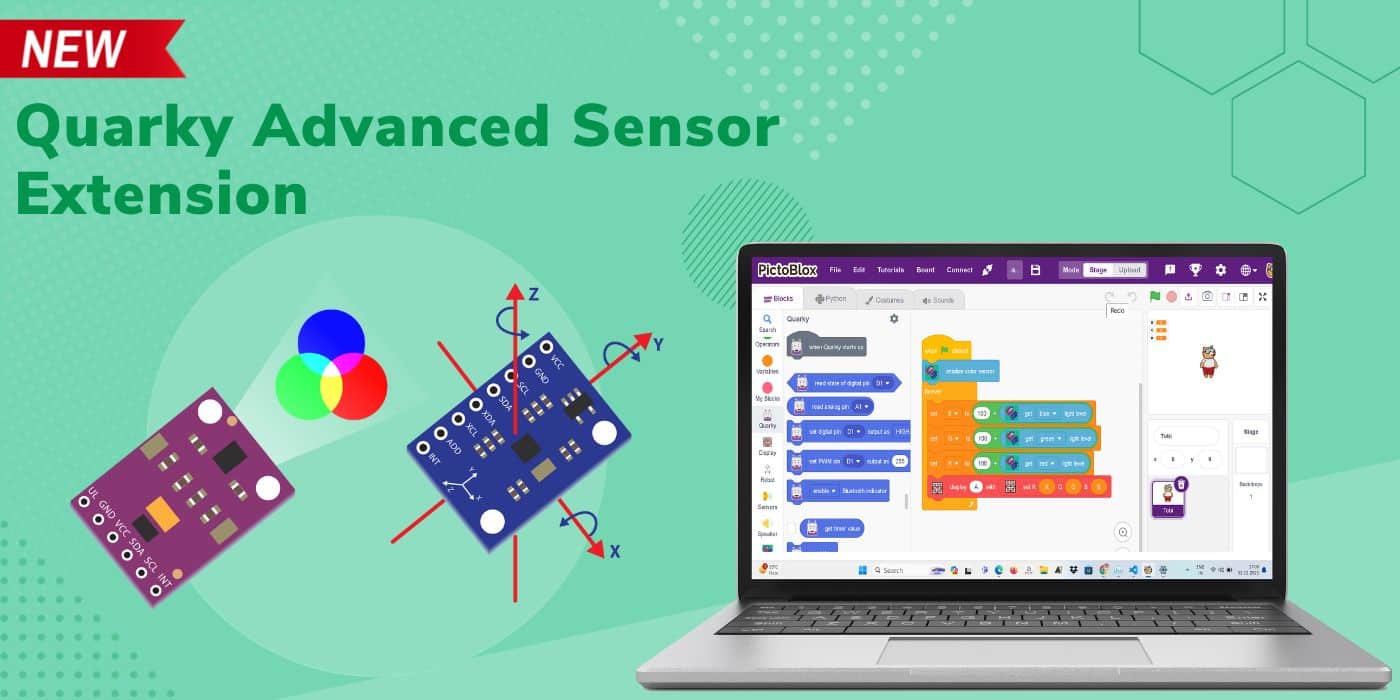
Users can seamlessly integrate advanced sensors like the APDS 9960 color sensor, MPU6050 gyroscope, and accelerometer (motion sensor) in the advanced sensor extension with Quarky. This combination empowers users to harness the full potential of color and light detection and also measure the proximity and motion sensing capabilities in their projects, allowing users to create dynamic and responsive projects that leverage the precise color identification of the APDS 9960 and the motion-tracking capabilities of the MPU6050 gyroscope and accelerometer.
Notes:
- A gyroscope is essential for determining an object’s rotation rate or change in orientation. The MPU6050 includes a three-axis gyroscope that measures angular velocity along the X, Y, and Z axes.
- An accelerometer can detect changes in velocity or inclination and provide information about the static acceleration due to gravity. The integrated three-axis accelerometer in PictoBlox measures acceleration along the X, Y, and Z axes.
Click here to learn more about the Advanced Sensor extension in a step-by-step guide.
Screen Recording Feature in PictoBlox’s Latest Version
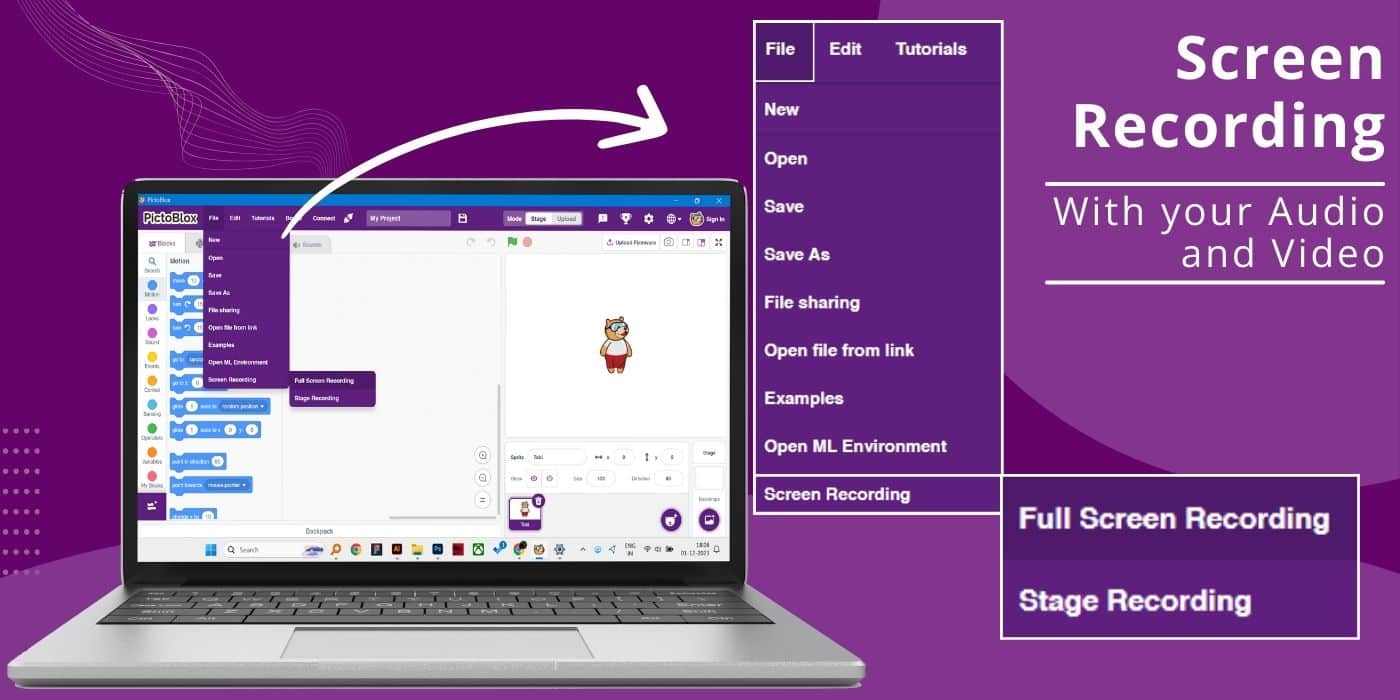
The all-new feature of PictoBlox allows you to screen record your project with your audio and video. Follow these steps and you are all set to show your creativity;
- Click on File from the Navigation bar
- Select Screen Recording and choose the recording type
- If you select full-screen recording, the recording setting modal will appear
- On clicking start recording, the recording will begin after 3 seconds.

Microphone – Capture audio commentary or ambient sounds, enhancing the overall audio-visual content.
Stop Recording – End a screen recording session and save the captured video. The captured image will be saved as an MP4 in your desired location. You can then share it in any way possible.
Pause/Play Button – Temporarily stop and resume the recording process without stopping the session.
Restart Recording – Discard the current recording and start a new session afresh.
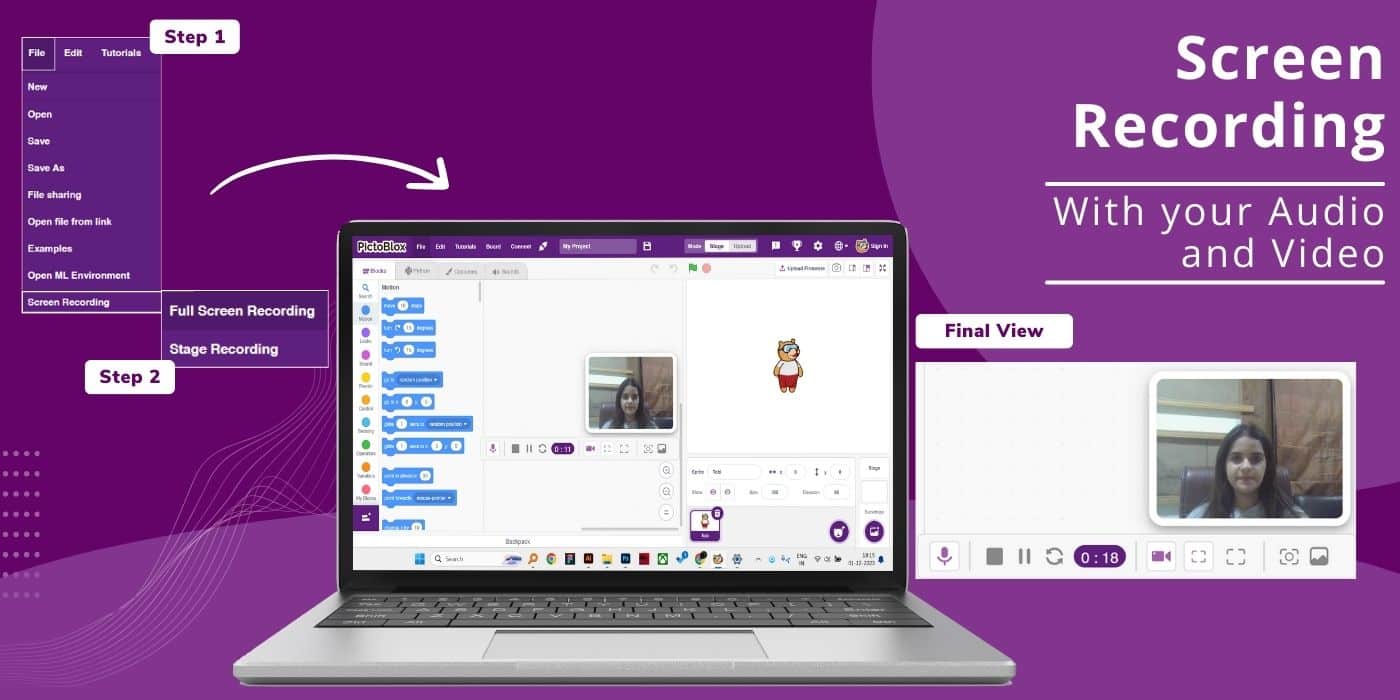
Timer – Shows the duration of the current recording.
Camera Modal – Toggle the webcam on or off, allowing for picture-in-picture video capture.
Shrink – Minimize the recording interface, providing more screen space for the content being recorded.
Expand – Enlarge the recording interface or the recorded content on the screen.
Screen Capture – Take a still screenshot of the current screen content.
Gallery – Access and view previously recorded videos and screenshots.
More Blocks, More Fun in PictoBlox Latest Version 6.1.0
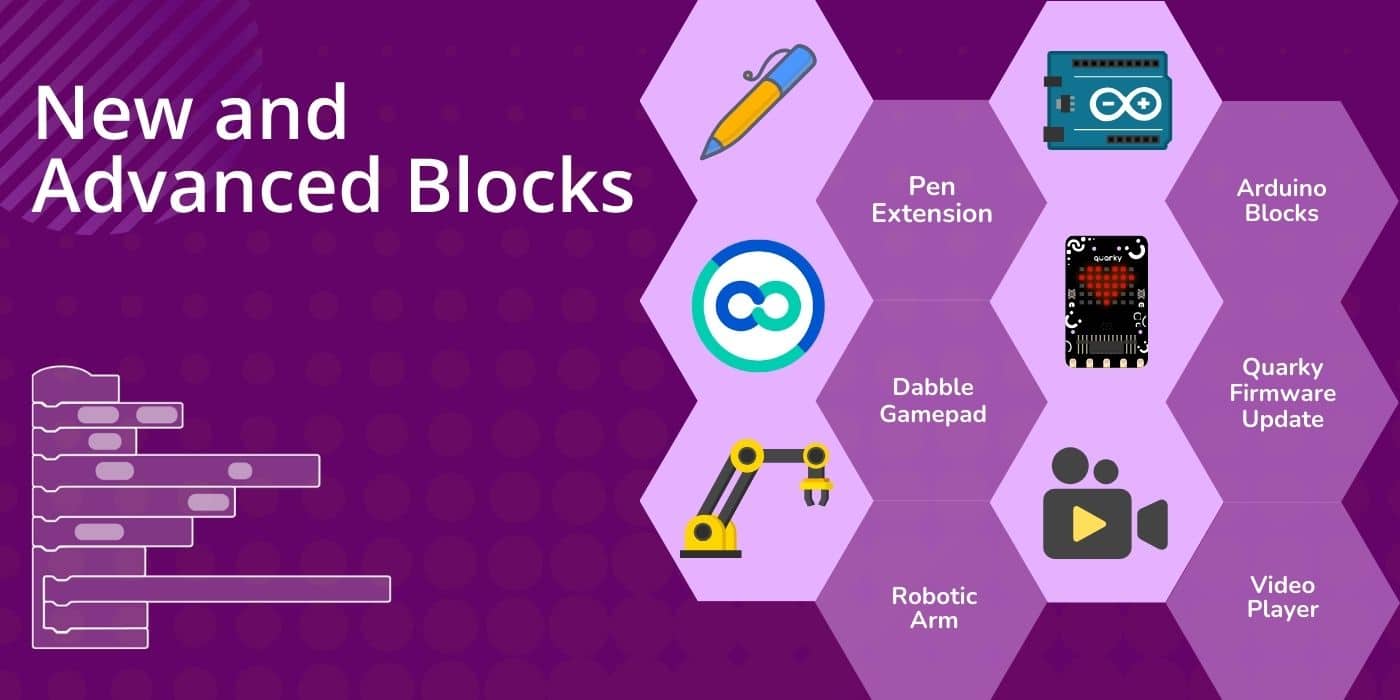
Integration of new and advanced blocks in the latest version of PictoBlox greatly enhances the user experience by providing them with more tools and capabilities to express their creativity, solve complex problems, and learn programming concepts in an engaging way. Let’s see what these advanced block updates are:
- Advance Pen Extensions
- Robot Blocks in Quarky Expansion Board Extension
- Dabble Gamepad Blocks for Upload mode in Quarky
Advanced Pen Blocks in Pen Extensions
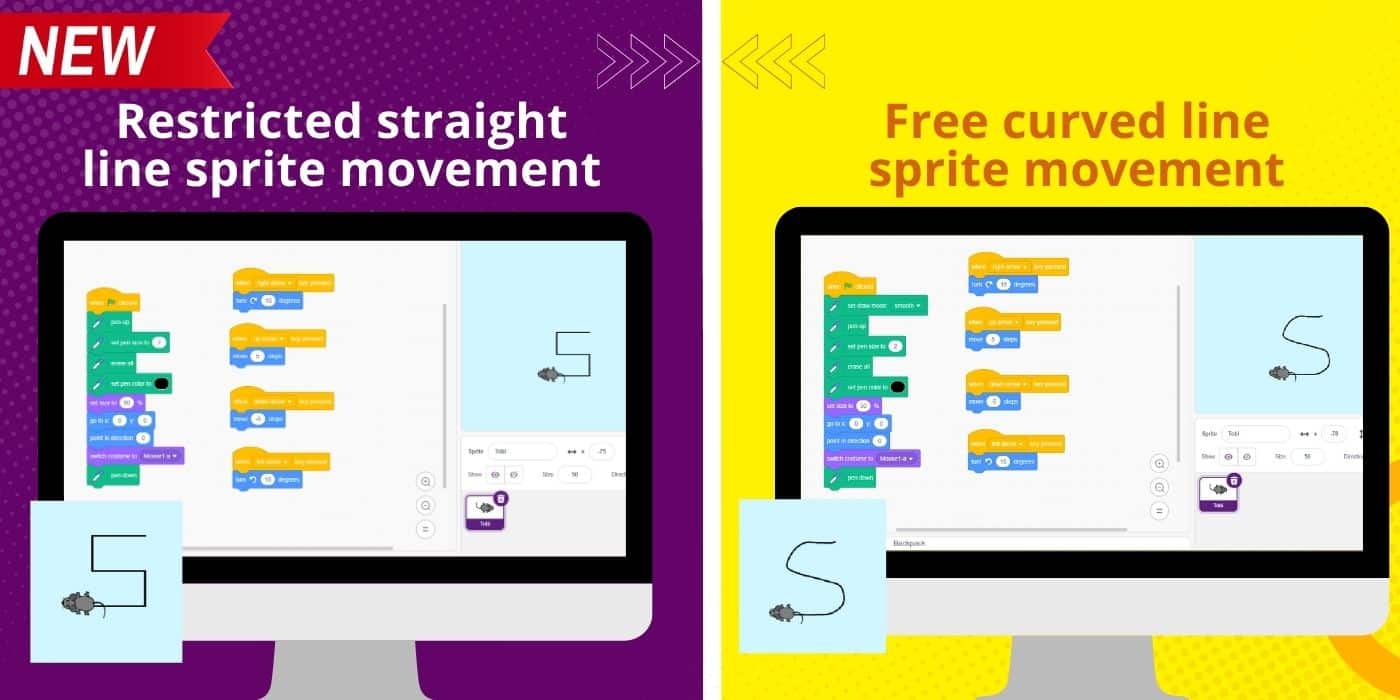
With the new PictoBlox version updates, advanced pen blocks have been added to the pen extension. This advancement will allow users to draw lines by dragging the sprite. Now they can also draw curved lines, set filter distance and angle, and select the drawing mode.
One can access the advanced pen blocks by selecting the Pens extension in the PictoBlox app.
Robot Blocks in Quarky Expansion Board Extension
In its newest update, PictoBlox has advanced robot blocks in the Quarky Expansion Board Extension that allow users to:
- Control the direction of the robot (forward or backward)
- Set the robot’s speed
- Select its orientation (horizontal or vertical)
- Calibrate the servo motors
Dabble Gamepad Blocks for Upload mode in Quarky
PictoBlox 6.1.0 brings you support for the Gamepad module in Dabble for Quarky. Users can upload the code made using Dabble blocks in PictoBlox to Quarky and then control Quarky using the Dabble app on their Android or iOS devices.
This extension consists of three blocks.
- The first block is designed to detect when a gamepad key is pressed. It allows you to determine if a button on the gamepad has been pressed.
- The second block is used to retrieve the angle when you are using Dabble in joystick and accelerometer modes. This block provides information about the orientation or angle of the device when it is being used as a joystick or in accelerometer mode.
- The third block is used for refreshing the data.
Latest Updates in Python Coding Environment for Kids
The addition of a wide array of amazing features in the Python Coding environment in PictoBlox will enhance the user’s experience of coding and make it fluent and fun-filled. The features include:
- Python Debugger
- Syntax Error Highlighting in Python
- Code Auto-Completion in Python
- PIP Package Manager
- REPL Mode in Python
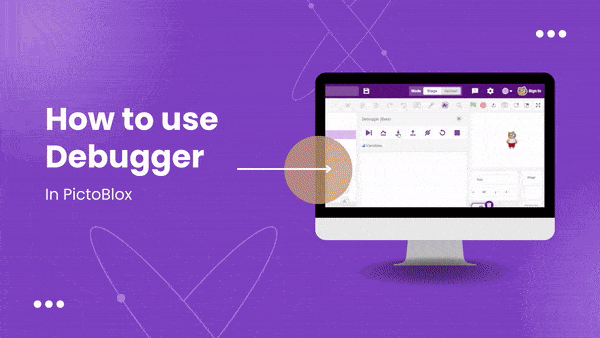
Python Debugger

A Python debugger is a tool that helps programmers identify and troubleshoot issues in their Python code by allowing them to inspect the code’s execution at various points. With its integration in PictoBlox, it will allow users to monitor and analyze the execution of their Python code, making it easier to identify and troubleshoot errors, bugs, and unexpected behavior in their programs.
The debug actions include:
- Continue: Resume normal program or script execution (up to the next breakpoint).
- Step Over
-
-
- Steps over the current line of code and takes you to the next line, even if the highlighted line has method calls in it. The implementation of the methods is skipped, and you move straight to the next line of the caller method.
- If there are breakpoints inside the skipped methods, the debugger will stop at them.
-
- Step Into: Step into the method to show what happens inside it. Use this option when you are not sure the method is returning the correct result.
- Step Out: Steps out of the current method and takes you to the caller method.
- Disable Breakpoints: Disable all breakpoints present in the program.
- Rerun: Rerun the debugger to reflect the edited changes.
- Stop: Terminate the current program execution.
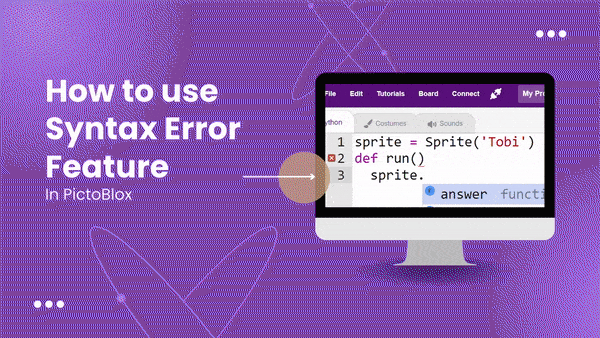
Syntax Error Highlighting in Python
Syntax error highlighting in Python refers to a feature that visually identifies and highlights parts of the code that contain syntax errors, making it easier for users, especially beginners and kids, to identify and correct mistakes in their code. This feature will allow PictoBlox’s innovative users to experiment with code, make mistakes, and learn from those mistakes by immediately seeing the errors they’ve made.
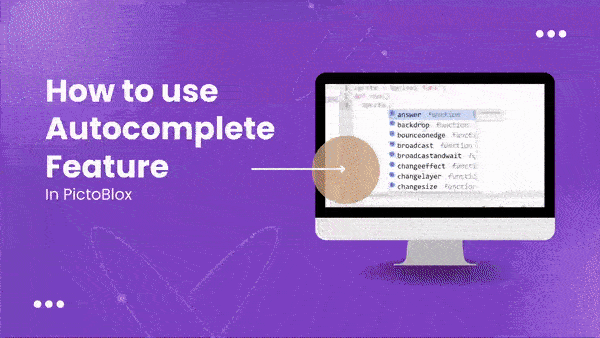
Code Auto-Completion in Python
Autocompletion is a feature in programming editors and integrated development environments (IDEs) that suggests and completes code as a programmer type.
This exciting feature has been added to the Python coding environment in PictoBlox, and it will significantly ease the coding process for users in PictoBlox in several ways:
- Reduced Typing Effort: Auto-completion can help reduce the amount of typing required. This is especially beneficial for longer functions and variable names.
- Syntax Assistance: It assists in writing correct syntax by suggesting appropriate keywords, function names, and arguments. It helps kids learn Python’s syntax rules more effectively.
- Error Prevention: By suggesting valid code elements, auto-completion can help prevent syntax errors and typos, which can be frustrating for beginners.
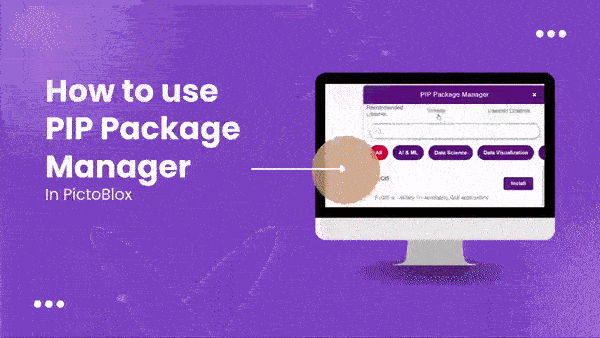
PIP Package Manager to Download Custom Modules and Libraries in Python
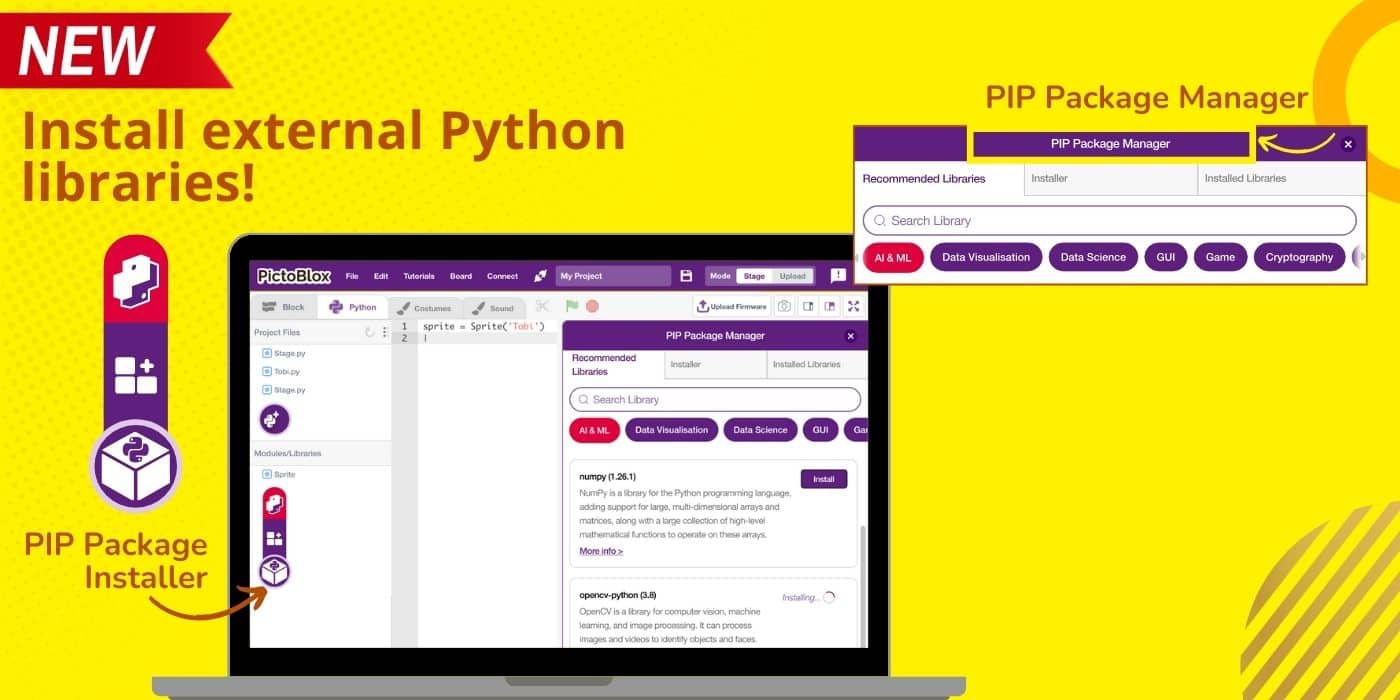
For users to add extra libraries or modules as per their needs that aren’t already included in PictoBlox, they can now do so through the very new PIP Package Manager feature. With the PIP Package Manager, one can install external Python libraries from the Python Package Index (PyPI) directly within the PictoBlox Python IDE.
There are two methods for library installation using the PIP Package Manager:
A) Recommended Libraries: This option presents a curated list of frequently used libraries. Users can explore the suggestions and pick the libraries they wish to install. By clicking the install button next to each library, they can start the installation process.
B) Installer: If the user wishes to have a particular library that isn’t listed among the recommended ones, they can input the library’s name directly. After entering the library’s name, clicking the install button will initiate the installation process.
The installation progress can be monitored through the Python terminal logs. Once the installation is complete, users have the choice to update the library if a new version is available or uninstall it altogether.
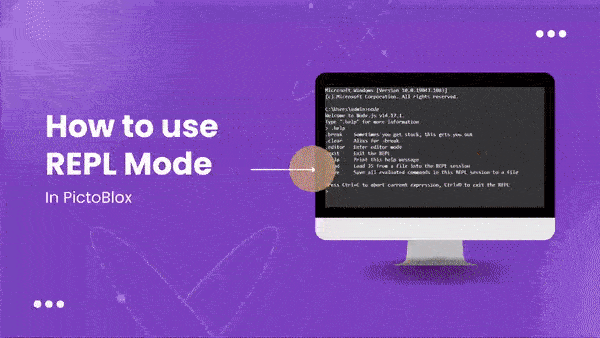
REPL Mode in Python
REPL stands for Read, Evaluate, Print, and Loop. The REPL is how one interacts with the Python interpreter.
With the incorporation of REPL mode in the Python coding environment in PictoBlox, users can type commands and instantly see the output printed out. They can interact with sprites very easily in REPL mode. They can also use the REPL to print out help for methods and objects in Python. Using the keyboard’s up and down keys, users can go back and forth to their previous input history.
Latest Updates for Arduino with PictoBlox
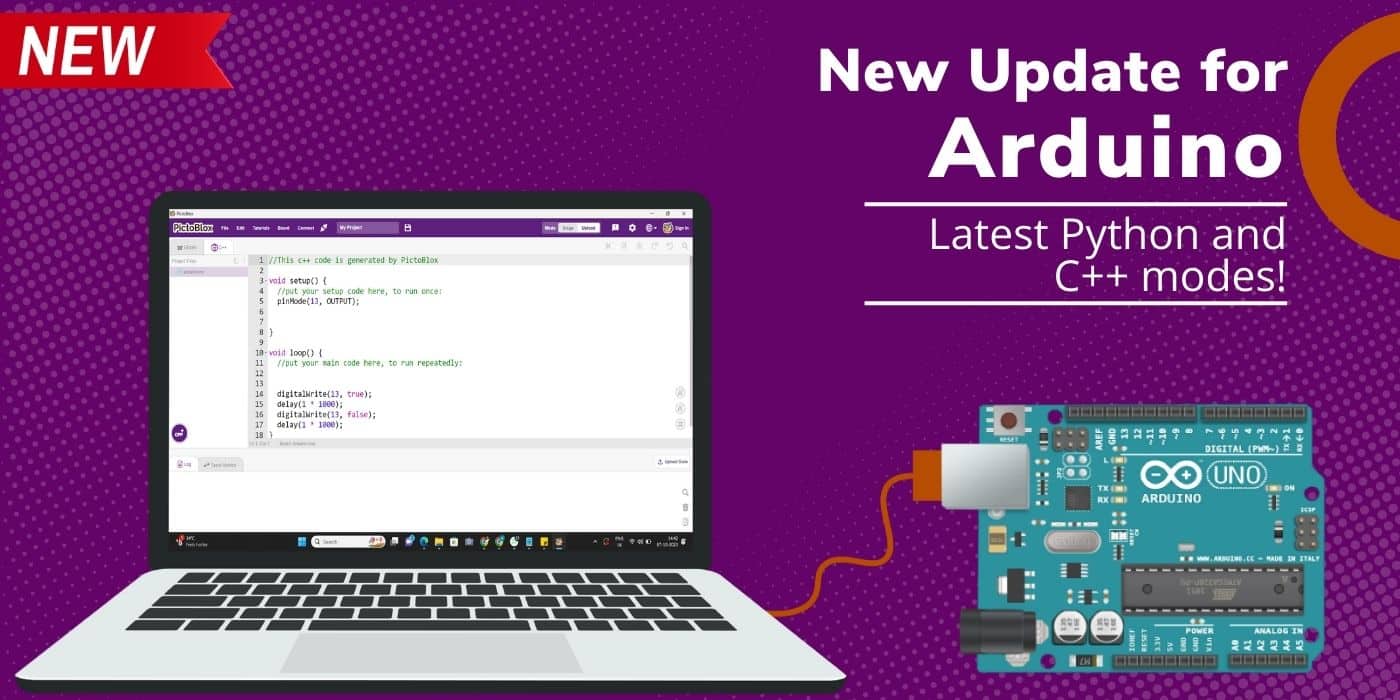
PictoBlox brings all new updates for the Arduino board, ensuring your projects are always equipped with the latest features and improvements.
New C++ Mode on the Arduino Board
PictoBlox 6.1.0 brings you a new C++ coding interface for Arduino boards. This integration with C++ opens up a world of opportunities by granting access to an extensive array of libraries, greatly streamlining complex programming tasks.
Support for Python Mode in Arduino Boards
The latest update in PictoBlox software v6.1.0 now also supports Python mode in Arduino boards (Uno, Mega, and Nano). This feature allows users to program their Arduino boards in stage mode using the Python programming language. The Arduino board can be selected from the Board menu in PictoBlox and can be programmed to perform various tasks, such as controlling LEDs, motors, and sensors.
Other Remarkable Updates
PictoBlox 6.1.0 has new exciting features that can help you create more AI, ML, coding, and robotics projects with ease! Explore the all new features, like screen recording in PictoBlox and file sharing through QR.
- Quarky Firmware Update
- Updates in Quarky Settings and Troubleshooting
- Ultrasonic Sensor Test
- PictoBlox File Sharing through QR Code
Updated Quarky firmware to v4.4
PictoBlox v6.1.0 comes with the latest updated Quarky firmware, v4.4. The updates in the new version include:
- Addition of dabble and Quarky robotic arm libraries: Dabble and Quarky robotic arm libraries will provide pre-built functions and commands for controlling and interacting with robots and robotic arms. This simplifies the programming process, making it easier for users to develop robot-related applications without having to write complex code from scratch.
- Resolved bug causing Servo motors erratic behaviors’: The bug fix results in improved overall performance, allowing the motor to respond accurately to commands and produce the desired output.
- Resolved RGB LED random flickering bug: Random flickering in the RGB LED light on the Quarky board will lead to improvements in the overall quality, reliability, and user experience of the Quarky robot and related projects.
- Resolved minor bugs in pre-existing libraries: The latest bug fixes in existing libraries will now result in a smoother and more efficient coding experience for PictoBlox users.
Updates in Quarky Settings and Troubleshooting
With the introduction of new extensions, we have updated Quarky settings for the smooth transfer of information. Here are a few updates that you can go through to troubleshoot your robot:
Output and Input (GPIO) Pins Testing
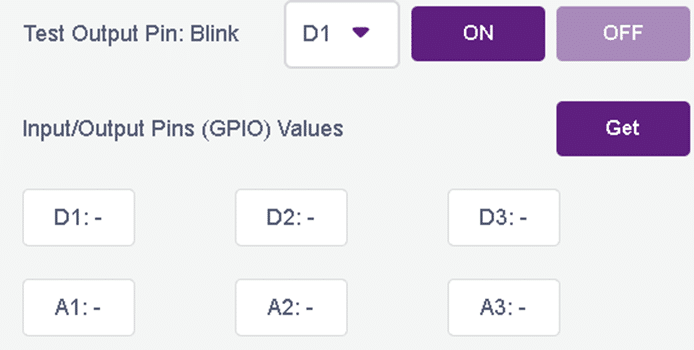
- If your digital pin output commands are not working properly, you can test the hardware pins using the blink option. On clicking the ON button, the corresponding pin will go high and low periodically, and you can test with an LED or multimeter if the hardware pin state is changing or not.
- Similarly, to test some sensors’ input values to the hardware pins, you can stream the values read by the Quarky pins continuously by clicking the Get button. You can validate the proper functioning of your Quarky input pins and calculate the threshold for your analog sensors.
Ultrasonic Sensor Test

You can validate the proper functioning of your Ultrasonic sensor by connecting the echo and trig pins of your ultrasonic sensor to the D1 and D2 pins, respectively. On pressing the Get button, you will continuously get the distance measured by the ultrasonic sensor if the sensor works correctly.
If you don’t get the distance, please check if your operating sensor is a 3.3V compatible sensor, as Quarky does not support 5V logic-level sensors.
Distinguishing 3.3V and 5V Ultrasonic sensors
Check for the part number on the sensor (depicted by the Green box in the image below). Search for the text HC-SR04+, which means it is 3.3V compliant. If the part number is HC-SR04, it is a 5V version and won’t work with Quarky.
You can also distinguish the 3.3V and 5V sensors by looking at the backside of your sensor and differentiating the presence of the C7 capacitor (depicted by the Red highlight box in the image below):
RGB Test

If you want to test the proper functioning of the RGB LEDs on your Quarky, press the run button, and an LED test sequence will run on your board, which you can observe to validate the RGB LEDs. The test sequence would be as follows:
- The complete grid would follow the pattern of colors: Red, Green, Blue, and then White.
- The white color pattern will go from low brightness to high and then from high to low.
- Finally, the rainbow pattern will run on the board.
This above sequence will help you identify any faulty LED on the board.
PictoBlox File Sharing through QR Code
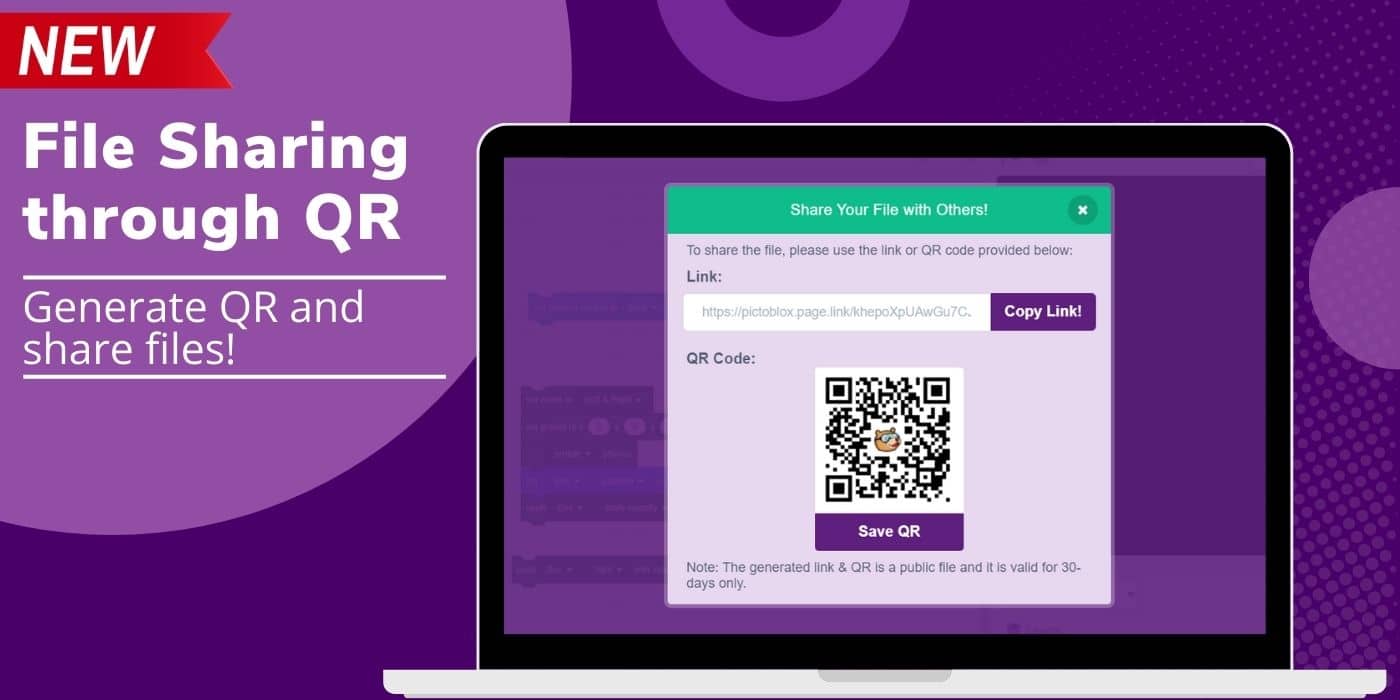
File sharing has been made more convenient in the latest PictoBlox v6.1.0. Users can now share their PictoBlox projects through generated QR codes which can be downloaded, scanned, or uploaded from a computer for viewing purposes.
Explore PictoBlox in New Languages
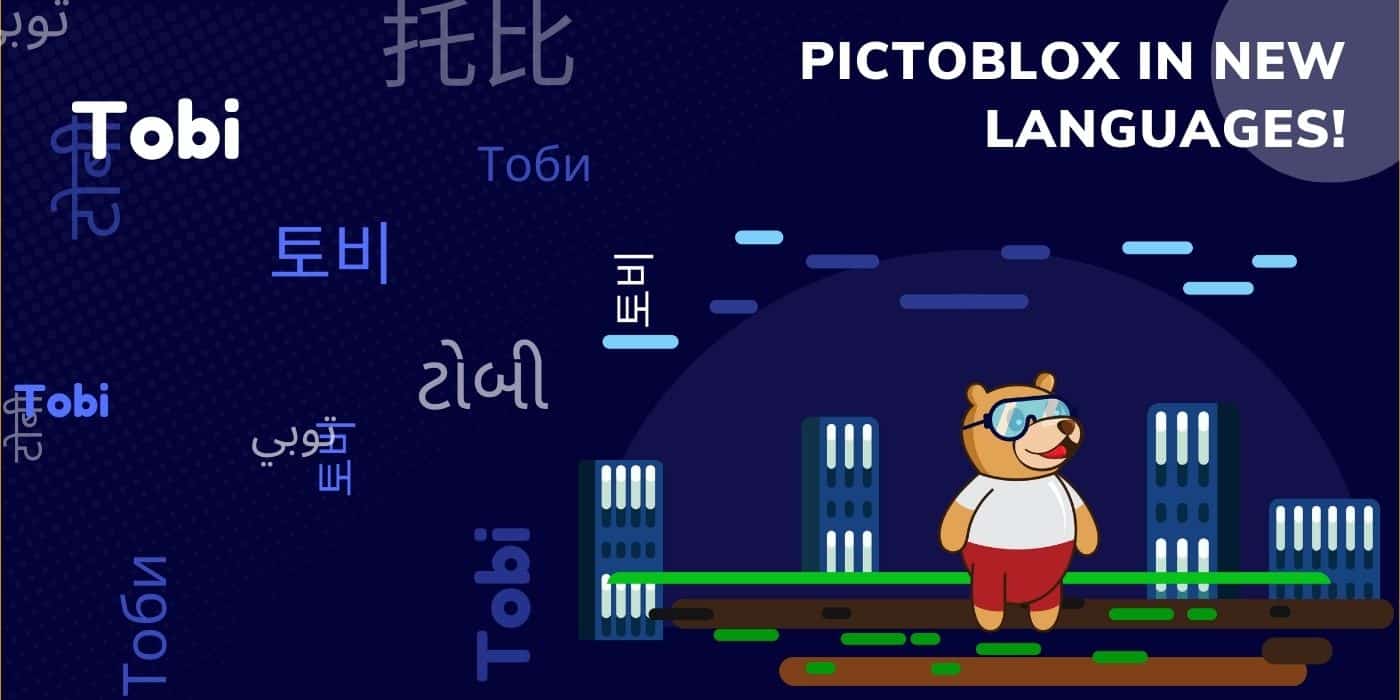
Even with the best technologies, some of the smartest brains may find language to be a significant obstacle. Therefore to resolve this issue, PictoBlox has been made available in more languages.
PictoBlox supports English, Hindi, Gujarati, Korean, Traditional Chinese (TC), Xhosa, Russian, and Hungarian languages. With the latest updates, PictoBlox can now also be accessed in Telugu and Malayalam languages.
After these updates, you can now access PictoBlox in:
- English
- Spanish
- Portuguese-BR
- Hindi
- Xhosa
- Russian
- Korean
- Chinese
- Hungarian
- Malayalam
- Telugu
Latest Bug Fixes
PictoBlox’s latest updates come with various bug fixes, leading to a smooth and uninterrupted coding experience. The bug fixes include:
- Error while opening files containing hardware extensions
- Error in saving ML extension files
- Resolved bugs in servo blocks in Quarky.
In a Nutshell
PictoBlox makes 21st-century learning accessible and engaging. It empowers students with tech education to build and bring their ideas to life with hands-on coding, artificial intelligence, machine learning, the Internet of Things, robotics, game design, and AR-VR.
With PictoBlox, one can:
- Learn Python programming with all the new features.
- Practice what they learn through different DIY projects.
- Learn how to work with software and hardware in collaboration.
- Code their own robots and games with advance AI and ML extension.
PictoBlox is available for Windows, Mac, Linux, and Chromebook users. The PictoBlox app is also available on the Google Play Store for Android users and the Apple App Store for iOS users (iPads or iPhones).
With all of its amazing functionalities, PictoBlox can be used as a web browser at https://PictoBlox.ai/