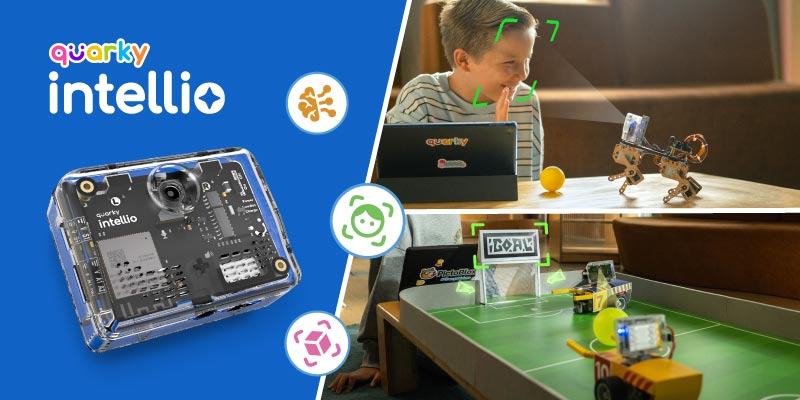
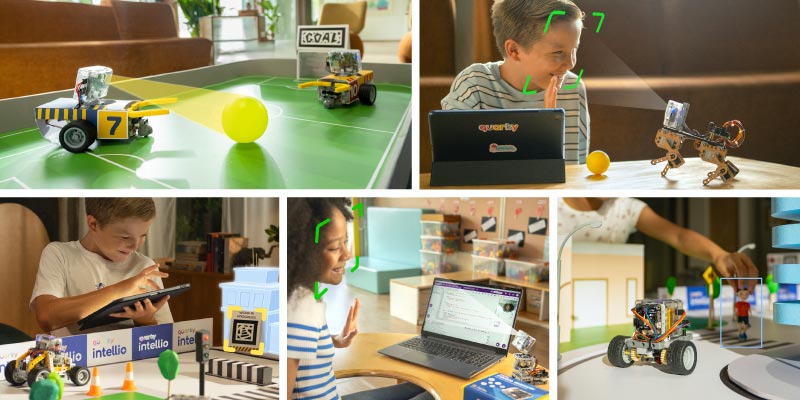
Quarky Intellio is an AI robotics kit for students and creators that brings artificial intelligence, computer vision, voice interaction, and AR into hands-on learning. Equipped with a built-in camera, microphone, and speaker, Intellio enables real-time interaction, allowing users of all ages to create projects that go beyond robots, bringing real-world technology to life.
The module seamlessly connects with popular platforms like LEGO, Arduino, Raspberry Pi and ESP32 and supports a wide range of peripherals, from servos and sensors to displays within a unified ecosystem, making it the perfect module for performing Edge AI.
With Intellio, kids and innovators can:
- Learn computer vision using a built-in camera
- Build voice-controlled robots with speech recognition
- Create AI projects using models like ChatGPT
- Program robots using block coding and Python
- Design immersive AI and AR learning experiences
Quarky Intellio Technical Specifications
Here are the technical specifications of Intellio:
Processor ESP32-S3-WROOM-1-N16R8, 16MB Flash
Wi-Fi Wi-Fi 802.11b/g/n, 2.4 GHz Band
Bluetooth BLE - Bluetooth 5.0
USB USB Type C, Up to 1M Baud Rate, Charging
Battery Li-ion 1000mAh 3.7V Battery
Battery Life Lasts up to 3.5 hrs on Live Streaming Audio-Video
Camera OV5640, Auto-focus Lens, FOV - 72°
Microphone Omnidirectional MEMS Microphone
Speaker Hi-Res 8Ω 1W Speaker with inbuilt Codec
MicroSD Card Slot Up to 32GB of Storage
TFT Display Port SPI TFT display connects via a 7-pin SD-card connector to the GPIO interface.
Servo Port 1 Servo Motor Channel - 3 Pins
Vcc (3.7-5V), Imax output 1A
GPIO and I2C Port 2 Pins, Imax Output 40mA
I2C Interface
3.3V and Ground Pins
Connects with Quarky Expansion Board
Programmable LED 1 RGB LED WS2812B-4020
Switches 2 Programmable Tactile Switches
Power Switch and Reset Switch
Indicators Power LED, Low Battery LED, and Charging LED
Mechanical Mounting 6 mounting holes for Construction Part Connectors
Axle connector for mounting Servo Motor
Casing Transparent Polycarbonate
Dimensions and Weight 65mm x 49mm x 26mm and 60 g
How to Connect Quarky Intellio with PictoBlox
Quarky Intellio works with PictoBlox, a powerful coding platform that supports block-based coding and Python programming, with built-in capabilities for AI, computer vision, and AR. Once PictoBlox is set up, you’re ready to connect Intellio and start building real-world AI projects.
Here are the steps to connect Intellio to PictoBlox:
- Download PictoBlox: Click Here to download PictoBlox (available for Windows, macOS, and Linux).
- Power On Intellio: Turn on your Quarky Intellio and ensure it’s fully charged.
- Select the Board: Before connecting Intellio, select Quarky Intellio as the board type in PictoBlox.
- Connect Intellio to PictoBlox: After selecting the board, click on “Connect” and choose Intellio from the device list.
Read More: Latest PictoBlox Software Update V9.0.0
AI and AR Projects Using Quarky Intellio
Quarky Intellio combines cutting-edge AI and AR technologies with robotics and computer vision, supporting both beginners and advanced learners. Whether you’re designing an interactive AR experience or building an AI-powered robot, Intellio provides the tools to bring your creative ideas to life.
1. Camera Vision, AR markers (April Tags) and Real-Time Interaction
Quarky Intellio comes with a built-in camera that streams real-time footage, allowing students to track lanes, detect objects, recognize faces, and even AR markers (April Tags) just like real autonomous robots and smart machines.
By combining computer vision + AR markers (April Tags) + motion control, kids don’t just drive robots, They build robots that think before they move.
Project – Lane-Following Robot with AR Navigation using Intellio Camera Vision
This beginner-friendly AI robotics project helps students understand how self-driving cars use computer vision and decision-making.
Steps to Follow:
- Connect Intellio to PictoBlox: Seamlessly integrate Intellio with PictoBlox to enable effortless interaction and control.
- Set up lane-detection in Camera Vision: Configure blocks to detect the lane/track on the floor.
- Use motion-control blocks to follow the path: Use move forward, turn left, turn right, and stop if off-track.
- Add AR marker detection: Assign actions to markers such as STOP, TURN, SLOW, or WORK IN PROGRESS.
- Test and fine-tune robot behavior: Adjust speed, turning angles, and detection sensitivity for smooth navigation.
- Enable camera feedback for real-time control: The bot continually checks what it “sees” and reacts instantly.
Learning Outcome: Students learn how robots “see” the world using a camera. They explore camera-based navigation, lane detection, AR marker reading, and obstacle avoidance to enable a robot to drive safely on its own, like self-driving cars.
2. AI Model Integration (Like ChatGPT and more)
With Intellio, users can integrate advanced AI models such as ChatGPT to create interactive, intelligent systems that listen, understand, and respond like a real assistant.
Project – AI Desk Companion with Voice Recognition Using Quarky Intellio
An AI-powered desk companion that listens to your voice, answers questions, plays voice-based quizzes, and controls robots.

Steps to Follow:
- Connect Intellio to PictoBlox and use voice recognition blocks.
- Use AI model blocks to integrate ChatGPT or other AI models for generating responses.
- Set up voice input commands with speech recognition (e.g., “What’s the weather?”) and use speech-to-text for processing.
- Program AI responses to perform actions like controlling a robot, and test reactions with text-to-speech feedback.
Learning Outcome: You’ll experience how AI can recognize speech and respond like an intelligent assistant, providing hands-on learning with real-world AI systems.
3. Voice Recognition
Quarky Intellio’s Voice Recognition feature lets users integrate voice commands into their projects, enabling real-time interaction with robots and devices. The built-in microphone and speaker, combined with LLM models, enable voice-controlled experiences for interactive, hands-on learning.
Project – Robo Dog – Voice Controlled Robot Using Quarky Intellio
A voice-controlled robot dog that can understand and respond to commands like “sit,” “stand,” or “move forward.”

Steps to Follow:
- Connect Intellio to PictoBlox and use voice recognition blocks.
- Program voice commands (e.g., “sit,” “move forward”) using speech recognition.
- Use servo motor control blocks to program the robot dog’s movements in response to voice commands.
- Test the robot dog’s reactions to various voice commands.
- Adjust blocks to enhance accuracy and responsiveness based on real-world interactions
Learning Outcome: This project teaches voice recognition, real-time speech processing, and robotics control. You will learn how to integrate AI models, enabling your robot dog to respond to real-world voice commands, making it feel like a smart, interactive companion.
4. Face and Object Detection
Intellio include camera vision with object detection to create immersive learning experiences.
Project – Spot the Object using Quarky Intellio
A camera-based challenge where Intellio recognizes objects placed in front of it.
Steps to Follow:
- Connect Intellio to PictoBlox and use Object Detection blocks.
- Use the camera to scan simple objects.
- Test how accurately Intellio identifies each object and react accordingly.
Learning Outcome: Learners explore computer vision basics and see how AI models recognize objects in real time.
5. Python, OpenCV, and TinyML Support
As learners grow, Intellio helps them transition from block coding to Python, OpenCV image processing, and TinyML for edge AI applications.
Project – Balloon Popper Robot using Python and Computer Vision with Quarky Intellio
A robot that detects and pops balloons using color and shape recognition.
Steps to Follow:
- Connect Intellio to PictoBlox and set up Python support for advanced image processing.
- Use ML libraries to program Intellio to recognize balloons.
- Add a popping mechanism using servo motor blocks to pop the balloons.
- Program the robot’s actions (e.g., turn 90 degrees when a balloon is detected).
- Test and adjust the color and shape recognition for accuracy.
Learning Outcome: You’ll learn Python coding for image recognition, shape detection, and robotics control skills essential for building AI-powered robots.
Keep Experimenting with Quarky Intellio!
Imagine a classroom where kids don’t just learn to code they bring AI, robotics, and augmented reality to life. With Quarky Intellio, students build mini self-driving cars, create voice-responsive robots, and design smart AI companions by experimenting and exploring, not just following instructions.
Quarky Intellio turns learners into makers. It gives them the confidence to turn big ideas into intelligent creations.